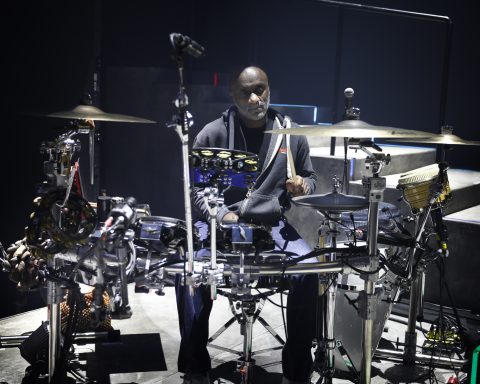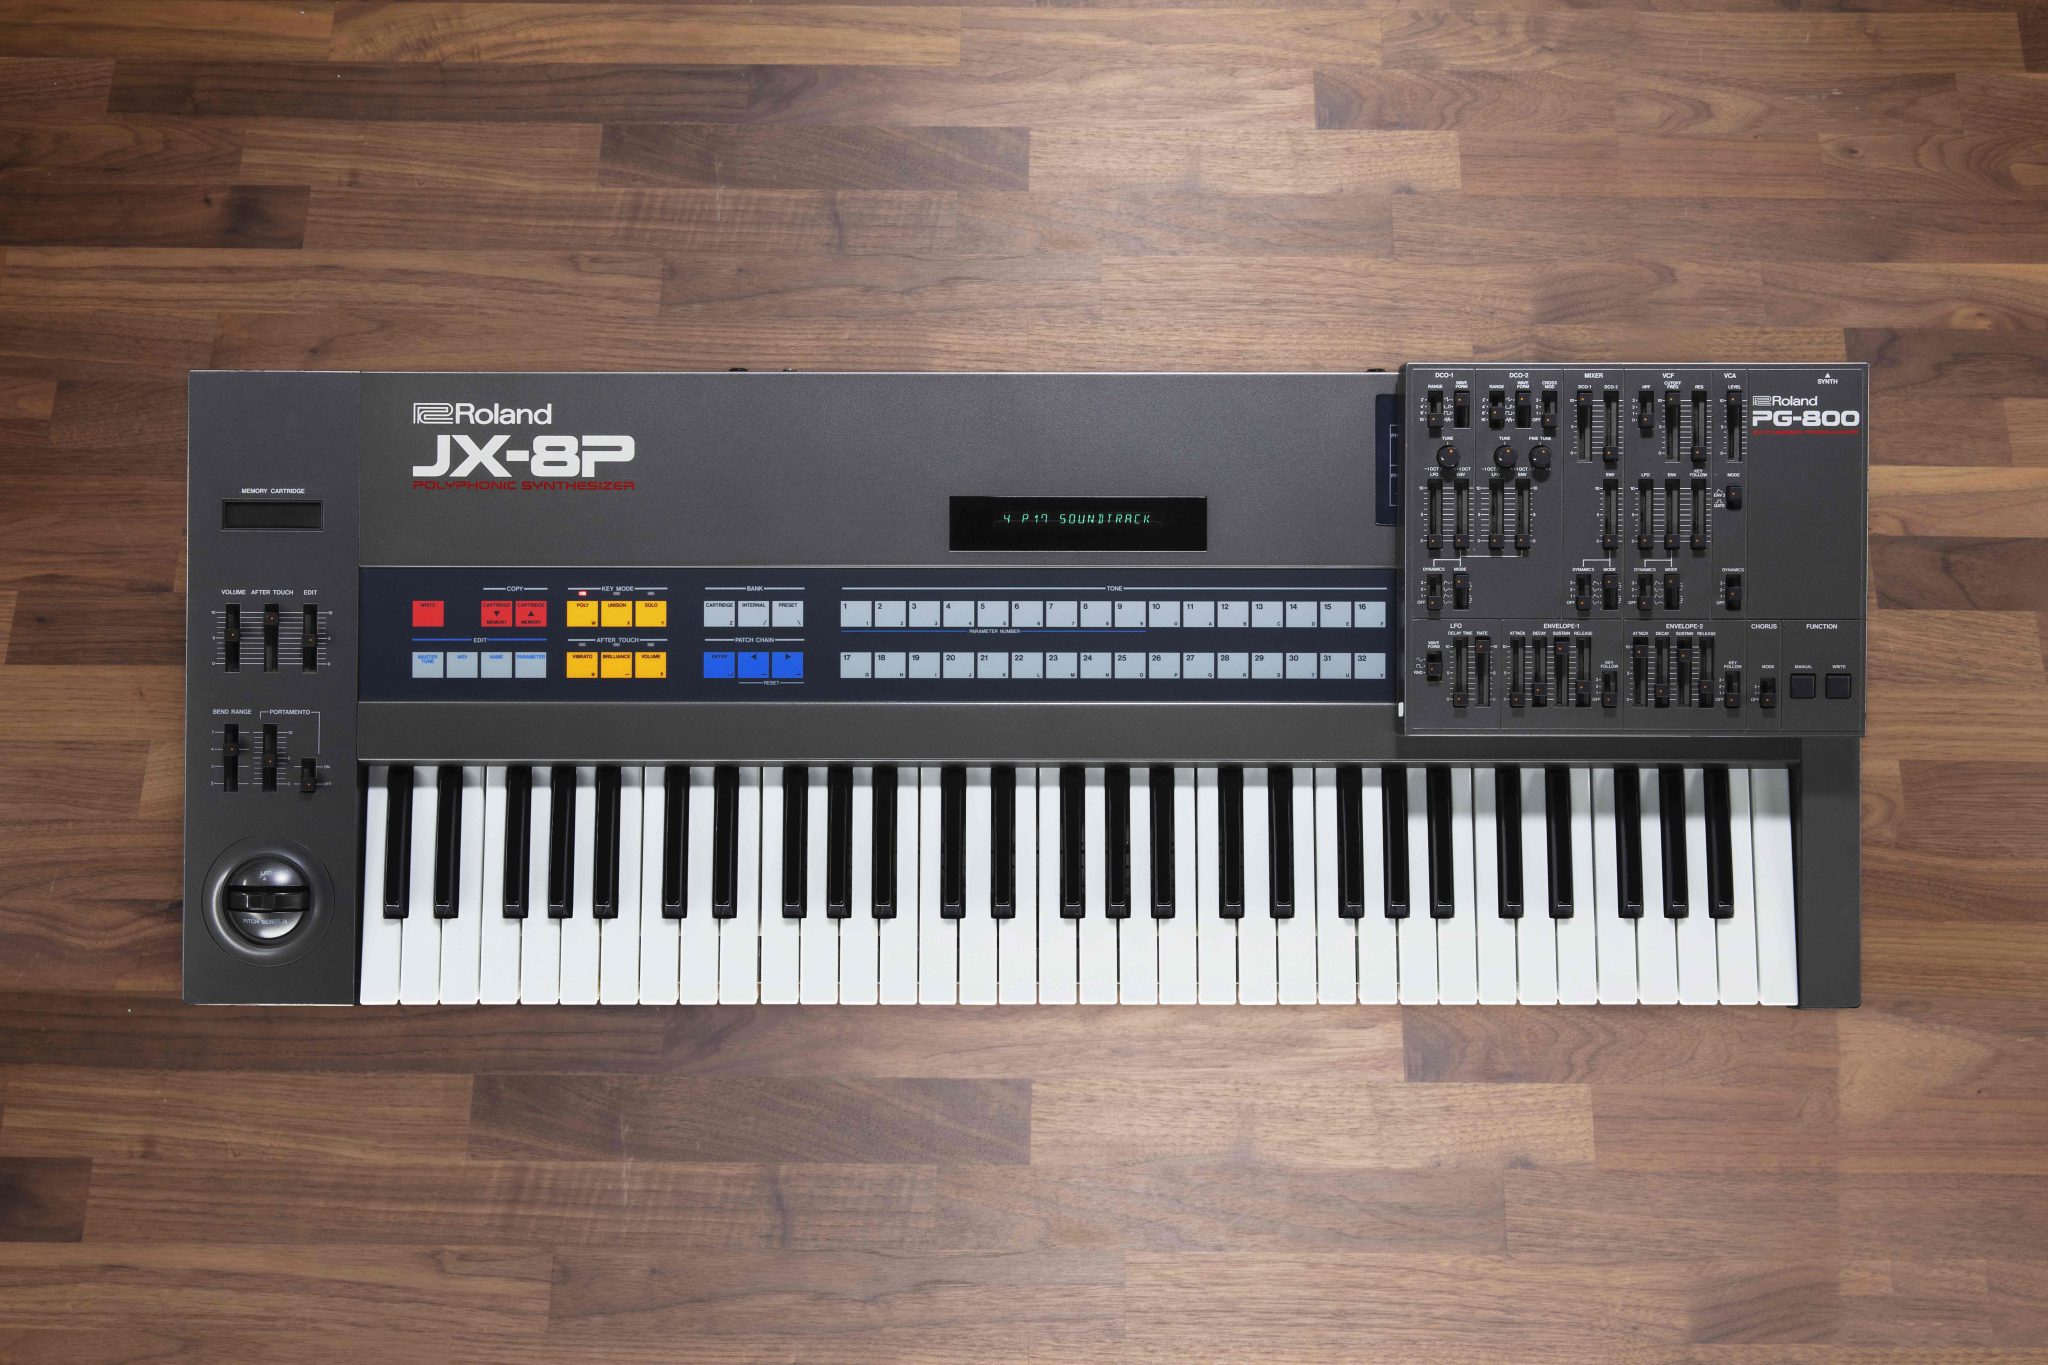
Released in 1985, the Roland JX-8P holds a unique role in the pantheon of 80s-era analog synths. While much of the synthesizer industry was pivoting into fully digital synths like the DX7 or samplers from Ensoniq, Roland remained committed to their legacy of powerhouse analog hardware—with a twist. The JX-8P approached classic analog with a few massive enhancements that made it capable of shimmering and percussive digital textures and thick analog bass, brass, and strings. Learn to use the JX-8P Model Expansion‘s thoughtful architecture to create bells and mallets that blur the line between analog warmth and digital precision.
GUIDE
Punchy Analog
For a deeper history of the JX-8P’s notable role in the golden age of synthesis, check out JX-8P: The Whole Story. Creating punchy analog sounds with the JX-8P is a straightforward affair, thanks to its dual DCOs, analog filters, and familiar envelopes and LFO. That said, designing bells and mallet sounds that defy easy categorization requires some planning, as the architecture is deceptively flexible despite its reputation as an analog classic.
FM Bells
Some sounds are so iconic that they help define an entire era of music. One of those sounds is the “Tubular Bells” preset. That said, this bell sound is not the exclusive domain of FM synthesis. Once one understands the harmonic structure of those bells, it becomes possible to recreate the sound via other forms of synthesis.
To the surprise of many designers, the JX-8P’s engine and hard sync implementation can reproduce this patch with incredible fidelity, provided that you know what goes where. Here’s how to recapture that evocative sound.
Step One
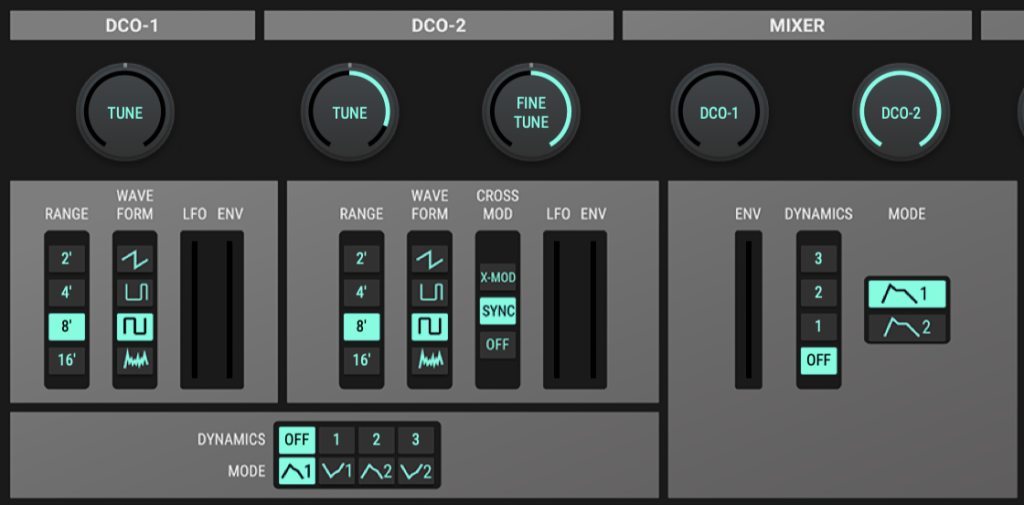
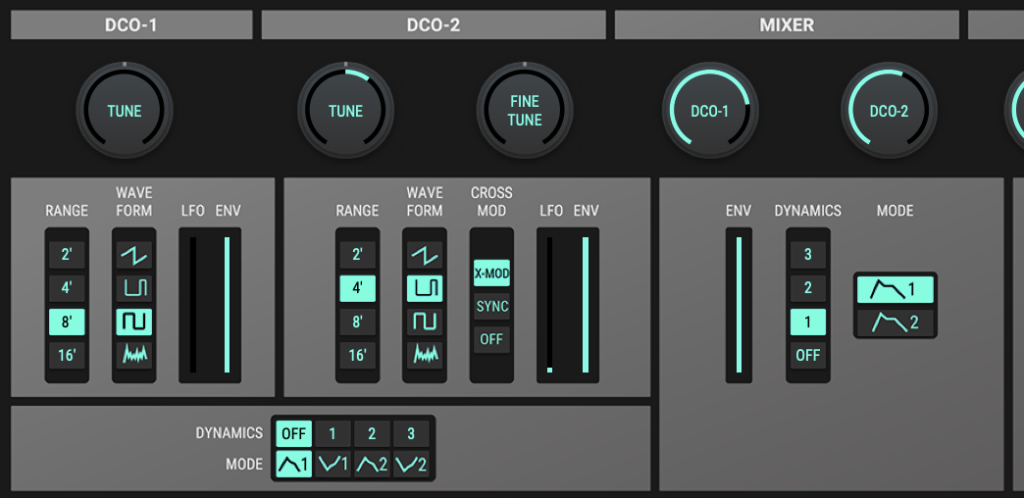
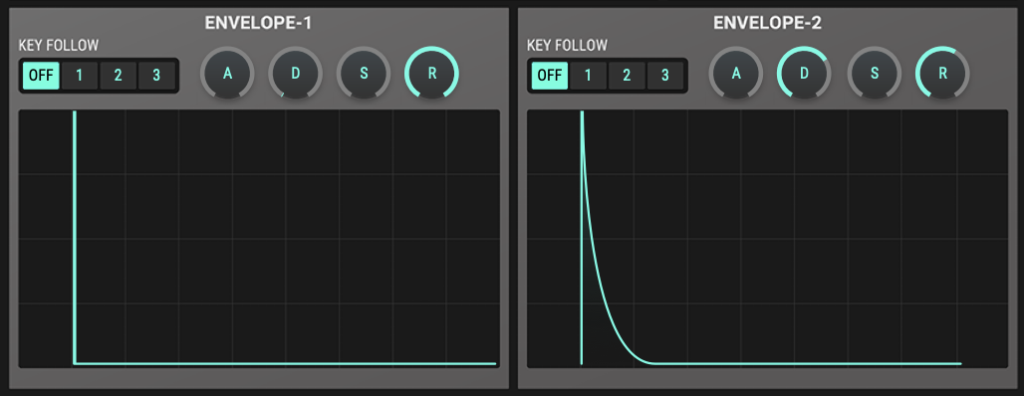
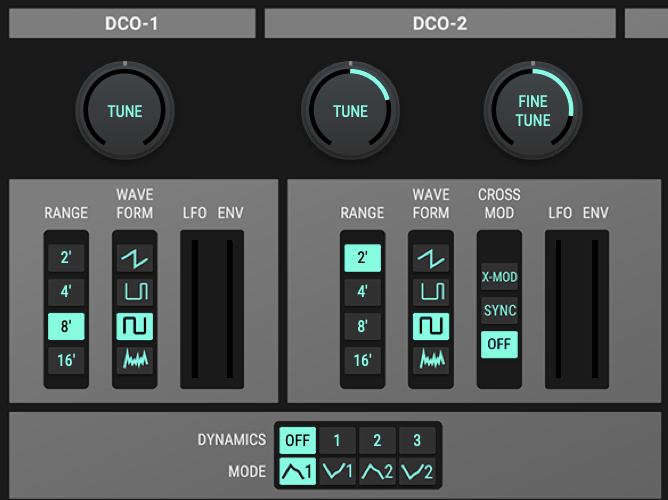
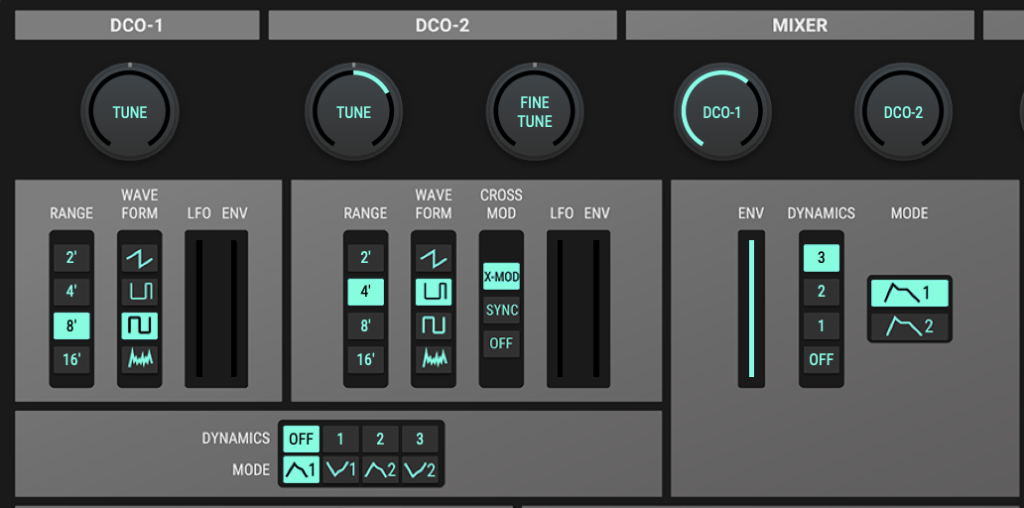
The key to this sound is the JX-8P’s combination of hard sync and the tuning stability of its DCOs. Start by setting both DCOs to the 8’ octave using square waves, then turn on sync in DCO 2. Next, set the tuning of DCO 2 to +9 semitones and its fine-tuning to +50 (maximum). Then, in the Mixer, lower the volume of DCO 1 to zero and DCO to maximum volume (255).
"The key to this sound is the JX-8P's combination of hard sync and the tuning stability of its DCOs."
Step Two
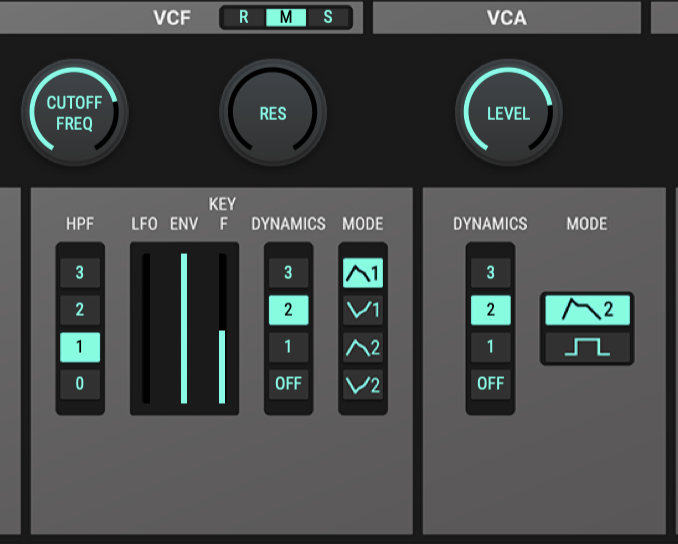
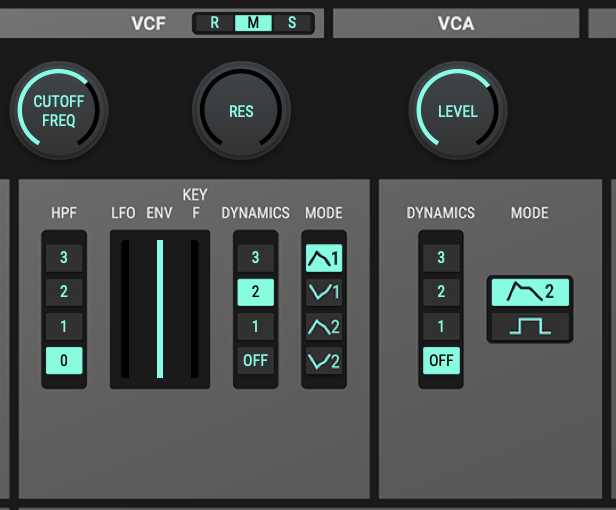
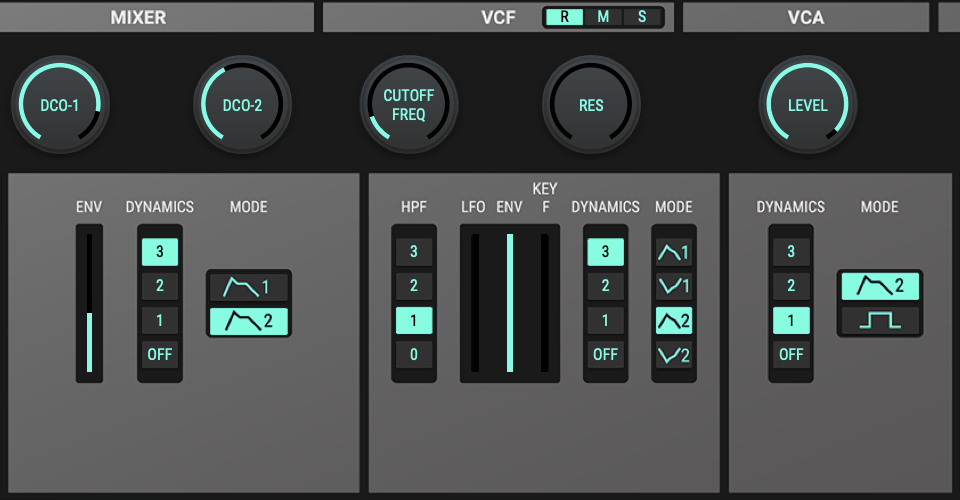
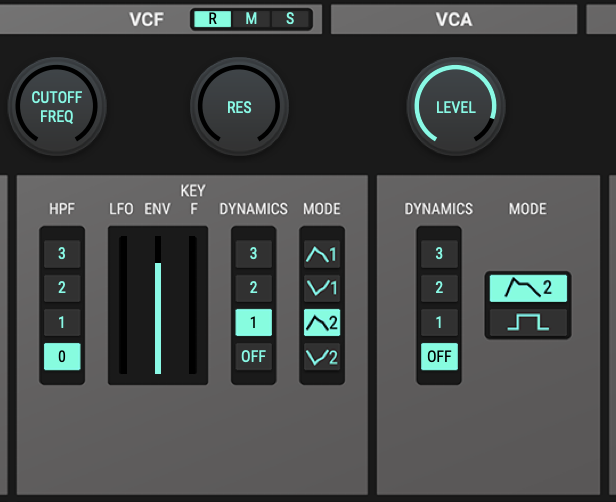
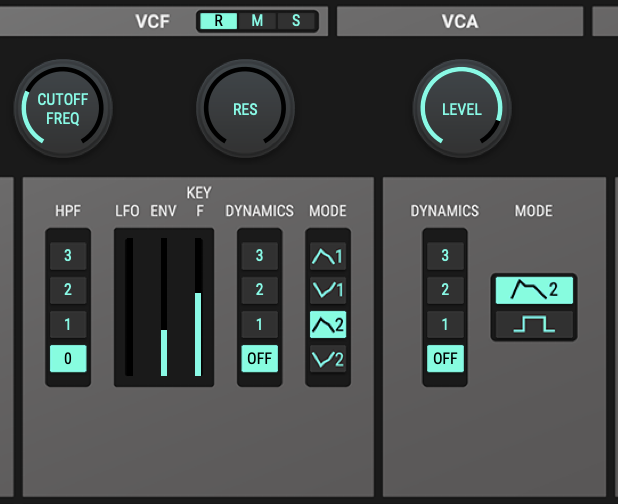
For the filter, tame the highs by dialing back the cutoff frequency to around 75% (value 772). In the JX-8P Model Expansion, any filter modes (R/M/S) will work, so set that to personal preference. Note that the envelope modulation is set to Envelope 1 at maximum, with the Key Follow (keyboard tracking) set to around 40% (value of 87). For velocity sensitivity, select Mode 2.
Step Three
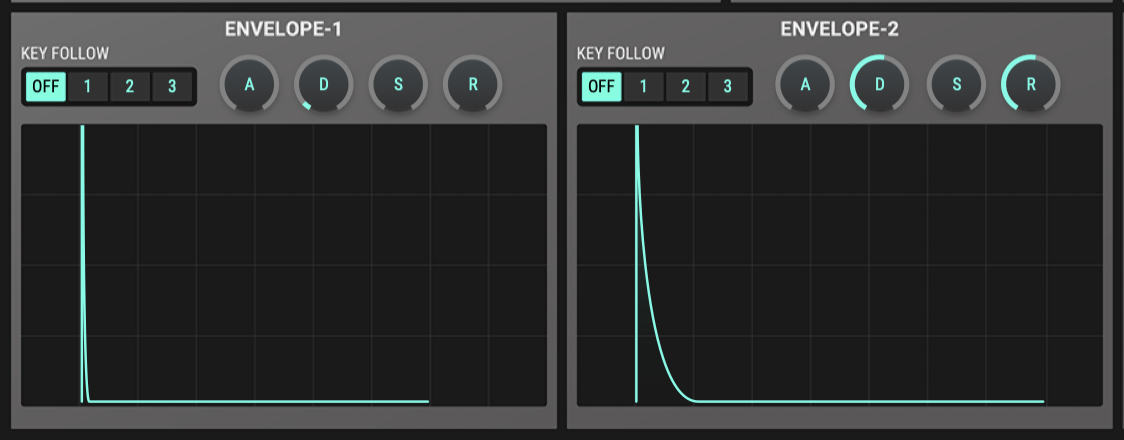
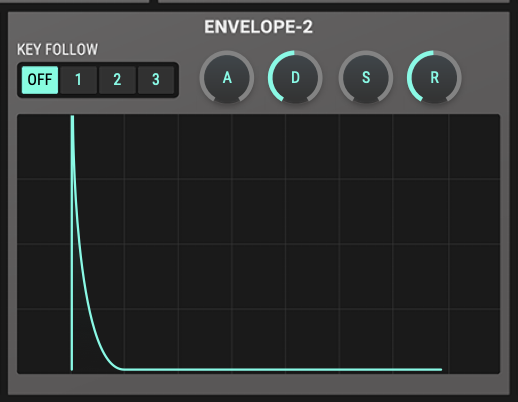
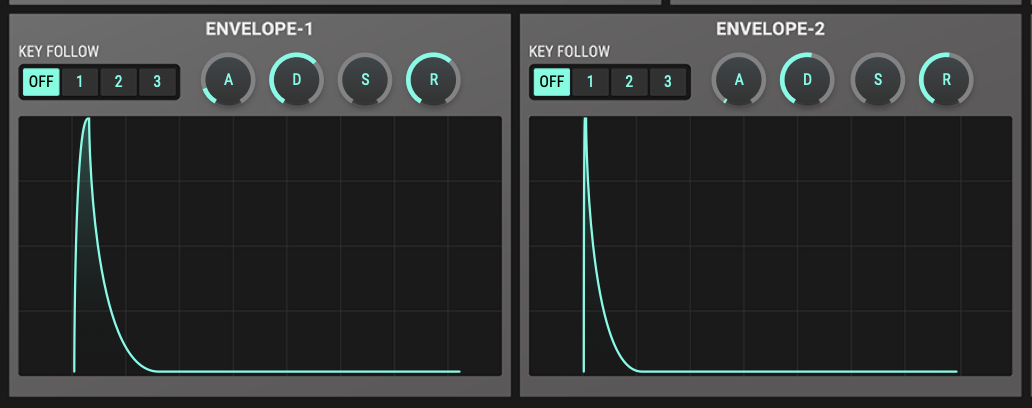
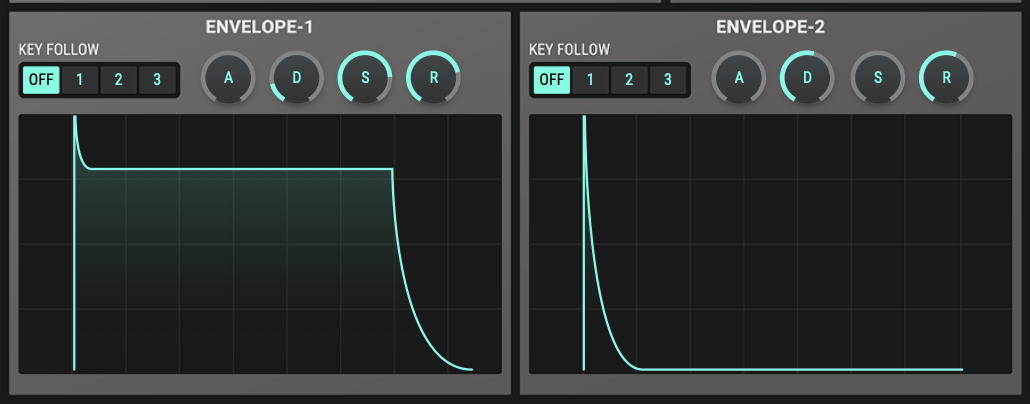
The envelopes are critical to this sound. Since Envelope 2 controls the VCA (volume), set that to a bell-like shape with an attack and sustain set to 0 (minimum), and the decay and release both set to a bit over 50% (value 547 for both). Since Envelope 1 is set to the filter cutoff, we’ll use that for the sound’s sharp transient (click) by setting all of its parameters to 0, except for decay, which provides the click. Set the decay to around 50 or 60, ensuring it’s very short.
Finishing Touches
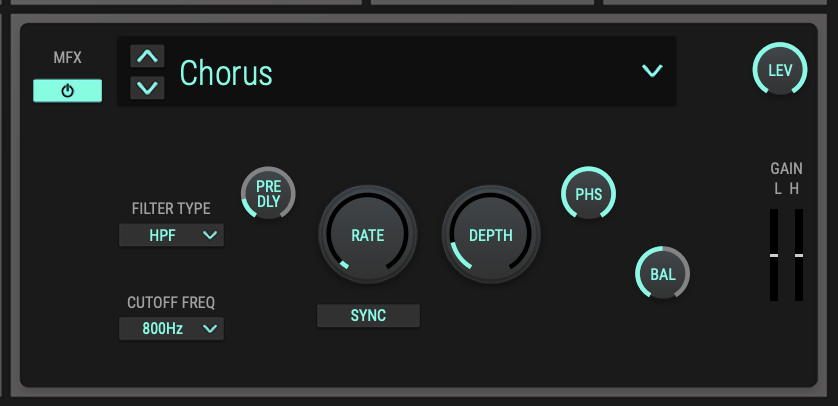
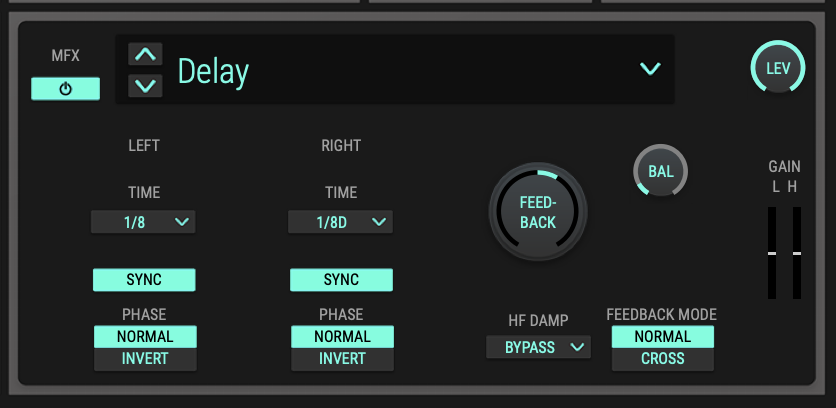
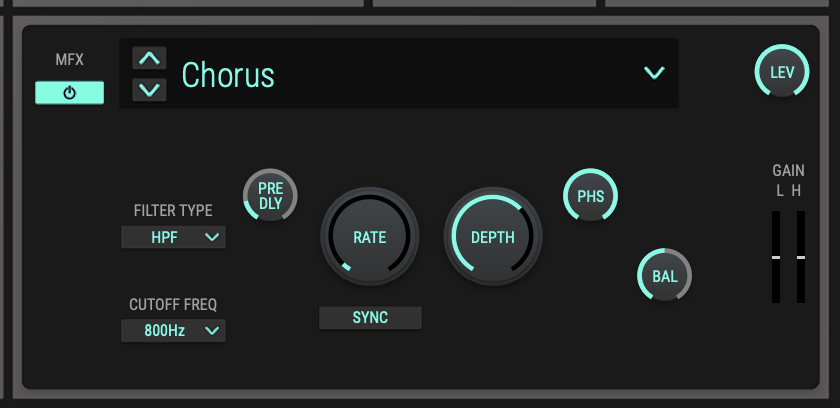
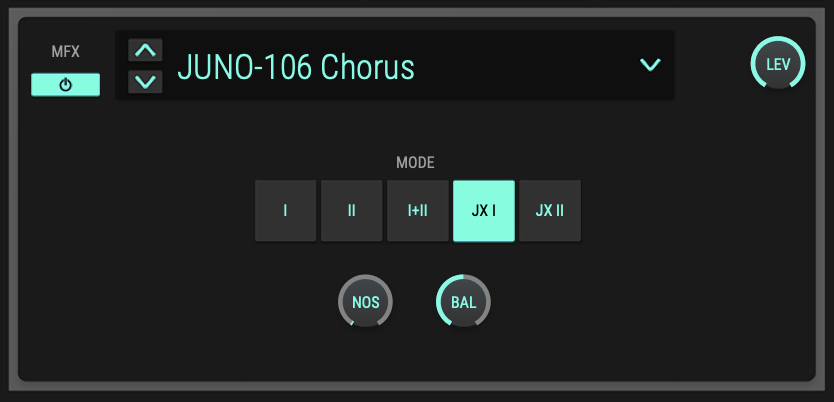
At this point, it should sound like FM Tubular Bells but flat and dry. Set the MFX to the standard Chorus model to add motion and depth and adjust it to taste. The factory default works perfectly, but it’s easy to customize further.
FM Bells Sound Example
Digital Chime
In addition to the arrival of FM, another hallmark of the ’80s digital sound was the introduction of wavetable synthesis, thanks to the PPG Wave 2 synth. Creating bells and chimes with wavetable is an entirely different process. But again, the JX-8P is equally capable of these textures, thanks to Roland’s inclusion of X-mod (cross modulation).
Without getting too lost in technical details, the JX-8P’s implementation of X-mod is actually a version of AM (amplitude modulation). This tool is handy for ring modulation effects—with the added benefit of DCO tuning stability and keyboard tracking of pitch. Now that we know what’s happening under the hood, let’s recreate one of these chimes using X-mod and ultra-fast envelope modulation.
Step One
Setting up the DCOs and Mixer is trickier for this one. DCO 1 forms the body of the sound, with an octave of 8’ and a square wave as the basis. DCO 2 provides the digital “chime” components, with an octave of 4’, pulse wave, and X-mod turned on. Before re-tuning DCO 2, it should sound like a pretty analog pluck. However, thanks to X-mod (AM), setting the Tune parameter to +3 semitones gives the sound a haunting shimmer. Finally, set the Mixer (DCO 2) envelope modulation to Envelope 1 at maximum.
"In addition to the arrival of FM, another hallmark of the ’80s digital sound was the introduction of wavetable synthesis."
Step Two
Before adjusting the VCF cutoff frequency, take some time to experiment with the Mixer blend since each DCO contributes a different aspect of the sound. Then, set the cutoff frequency to around 60-70% (value 670) and increase the envelope modulation depth to its maximum—with the source being Envelope 1 and velocity dynamics set to 2.
Step Three
Envelope 2 is the volume envelope, so give that a bell contour with an instant attack, no sustain, and both decay and release set to around 600. Envelope 1 does the heavy lifting for the sharp transient strike at the beginning of the sound, as it’s assigned to the pitch of both DCOs and the cutoff frequency. Here, we’ll use an instant attack, with no sustain or release, but the decay time set to an extremely short amount of around 10.
NOTE: Shortening the decay and release times for Envelope 2 transforms this sound into a unique mallet sound, especially in conjunction with lower DCO 2 volumes.
Finishing Touches
As with the FM Bells patch, this sound also benefits from a touch of chorusing. Try the classic Roland JUNO-106 chorus for its smooth, warm quality.
Digital Chime Sound Example
Toy Mallet
Even without the benefits of hard sync or X-mod, the JX-8P’s architecture can create other distinctive digital sounds. This is thanks to the ability to modulate the mixer volume of DCO 2 via one of the dual envelopes.
Using this approach, one can use DCO 1 for the primary patch tuning, while DCO 2 adds a dynamic harmonic (or inharmonic) controlled by a velocity-sensitive envelope. This effect can range from a subtle shimmer to an added detuned element. In this preset, we’ll use this technique to create a mallet sound with a toy piano’s characteristics.
Step One
As with many of these sounds, DCO 1 will provide the body of the tone, so set it to 8’ with a square wave. DCO 2 will provide the dynamic mallet characteristics, so set it to a very high octave of 2’, also with a square wave. The bell-like frequencies come from detuning DCO 2 to a non-harmonic interval. Here, adjust the Tune value to +6 semitones and then offset the fine-tuning by +33 cents.
"The JX-8P's architecture can create other distinctive digital sounds. These can range from a subtle shimmer to an added detuned element."
Step Two
First, set the Mixer so that DCO 1 is significantly louder than DCO 2. Next, assign Envelope 2 to modulate the volume of DCO 2 with a strong Dynamics setting of 3 for velocity response. In the Filter, set the cutoff frequency to a low value (around 150) and set its Envelope 2 modulation to the maximum with Dynamics mode set to 3.
Step Three
In this patch, Envelope 2 is doing all of the heavy lifting—controlling the mix of DCO 2, the filter cutoff, and the VCA (overall volume). With strong Dynamics values at each destination, this sound is highly velocity-sensitive. For a mallet character, reduce the attack and sustain to a value of 0, then set the decay and release identically at around 500.
Finishing Touches
By now, the tone should sound like a cross between a xylophone and a toy piano. While chorusing may be helpful, this sound benefits from a standard delay effect to give it a bit more depth.
Toy Mallet Sound Example
Steel Pan
Interestingly, designing Steel Pan drum sounds—via analog synthesis—has been a time-honored trick among veteran designers. While the recreated sound doesn’t have the authenticity of a sampled Steel Pan, it shares some dynamic flavor and envelope characteristics. Here, we’ll use the JX-8P’s X-mod and envelope mixing to design an analog-leaning version of this familiar world percussion instrument.
Step One
DCO 1 and 2 are set to the same octave (8’), with square and pulse waveforms, respectively. One of the keys to this sound is offsetting DCO 2’s fine-tuning to its maximum of 50 cents. In the Mixer, DCO 2 gets set to a low volume with intense modulation from Envelope 1. From there, set its velocity sensitivity to match the preferred playing style. Here, it’s set to Mode 2.
"Designing Steel Pan drum sounds—via analog synthesis—has been a time-honored trick among veteran designers."
Step Two
Filter modulation plays a significant role in this sound, with the cutoff frequency set to minimum (0), strong envelope modulation (value around 800-900), and dynamics from Envelope 2 modulating the VCA.
Step Three
Both Envelopes are critical to achieving the unusual attack characteristics of Steel Pan drums, which are slightly soft, despite being a percussion instrument. Since Envelope 1 governs the volume of DCO 2’s detuned flavor, we’ll set that to a looser attack around 130, a medium decay around 600-700, no sustain, and a release time that matches the decay time. Envelope 2 controls filter and volume, so we’ll keep that more percussive, with an attack of 20, no sustain, and both decay and release set around 500-600.
NOTE: Since the envelopes provide so much of the flavor for this patch, try swapping between them by switching their destinations. For example, switching the filter to Envelope 1 or switching the DCO 2 mix to Envelope 2 will provide variations to the sound. If one wants an even stronger percussive effect, try setting the attack of Envelope 2 to its minimum (0).
Finishing Touches
Because detuning is vital to this sound, try adding a strong chorus to the effects. This example uses the standard chorus with a deeper depth of around 80-90 to enhance the flavor.
Steel Pan Sound Example
Carrilon
A Carillon (sometimes called “church bells”) is a set of stationary bells, usually inside a large tower, tuned chromatically and played with a massive two-octave lever keyboard. This instrument has existed since the Middle Ages and remains in some clock towers and older churches. The JX-8P shows its range with its ability to approximate the sound of a Carillon. While the character remains synthetic, the unusual inharmonic frequencies get replicated via its oscillators’ X-mod (AM) mode.
Step One
To start, set DCO 1 to a square wave at 8’ octave and DCO 2 to a pulse wave at 4’ octave. Again, the X-mod mode is crucial to creating the inharmonics in struck metal instruments, so we’ll further adjust DCO 2 to +5 semitones. Then, in the Mixer, we’ll turn DCO 2 to zero (no sound), then use Envelope 1 to modulate its volume. Set the Dynamics mode according to the preferred playing style. In the patch example, it’s at 3.
"A Carillon is a set of stationary bells, usually inside a large tower, tuned chromatically and played with a massive two-octave lever keyboard."
Step Two
Since the filter cutoff and VCA will get modulated via Envelope 2, we’ll set the cutoff to around 30% (roughly 300) and add a touch of keyboard tracking via the Key Follow parameter. For that parameter, a value of about 120-140 will help keep the sound consistent across the keyboard.
Step Three
Since Envelope 1 exclusively controls the volume of DCO 2, we’ll use a more unusual shape with a sustain value of around 800. The key here is an instant attack and a very short decay (around 100), so this envelope adds a sharp transient without lowering the volume of DCO 2 excessively. Finally, extend its release time to 700 or higher. For Envelope 2, we’ll use the standard “bell” shape we’ve used on several of these patches: Instant attack, no sustain, and equal decay and release times in the 500-600 range.
Finishing Touches
While this sound is fine without effects, it can feel too dry. To add the familiar shimmer of a bell decay, try adding the JUNO-106 chorus. The new ZENOLOGY reverb is another enhancer, so try setting the Send level to 50%.
Carillon Sound Example
Download
JX-8P Bells and Mallets Patches
Try out the presets from this article with the JX-8P Model Expansion.