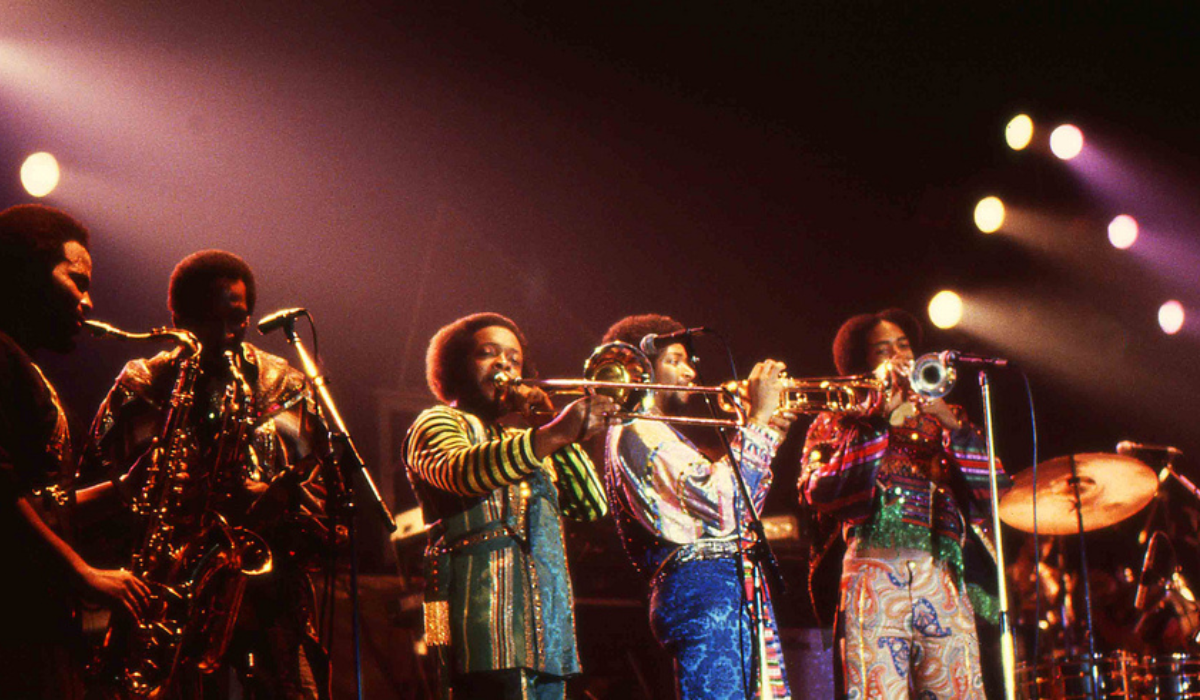
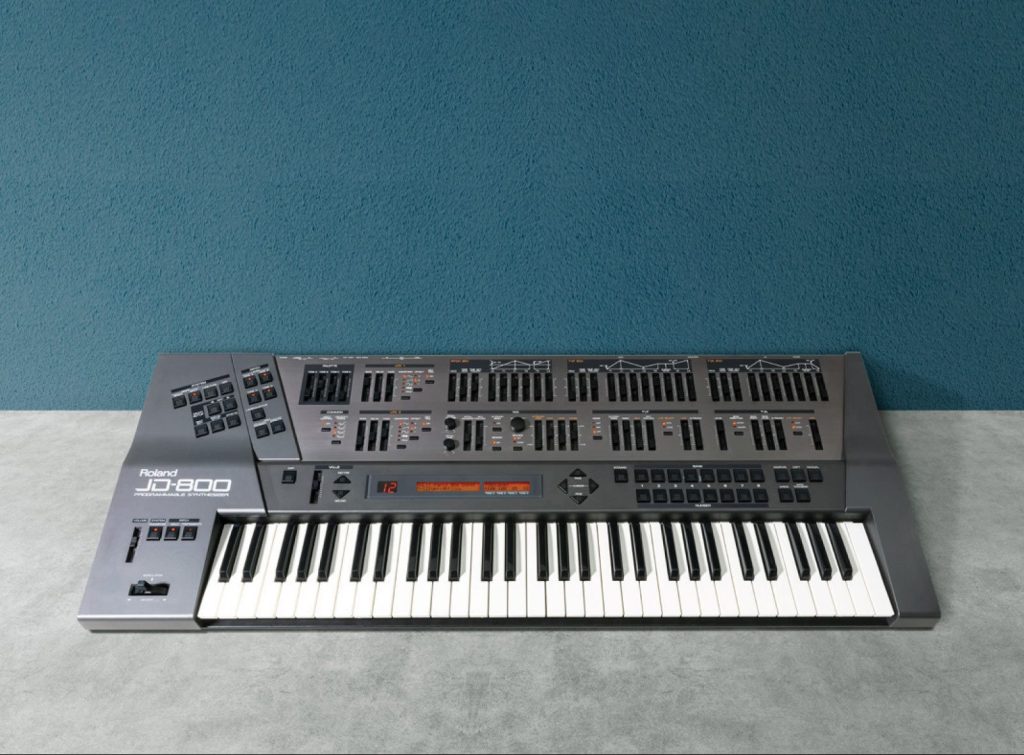
The JD-800 dominated the ’90s with massive textures and a front panel that pushed the limits of real-time sound design possibilities and quickly became the go-to synthesizer for film composers, pop artists, and trance/techno/electronica producers. Both Sasha and Prince were power users who applied its powerful synthesis tools to their fullest. Learn to create immense layers with the JD-800 Model Expansion.
GUIDE
From D-50 to JD-800
Since the dawn of digital, layering has been the basis for some of their most beloved Roland synths. From a design perspective, 1987’s legendary D-50 centered on combining multiple tone generators via Roland’s LA synthesis. Thanks to that innovation, the D-50 could merge sampled waveforms with virtual analog, creating the iconic sounds for countless #1 Billboard hits.
In 1991, Roland continued to advance LA synthesis with the JD-800. The JD-800 dominated that decade with massive textures and a front panel that pushed the limits of real-time sound design possibilities. Like its predecessor, the D-50, the JD-800 consisted of four layers—or “Partials” in Roland terminology—but with far more sophisticated waveforms, filtering options, and effects.
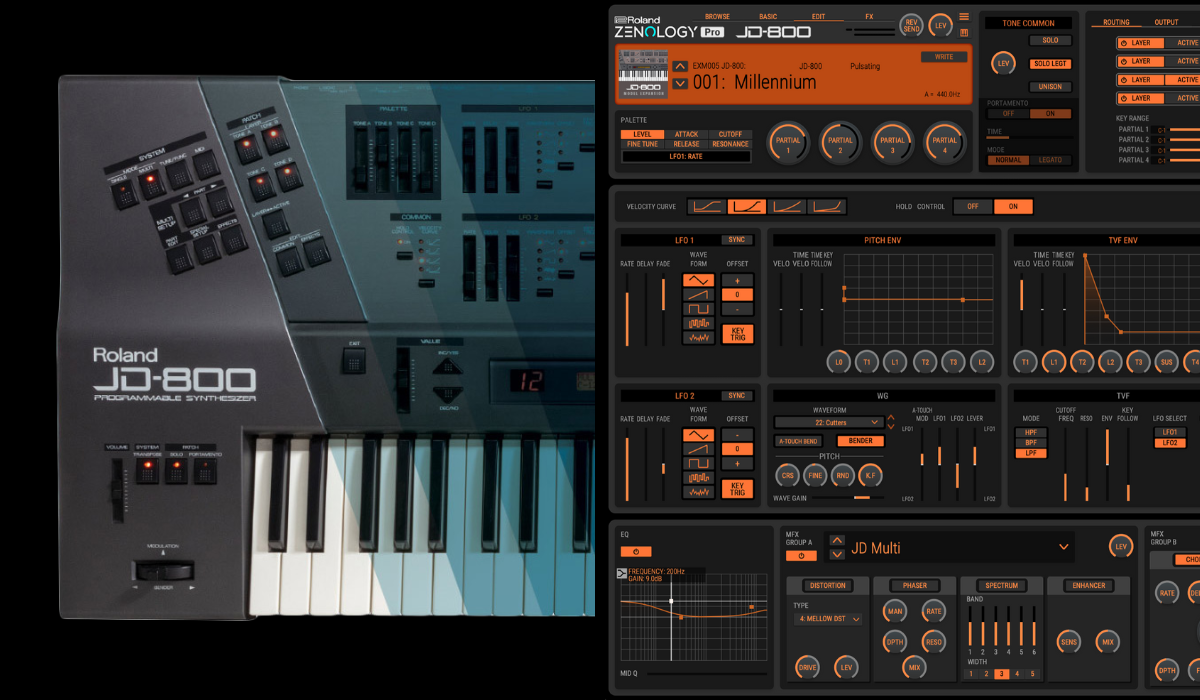
"The JD-800 architecture consists of four Partials, which then get processed by a wide assortment of effects, including phaser, chorus, delay, and several other options."
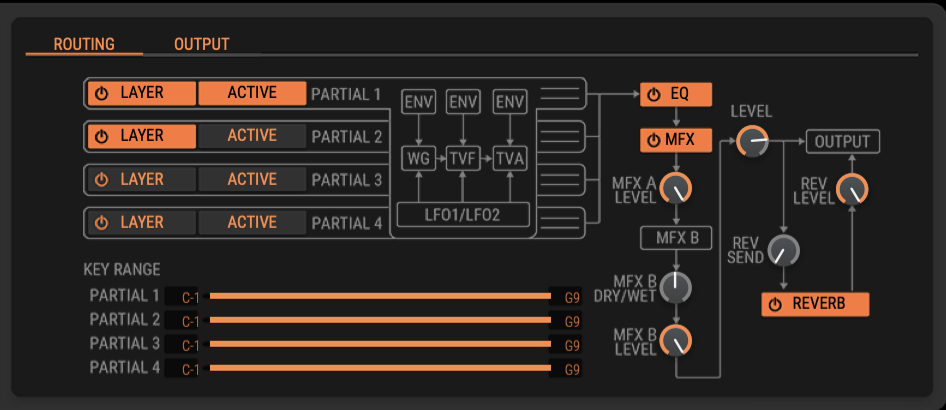
JD-800 Architecture Overview
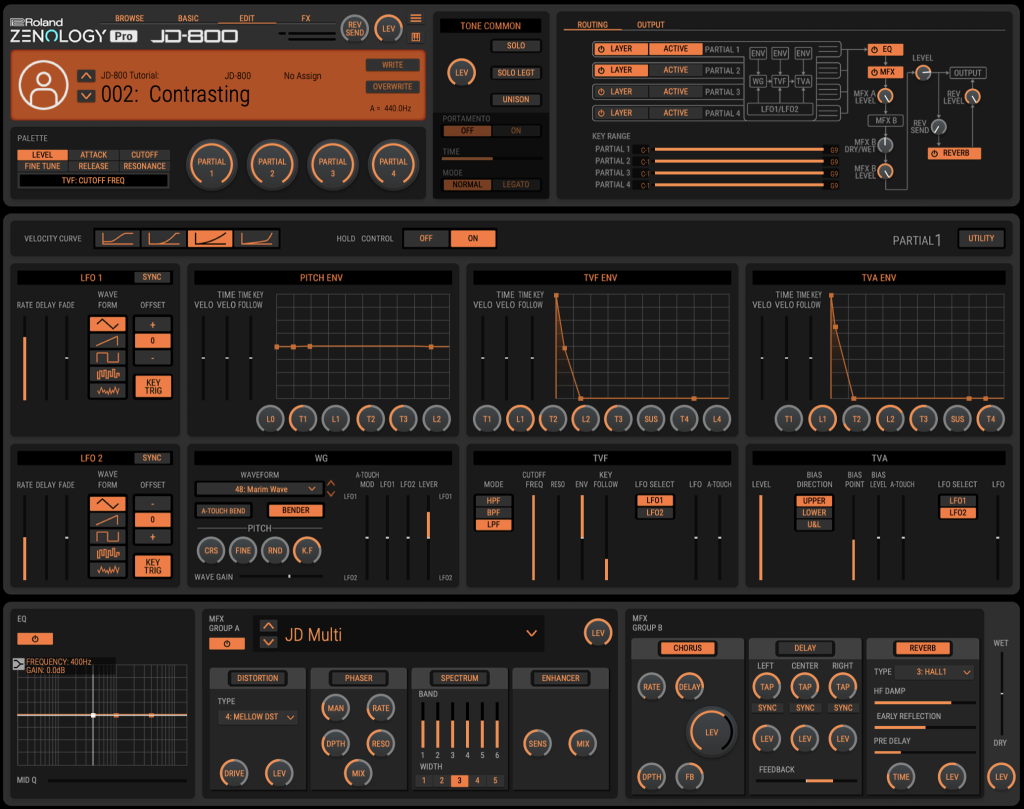
The JD-800 architecture consists of four Partials, which then get processed by a wide assortment of effects, including phaser, chorus, delay, and several other options. What’s impressive about this system is that each Partial consists of an entire independent synthesizer.
All four Partials include a sampled oscillator (called a Wave Generator) followed by a multimode resonant filter (TVF) followed by an amplifier (TVA). Each of these components includes its own dedicated envelope. Partials also contain two LFOs and a wide variety of performance control tools, like custom velocity curves, aftertouch, and assignments for Roland’s modulation lever.
With this approach to synthesis, the fundamental concept isn’t to design a single sound and slap some effects on it. Instead, sound design focused on using each Partial as a layer in a larger sound.
"To some designers, layering is a critical part of their creative process. Learning to combine multiple sound sources often requires a degree of forethought."
Layering Techniques
Let’s discuss three different approaches to creating templates via different layering styles with the downloadable templates at the end of this tutorial. By understanding how these templates were made, you’ll better understand the art and design philosophy of layering synthesizers. With some experimentation, you’ll be able to design your sounds with confidence and a sense of direction. So here we go!
With the above in mind, the ideal way to discuss programming the JD-800 is to address the technical aspects of layering sound itself. Layering isn’t just a matter of “turning knobs until it sounds good.” In fact, to some designers, layering is a critical part of their creative process. Learning to combine multiple sound sources often requires a degree of forethought: What does each layer contribute? How can you emphasize specific elements of the sound? As with mixing and engineering, there’s also the matter of how do you keep your sound from getting too “muddy”?
The Three Cs: Contrasting, Complementary, and Cohesive
Below are three common approaches to layering just two sounds that will help you stay organized and methodical as you design your presets. They’re not the only options, but they’ll definitely make you more aware of how relevant a coordinated design process can be.
It’s also quite valuable to keep this in mind as you expand to build sounds from three or more layers, as in the JD-800. We’ll stick to two layers to keep things clear for this tutorial. For my college students, I refer to these as the “three Cs of layering.”
"Three common approaches to layering just two sounds will help you stay organized and methodical as you design your presets."
Templates
At the end of this tutorial are downloadable templates designed to give you a starting point for each of the above layering techniques. Let’s walk through how each was created. This information lets you know what to edit to make these sounds your own.
Contrasting Template
Introduction to Contrasting Layers
The concept of contrasting layers will be the most obvious example. To explain this, let’s use an orchestral analogy. Most people can immediately identify mallet percussion instruments like xylophones and glockenspiels. Due to their bright, bell-like texture and percussive envelopes with hard attacks and long decays, they stand out in an arrangement.
In addition to orchestral mallets, most people can quickly identify the sound of a string section with overlapping violins, violas, and cellos. Thanks to countless cinematic film scores, we know this sound.
"Many '80s-era Roland presets relied on contrasting layers for their unique and instantly identifiable sounds."
Thus, when you combine a xylophone layer with a string orchestra layer, you have a pair of contrasting tones. Their envelopes are different, and their harmonics are distinct. As a result, you can identify both instruments together just by listening.
Many ’80s-era Roland presets relied on contrasting layers for their unique and instantly identifiable sounds. For example, my all-time favorite patch on the D-50 is “Fantasia” because it uses the abovementioned approach. There are two dominant layers. One is a bright mallet that sounds a bit like a Glockenspiel. The other dominant layer is a spacious pad sound. While the pad isn’t exactly orchestral strings, it does share similar qualities despite being smoothed using the D-50’s filtering.
Working with two contrasting layers will be the most familiar approach for many producers. In this tutorial, we’ll combine a marimba (first Partial) with a soft pad (second Partial).
Step 1: Selecting Layers
As you start working with the JD-800, the first thing to notice is the upper right corner, which includes buttons for turning Partials on and off and effects routing. It also contains a button labeled “Active,” which switches the synthesis view to the layer you want to work on. In this image, the first layer is active onscreen.
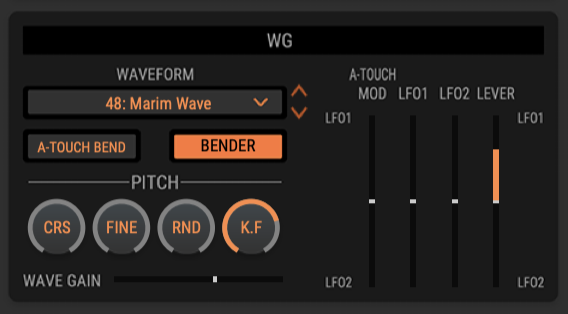
Step 2: Marimba Wave
In the WG section (wave generator), we’ve selected “48: Marim Wave” for its sharp marimba attack and bell-like qualities. The rest of the parameters, such as tuning, don’t require further adjustment for this layer.

Step 3: Filtering
We don’t need much filtering for this sound, so slightly lower the TVF Lowpass Cutoff to give its envelope some room to work with. Since this is a template for contrasting sounds, the filter and envelopes are prepared, so all you have to do is change the waveform and adjust the filter settings to get started on your sound.
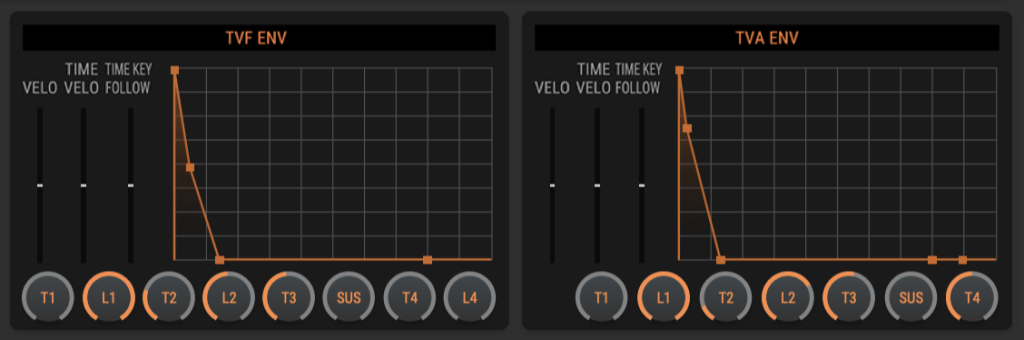
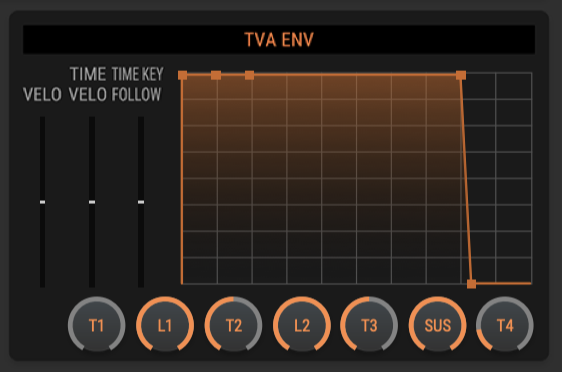
Step 4: Envelopes
As mentioned above, this layer is already configured for percussive elements. Note that the TVF and TVA envelopes reflect this with quick decays and no sustain.
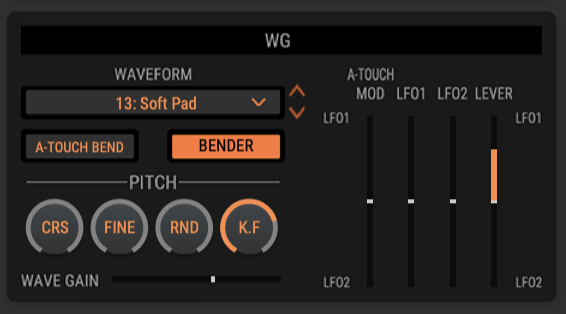
Step 5: Pad Wave
After changing the Active layer to the second layer, we’ll set the Wave Generator to the perfectly titled “13: Soft Pad,” again leaving the other parameters in place.
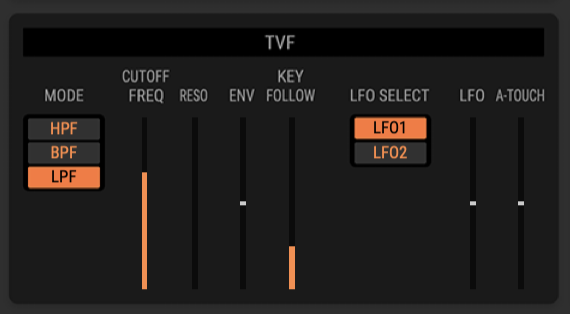
Step 6: Filtering
For the pad, we’ll refine the sound even more by lowering the TVF Lowpass Cutoff by about 25-30% to soften the high frequencies.
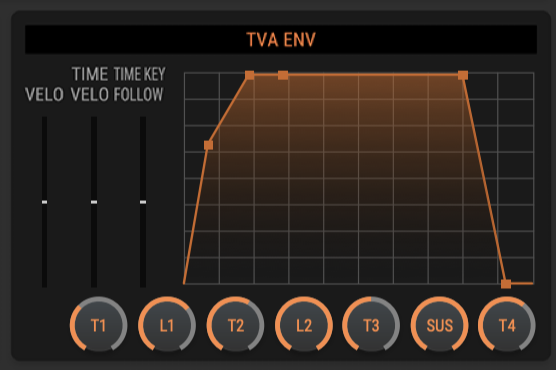
Step 7: Envelope
Here, we’ll use a classic pad envelope shape with a soft attack, but if you look at the envelope closely, you’ll see that the second envelope stage serves as an extension of the attack as the sound approaches the sustain level. At the end, the release time gets slightly extended.
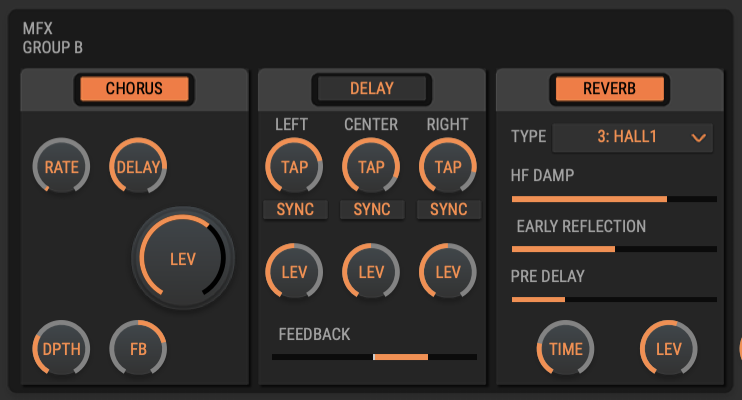
Step 8: Effects
While the JD-800 is known for its unique effects section, this classic layered sound only needs a touch of chorus and reverb to give it a glossier sound. With this in mind, it’s worth experimenting with other possibilities like the JD-800 Multi’s phaser.
Complementary Template
Intro to Complementary Layering
Complementary layering combines two sounds that share similar envelopes but have different timbres, harmonic content, or articulation. Continuing with our orchestral analogy, an example of this complementary mixing is combining an oboe with a concert flute, playing in perfect synchronization, though in different octaves.
In this case, you can hear both instruments as unique. However, since their envelopes are relatively similar, they blend well and create an entirely new timbre, mainly due to the combinations of different harmonics. From there, it’s just a matter of mixing the two textures.
Working with two complementary layers can be easy, although it often overlaps with cohesive approaches, which we’ll cover in a bit. Ultimately, this is fine since the end goal is to create sounds for your own music—and the JD-800 also has two additional layers to add complexity to your sound. This section will also help you familiarize yourself with the JD-800’s copy/paste functions, which are extremely useful for making layered sounds with similar envelopes. Here, we’ll make a pad with choir elements for “air” in the result.
"The JD-800’s copy/paste functions are extremely useful for making layered sounds with similar envelopes."
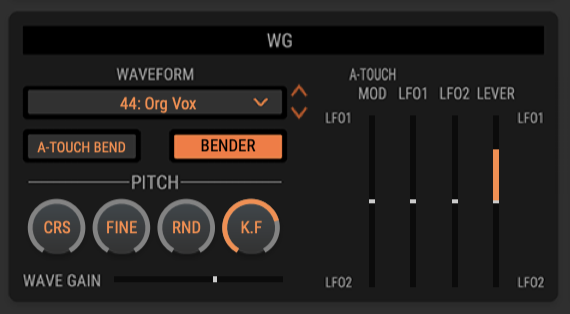
Step 1: Choir Wave
For the airy choir layer, we’ll start with the “44: Org Vox” wave, a wonderful vocal sound with a lot of breath. No further adjustments are needed.
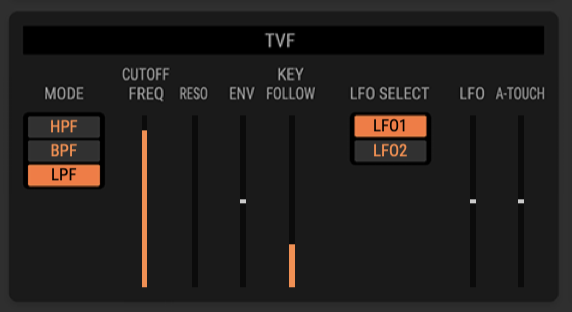
Step 2: Filter
To maintain the air, we’ll leave the TVF Lowpass Cutoff near maximum. From there, you can modify the filter to customize it for your own purposes.
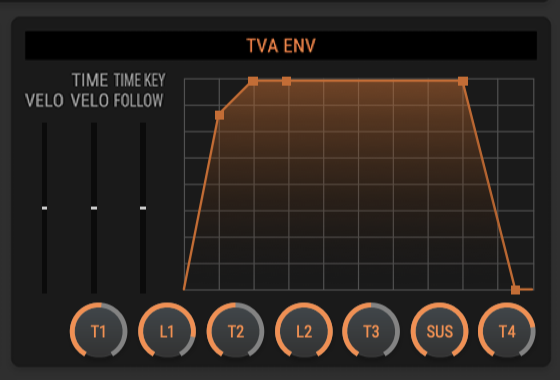
Step 3: Envelope
Since both layers will have envelopes suitable for pads, we’ll set the TVA Envelope up with a soft attack and upward decay, with full sustain and a bit of release. This sound is quite similar to the pad envelope in the previous section.
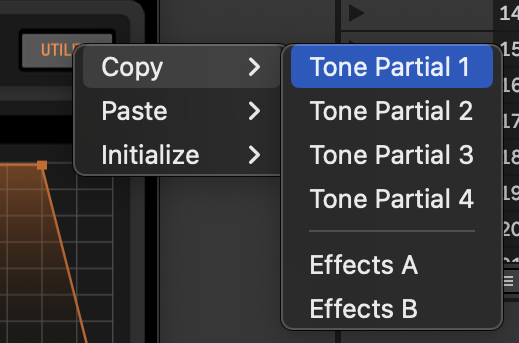
Step 4: Copy/Paste Tools
As described in the previous section, the copy/paste function is a massive timesaver for complex envelope designs.
NOTE: The Initialize function for each Partial is also handy if you find a preset you like but want to change a few of its layers. Call up the preset, determine which layers you’ll keep, and then initialize the other layers to add your creativity.
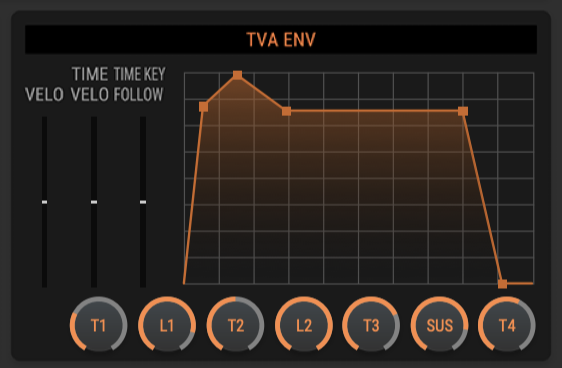
Step 5: Envelope
Before we get into the wave and filter for the next layer, let’s copy the envelope from the first Partial and use it as a starting point for the complimentary envelope. Here, we made several adjustments to the attack, decay, and sustain components of the TVA Envelopes.
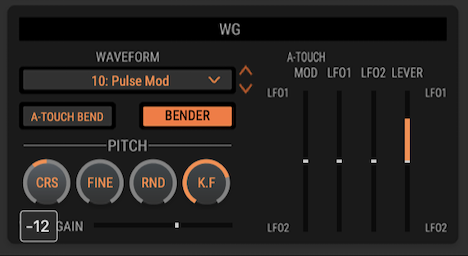
Step 6: Pulse Wave
Another great pad wave is “10: Pulse Mod.” This is exceptionally thick and smooth and a fantastic selection for our second layer. Here, we’ll turn it down another octave (-12) so it’s more distinctive when mixed with the choir layer.
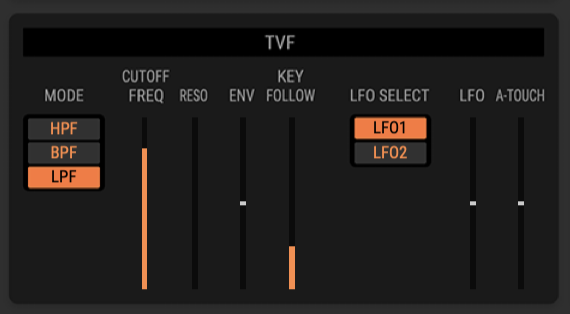
Step 7: Filtering
To tame the highs in the “Pulse Mod” wave, we’ll lower the cutoff on the TVF Lowpass until it’s warmer and softer.
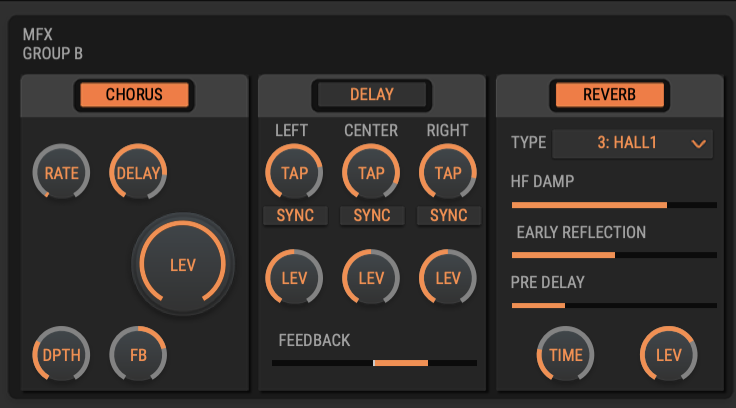
Step 8: Effects
Again, when working with any sound that relies on pad elements, Reverb and Chorus are winners for this type of sound. It’s also worth spending time on the JD Multi-effect preset, as its Spectrum and Enhancer sections work great on sounds like this.
Cohesive Template
Introduction to Cohesive Layering
Cohesive layering is tricky to compare to an orchestral scenario, so here, we’ll approach it from a synthesis perspective. In the case of two sounds that are layered cohesively, it is nearly impossible to distinguish one sound from the other—and the result sounds like a single sound despite having separate synthesis layers. Here are two techniques for creating cohesive layers via two different synth sounds.
In one example, the envelopes for each layer are the same. Due to these identical envelopes, the sounds will instantly mesh quite well. However, the waveform or sample selection is extremely important. When creating layered sounds using this approach, starting with a sine wave is often advisable as the basis for the second layer. Since sine waves consist of a single frequency, this layer can be tuned to a different octave (-12, 0, +12, +24) and still be highly transparent.
"Another way to layer cohesively is to have the second layer consist of an extremely short amp envelope decay."
In this manner, it’s also possible to use the sine wave layer to enhance the sub-bass in a combination where the other layer may not have as much lower frequency content.
Another way to layer cohesively is to have the second layer consist of an extremely short amp envelope decay, so it’s almost a “click” or thereabouts—but with the ability to be further shaped by waveform selection and tuning. In this case, the second layer with the fast envelope can effectively emphasize the attack of the overall sound heavily. Also, with this configuration, simply changing the mix of the two layers can increase or decrease this transient.
Techniques
Cohesive layering is a technique I use a lot in my designs. I frequently put a sine wave on one of my layers when I need more bass or fundamental tone. If I need a stronger attack and other methods don’t quite work, I’ll layer in a punchy sample to increase the transient.
In this example, I wanted to add more bass and fullness to the “Cutters” waveform since it’s bright and buzzy but a bit thin—because the waveform itself is actually designed for layering.
Step 1
We’ll start with an “Init Tone” preset for the JD-800 since both TVA envelopes should be identical. This saves a step. You can also copy/paste two envelopes that you create yourself.
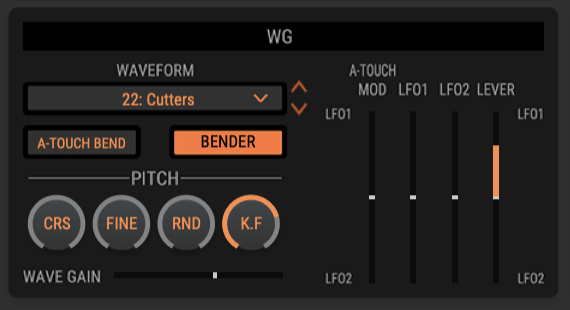
Step 2
Select the “22: Cutters” waveform in the Wave Generator. No other alterations.
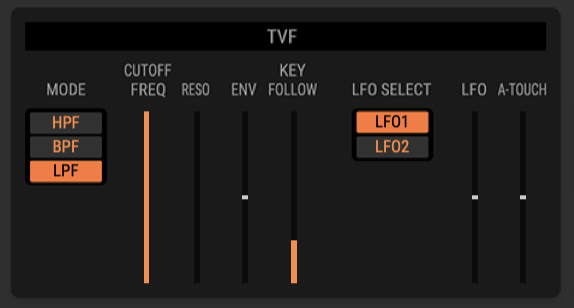
Step 3
Because this is a template, I left the TVF cutoff wide open here so you can adjust it when creating your patches.
Step 4
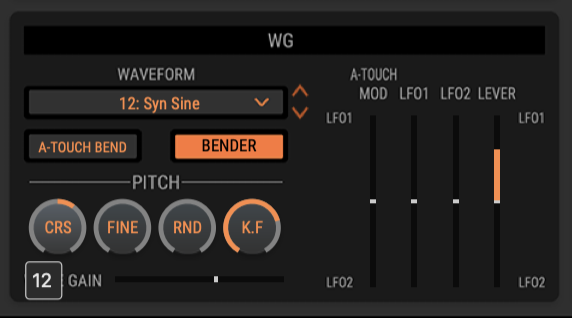
Now, since this started as an Init Tone with identical envelopes, to add bass and fullness, all you have to do is create a second layer with the Wave Generator set to “12: Syn Sine” and tune it one octave lower (-12).
From here, play some notes and adjust the Partial levels until you get the balance you’re looking for.
Download
JD-800 Layering Templates
Try out the templates described from this article with the JD-800 Model Expansion.