You probably know Roland Cloud can serve as your deep back catalog of Roland synths of yesterday and today. But you don’t want to miss the 90+ processing tools in ZENOLOGY FX, covering various processors and effects from Roland and BOSS. That can get overwhelming if you don’t know where to look. So, here’s your guide to finding patches, getting the desired results, and taking control of your sound.
Zen and the Art of ZENOLOGY FX
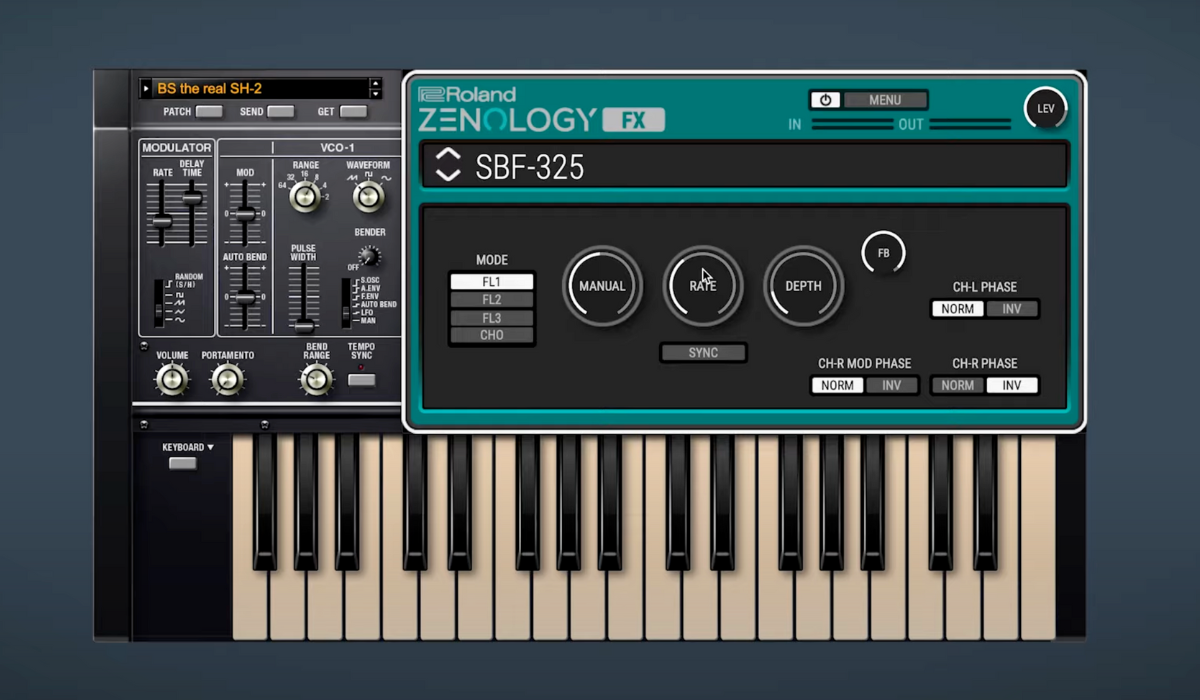
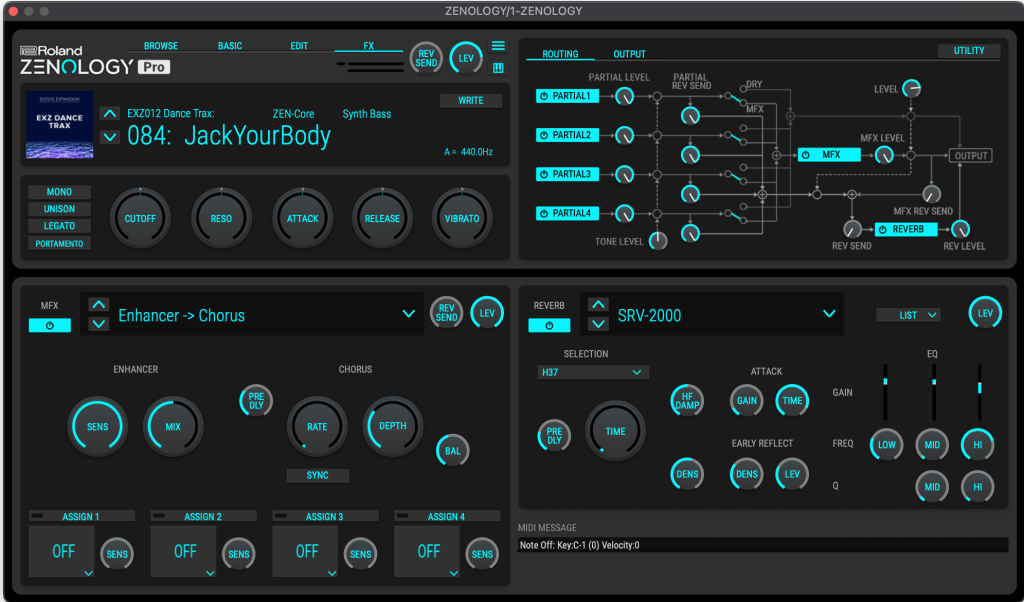
As the name implies, ZENOLOGY FX is also part of the ZENOLOGY Pro synth; ZENOLOGY FX is the standalone version of the MFX section. It’s also related to the ZEN-Core effects on a range of current Roland synths derived from years of Roland synths and keyboards. Being able to run ZENOLOGY FX separately means you’ve got a multi-effects powerhouse you can combine with any source you want.
It comes in all three Roland Cloud subscription tiers, including Core. ZENOLOGY FX is a treasure trove of unique effects derived if you know where—and how—to dig. Included effects cover a range of categories:
- Filter
- Phaser
- Flanger
- Chorus
- Modulation
- Drive/amp models
- Compressor/limiter
- Delay
- Looper
- Lo-fi effects
- Pitch shifting
"Being able to run ZENOLOGY FX separately means you’ve got a multi-effects powerhouse you can combine with any source you want."
Understanding the Interface
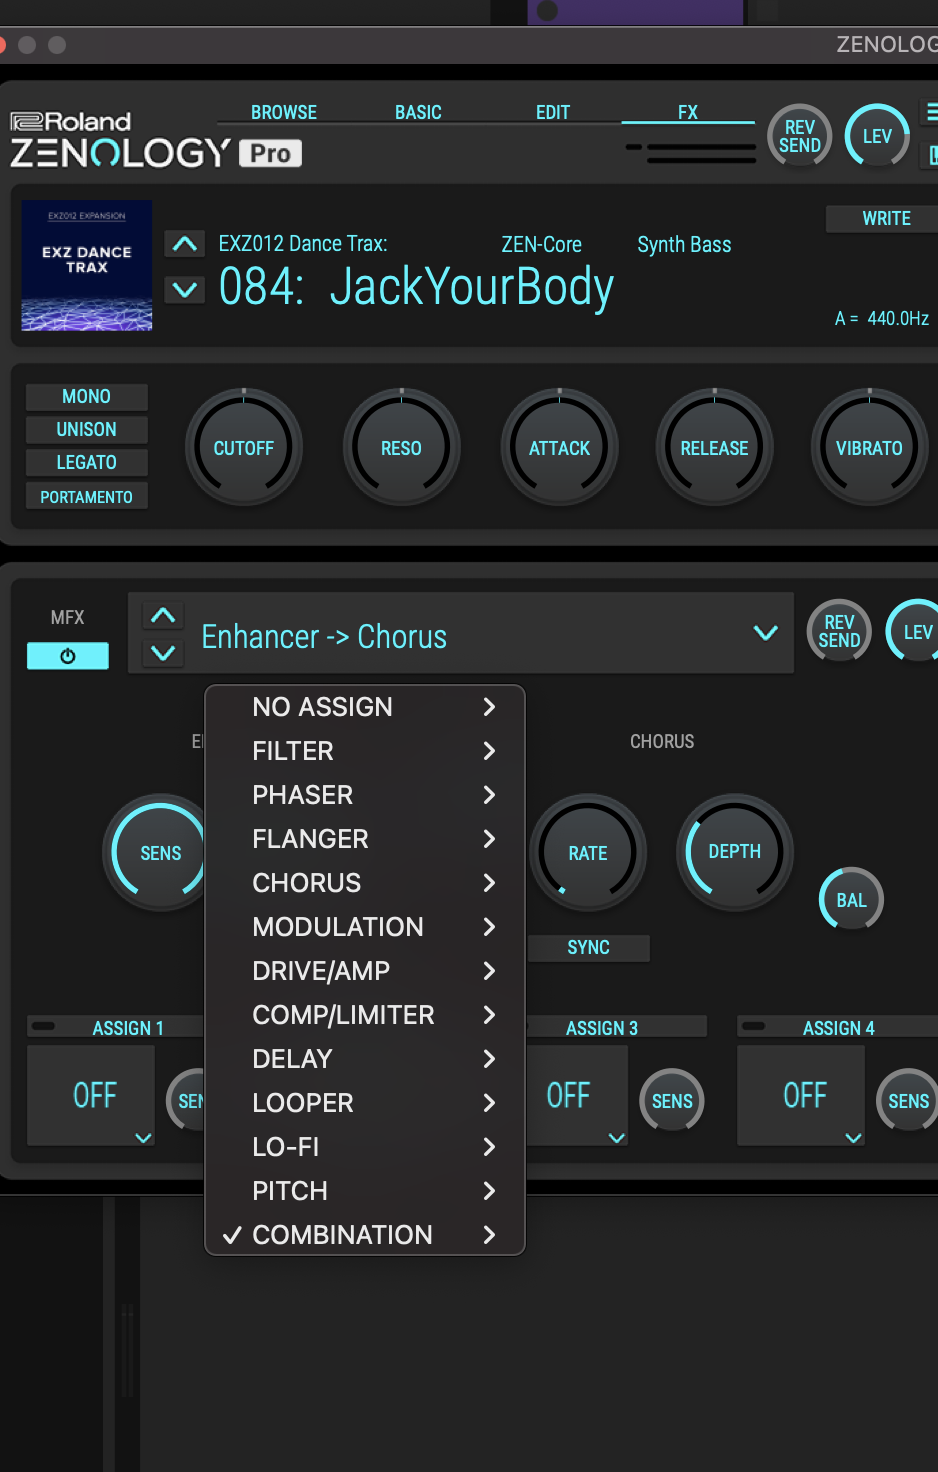
When you instantiate the ZENOLOGY FX plug-in (as AU, VST, or AAX), you get one effect insert that’s assignable to any of the 90+ effects. There’s also a Combination section with pre-configured combinations of two effects each, plus the standard JD section of the classic JD-800 polysynth. Typically, if you want to combine multiple effects, you’ll add more Zenology FX instances as inserts or sends in your DAW of choice. For convenience, you might also make your own combos using Channel Strip settings in Apple Logic Pro or Effect Racks in Ableton Live.
You can choose which effect type you want on the left-hand side of the screen. Notice the input and output settings (with meters) and the level (LEV) control. The critical difference is that input and output gain are set for the plug-in. They stay in place as you switch effects types, but the level gets stored with the effects type and preset. That’s useful while you’re designing effects presets. If you’re using something like an overdrive, you can manage the output level with the patch so you don’t overload your level when you pull up the patch.
If you make changes to parameters and then switch effects types, those settings are still there when you return. It does not reset to INIT, so you won’t lose your settings.
Finding Sounds
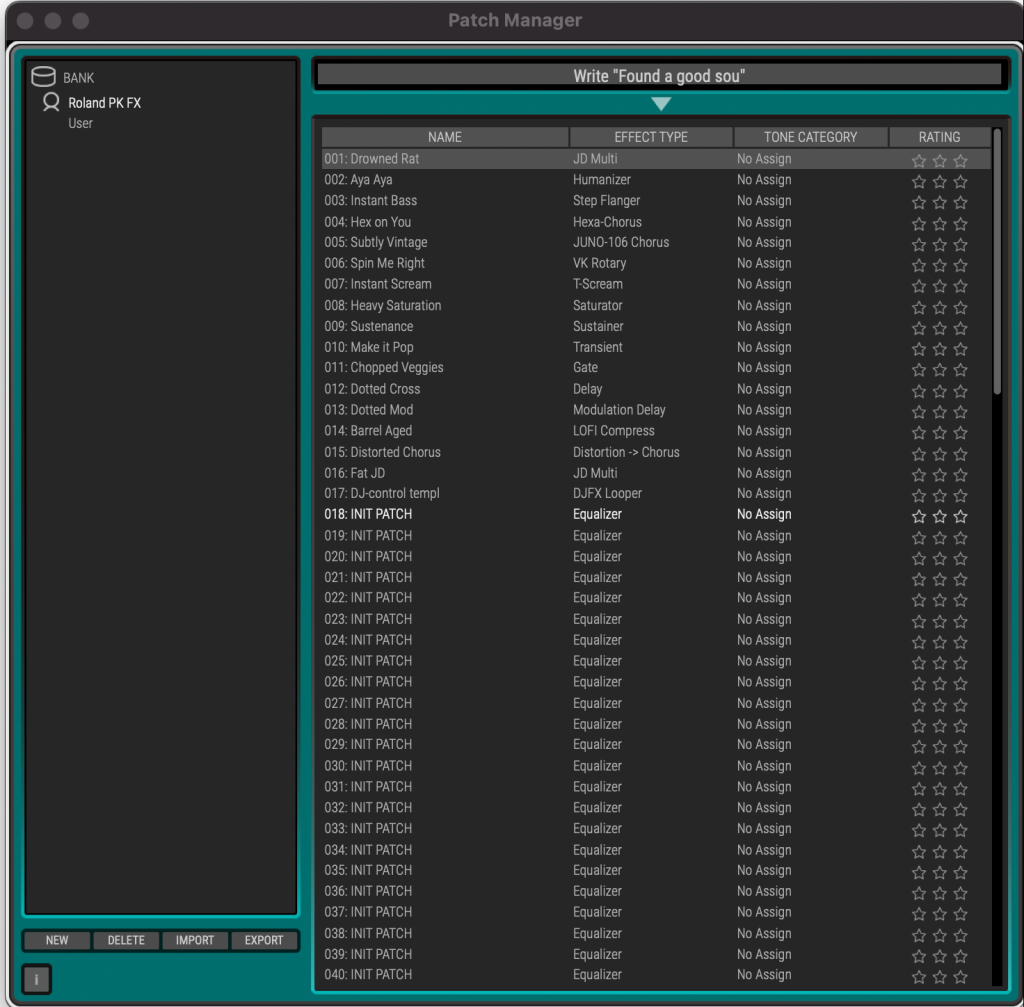
Bring up the ZENOLOGY FX Browser for all the presets, including any user banks you may have created. The FX bank is ZENOLOGY FX’s own presets. Banks marked ZENOLOGY correspond to the ZENOLOGY Pro synth. Under those, you’ll see all other installed libraries. Every installed library in Roland Cloud that uses the ZEN-Core effects engine has a corresponding effect patch in ZENOLOGY FX.
Mostly, those won’t make much sense out of the context of their original patch. You’ll probably want to stick to the main FX banks and your creations. If you want some random inspiration, it can be fun to pencil-drop the other sections. Finally, click Browse again to exit the browser.
"Every installed library in Roland Cloud that uses the ZEN-Core effects engine has a corresponding effect patch in ZENOLOGY FX."
Saving Patches
Once you’ve found a setting you like, click Write to save the patch. Then—and the order is essential—select a bank, choose a patch slot, click “Write” at the top, type in your new name, and hit enter. Longer names will appear truncated. The effect type will then get assigned automatically, and you can choose to add a tone category and rating if you prefer.
Note that the Write button at the top will show the last active preset name. It’ll only update once you enter a new name. You can also make your own banks in the list to the left. If you tweak an existing preset and want to update, click once to Overwrite from the main window.
Touring Top Effects
Filters > Step Filter
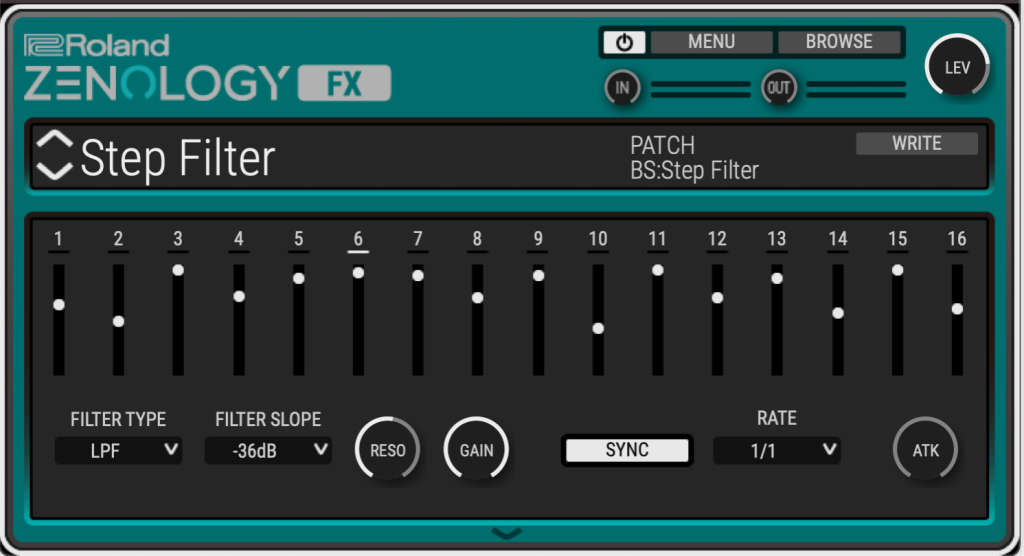
The ZENOLOGY FX Step Filter is one of a group of step-sequenced, rhythmic effects types with an interface like a vintage analog step sequencer. Try it with the LPF (low-pass filter).
Note that the sync value is for the total of all the steps—meaning set it to 1/1 (bar) if you want each step to be 1/16 note. Other step-sequenced Zenology FX effects types work the same way.
Filters > Humanizer
Try this dual-formant filter for some fun. It’s human, in that it creates a sound like a vocal tract. Set it to alternate between two vowel sounds or repeat the same vowel sound by setting both vowel 1 and 2 to the same setting. The vowels will either trigger with the rate (synced or free) or use an input threshold (an envelope follower) to trigger based on the input.
"The ZENOLOGY FX Step Filter is one of a group of step-sequenced, rhythmic effects types with an interface like a vintage analog step sequencer."
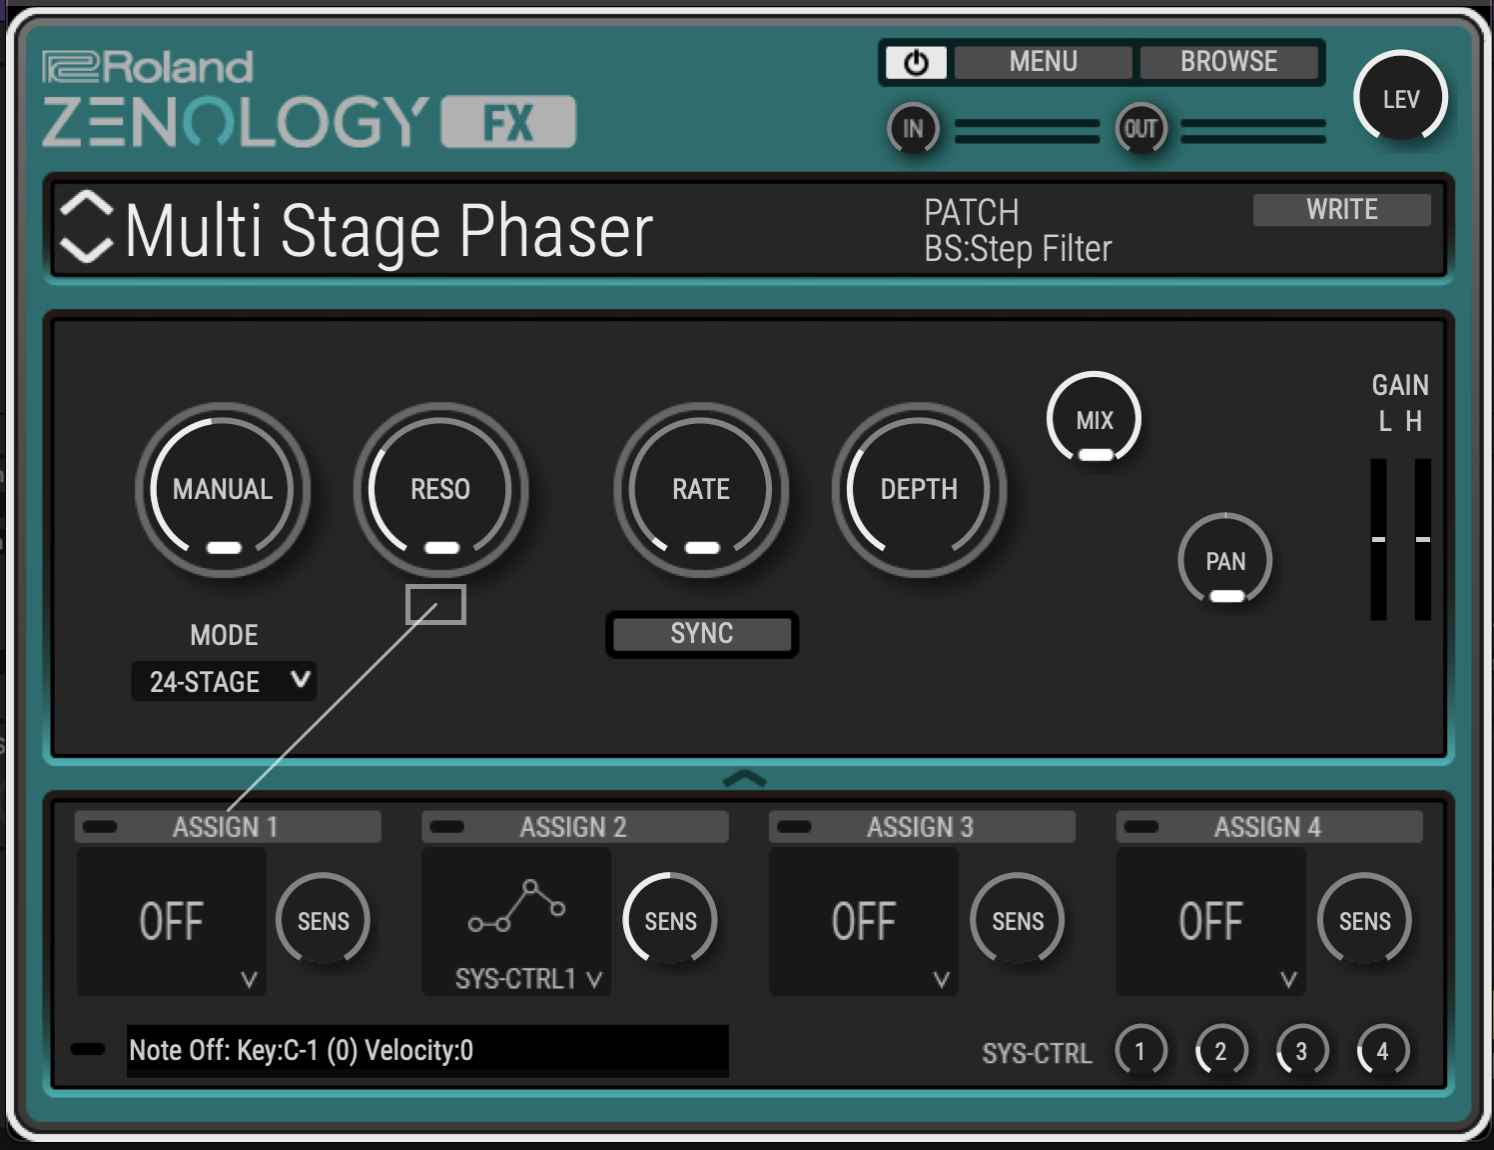
Phaser > Phaser
There are various phaser types included. The Script Phaser, for instance, is based on a classic typically used on electric pianos. But the default Phaser sounds especially lush (try setting it to 12-Stage mode) and has its own cross-feedback setting (x-fb). If you crank that last one up, you can even get some Pac-Man ghost sounds.
Flanger > Step Flanger
There are two parameters you can sync or run free: a conventional flanger rate and a step rate. Turn up feedback, set the filter to LPF, and change the cutoff frequency to one of its fixed values. You’ll get some unique pitched, resonant effects beyond what you might expect of a flanger; try it on drums or synth pads.
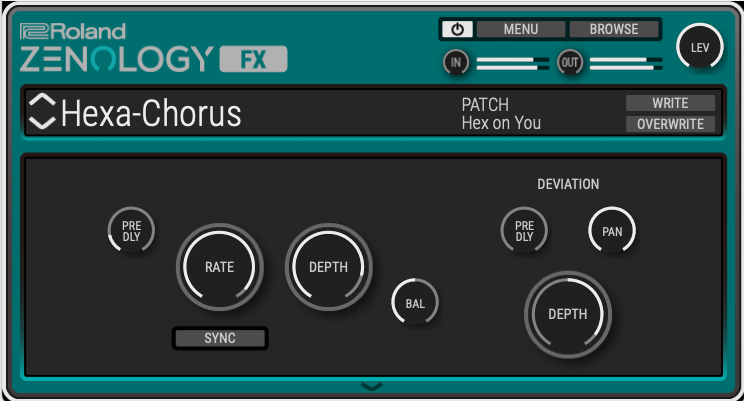
Chorus > Hexa Chorus
You know the standard classic Roland chorus types, but give Hexa-Chorus a try, too. It’s a six-layer chorus with stereo width (pan deviation) and many other controls.
"Hexa-Chorus is a six-layer chorus with stereo width (pan deviation) and many other controls."
Chorus > JUNO-106
Speaking of classic Roland chorus, the JUNO-106 model here has features missing from many emulations. The noise option—emulating the noisy sound of the JUNO-60 chorus—is offered here on a knob. As a result, you can choose some subtler and less overwhelming noise. There are also the two chorus modes recreating the two modes on the JX-8P.
Modulation > VK Rotary
True Roland organ fans will recognize the rotary model from the 1997 VK-7 Combo Organ with Virtual ToneWheel tech. It’s the most advanced of the rotary emulations here. But it’s useful on drum and synth sounds, too, primarily because of its pronounced low-end response. So even though the manual says to use the rotary effects on organ sounds, you don’t have to limit yourself to that.
"The Speaker Simulator has several different cabinet models. T-Scream is an easy go-to stereo distortion for everyday use."
Drive/Amp
The key to know here is that some of these effects are mono, and some are stereo, so you’ll want to choose based on your source and use case:
Mono
- Overdrive
- Distortion
- HMS Distortion
- Guitar Amp Simulator
- RD EPAmpSim (with stereo tremolo out)
Stereo
- T-Scream
- Fuzz
- Tone Fattener
- Saturator
- Warm Saturator
- Speaker Simulator
Try the Speaker Simulator and Saturator for the broadest range of options with stereo processing. The Speaker Simulator has several different cabinet models. T-Scream is an easy go-to stereo distortion for everyday use.
Comp/Limiter > Sustainer
This can create distortion-free sustain sounds (including elongating percussion). Plus, at extreme settings, you can get upward and downward compression. This is similar to what’s been popularly dubbed the OTT (Over The Top) effect after a multiband compressor setting of the same name. (Check the useful Compressor > Transient effect, too.)
Delay > Modulation Delay
This inserts per-channel modulation after both the left and right delay. With feedback, you can get pitched results; CROSS mode routes the feedback signal to the opposite channel.
LO-FI > LOFI Compress
Have you ever felt a track lacked some punch, especially compared to vintage gear? This effect adds compression, filtering, and signal degradation all in one go. Your signal runs through a compressor, a pre-filter, signal degradation, a post-filter (LPF or HPF with a fixed cutoff value, or off), and then a 2-band EQ (GAIN L and GAIN H), in that order.
With PRE FILTER set to 1, there’s no compression at all—just the lo-fi signal degradation effect. The compressor is engaged for any other value. Then choose PRE-FILTER 2-6 and LO-FI TYPE 1-9 to set how much damage you want. Higher numbers mean progressively crunchier filter and signal degradation for each. There are 54 possible pre-filter/lo-fi type combos in total, and each value has its own character, so this is one for some trial and error.
"If you like lo-fi processing, ZENOLOGY FX is worth exploring for this one effect alone."
You’ll get some noise, some bitcrushing, and some other lo-fi secret sauce. If you like lo-fi processing, ZENOLOGY FX is worth exploring for even this one effect alone. Using the balance control can introduce phasing effects, so it’s best to go all-in and leave this at its default 100% wet.
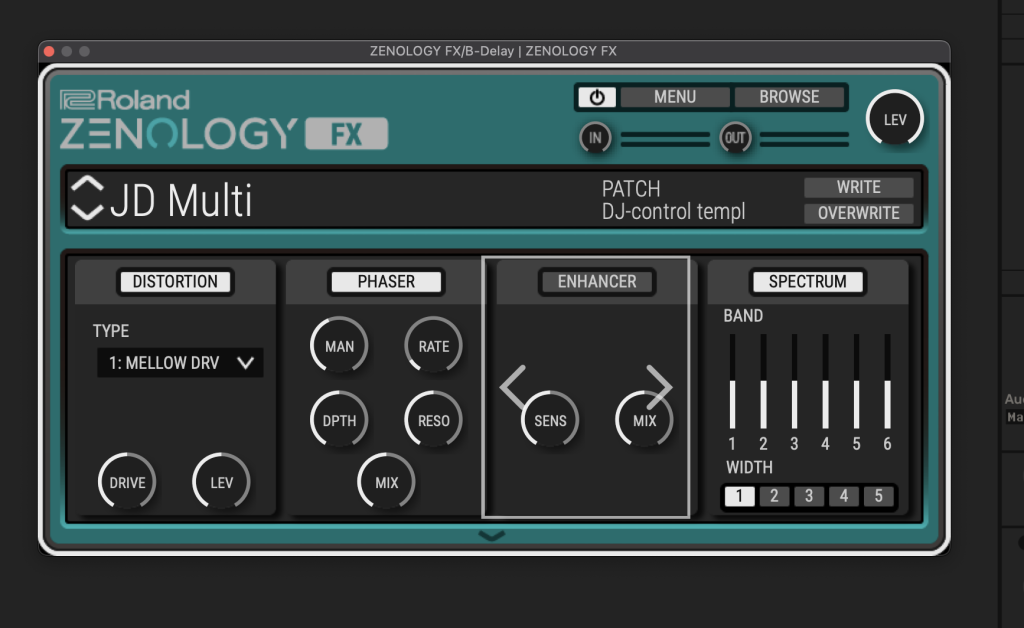
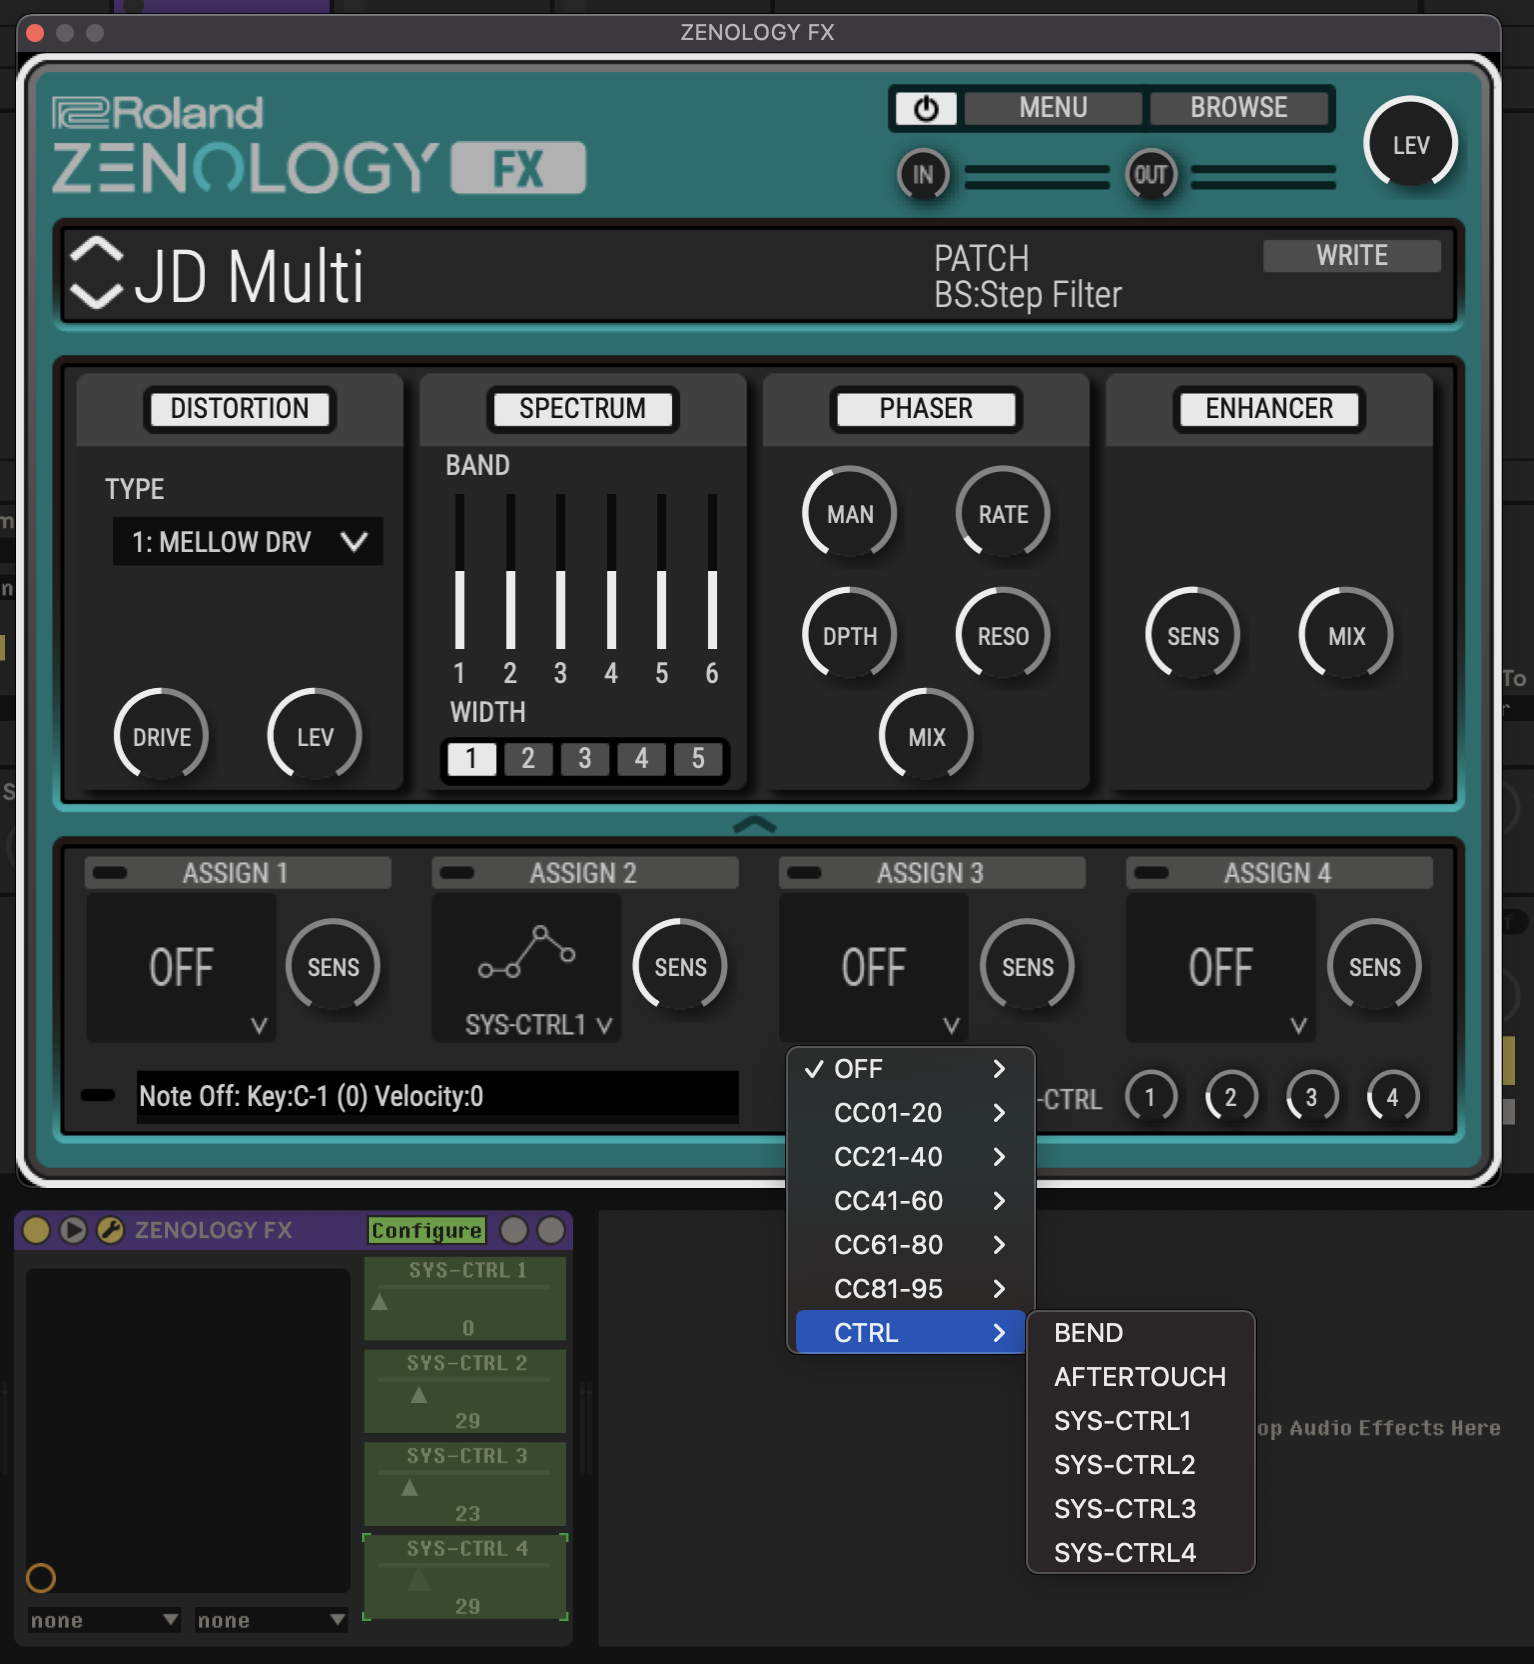
Multi > JD Multi
This is the full effects section from the JD-800, including distortion (with seven types, distinct from what’s in the Drive category), phaser, 6-band spectrum parametric EQ, and the JD’s unique Enhancer effect.
The JD Multi can also engage/disengage each of these modules, plus drag each section title to reorder them. (That also means you can adjust the spectrum pre-distortion for more control.)
Mapping MIDI and Automation
Let’s take one more key effect and look at how to map MIDI—or host automation—from your DAW. ZENOLOGY FX uses MFX Controls, a set of macros, for both.
Click the arrow at the bottom of the interface, and you get four assignable continuous parameter controls. To assign them to the parameter you wish to control, click and hold one of the four assignment slots. Assignable parameters will blink, and you can drag from the source control to a destination. Some effect types have just balance and level assignable; others have more. SENS determines how much the control message will impact the value in a positive or negative direction. You can even assign multiple controls to the same destination; they’re summed.
Hover over one of the MFX Control slots, and you’ll see lines connecting each source slot to each assigned destination. You cannot directly automate parameters in ZENOLOGY FX. To automate these, first assign any parameter you want to SYS-CTRL 1, 2, 3, or 4. You can then automate these in your DAW. The same summing applies.
You can also assign MIDI controls in two ways. Either ctrl-click / right-click a parameter and choose LEARN CC. Or manually select them on the pop-up below each assignment slot. (This will only work if you’ve successfully routed MIDI to the effect plug-in, however, which differs for each DAW.)
Looper > DJFX Looper
This is a simple but effective DJ-style looper, a la the SP-404, with forward and reverse speed, length, and loop on/off. The speed parameter is always active, even when not looping. All three of the parameters here are mappable, and it’s something you’d probably like to automate or play live.
We could directly assign MIDI, but that means you have to route MIDI into the effect plug-in, which can be a pain in some hosts. Generally, it’s easier first to assign the four MFX-Control slots to SYS-CTRL and then MIDI map in your host typically. This lets your host manage any conflicting MIDI assignments and allows you to map multiple ZENOLOGY FX instances in the same session. Plus, you can save these mappings in the ZENOLOGY FX preset.
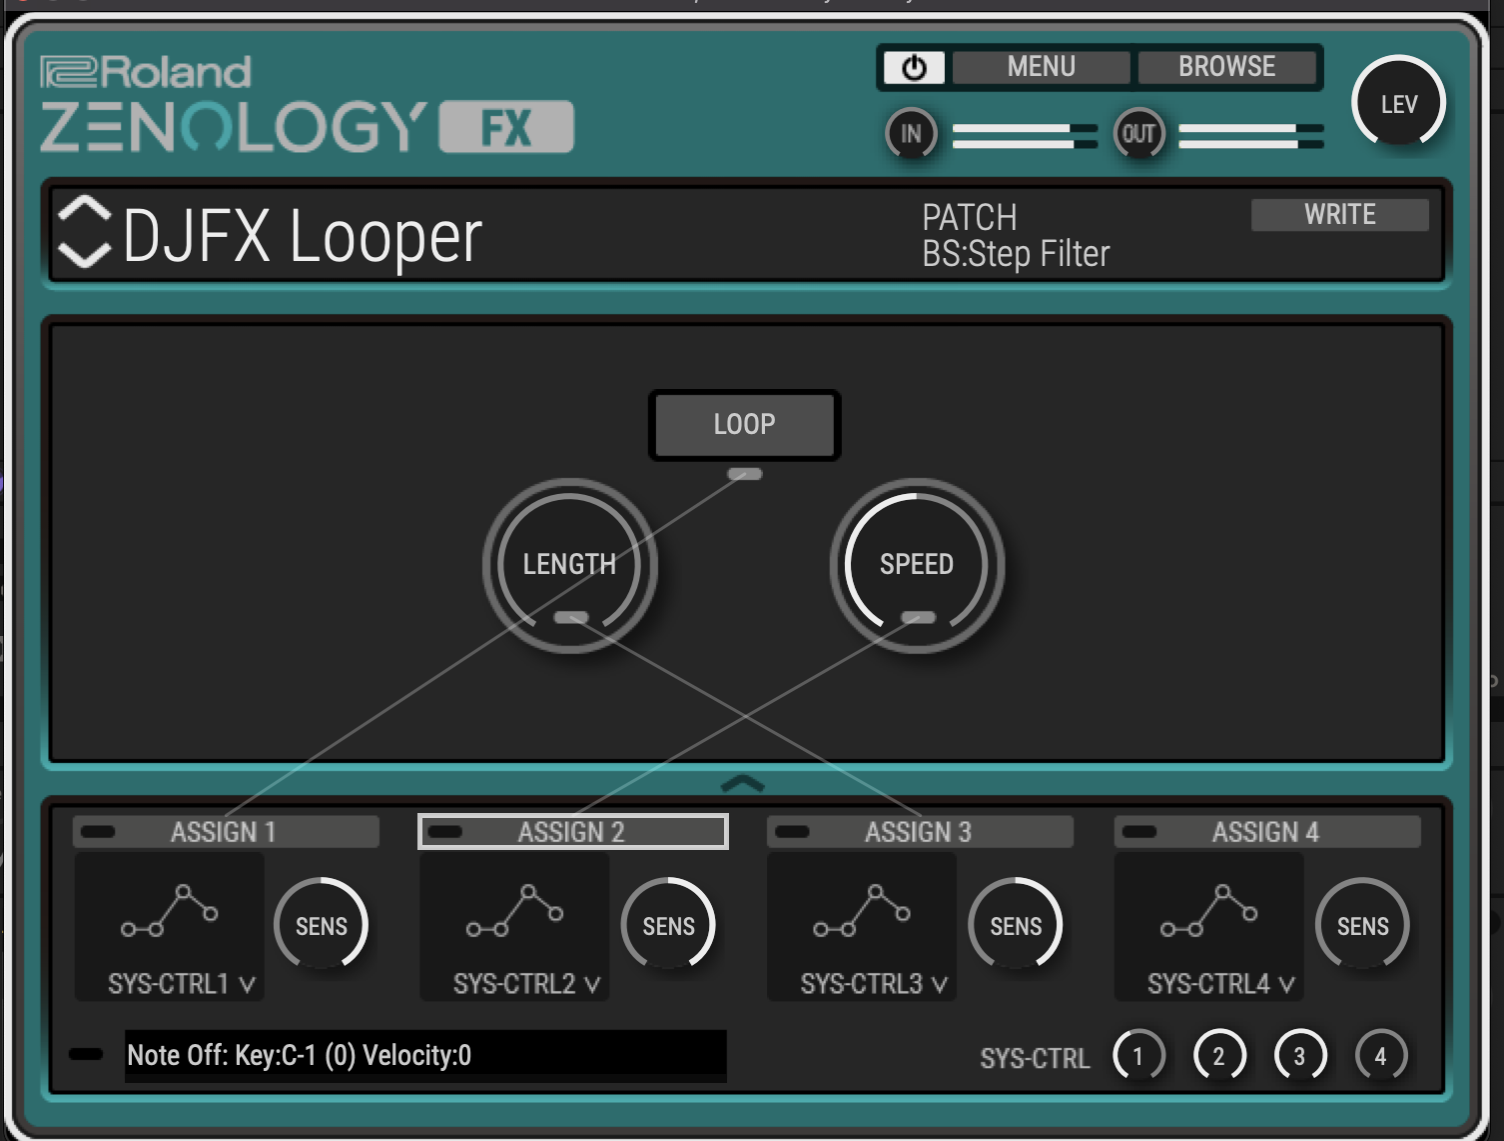
"This is a simple but effective DJ-style looper, a la the SP-404, with forward and reverse speed, length, and loop on/off."
We’ve done that with our DJ-CONTROL TEMPL preset, so you can reuse it in your own patches. Or try jamming with the DJ template. To control the parameter’s full positive/negative range—as with the SPEED control in DJFX Looper—first turn the parameter down, then turn the SENS up. Now positive values from 0-127 will scale from -1x speed (turned down) to 0 (at center) to 1x speed (turned up).
You can automate these values, or to play them live, assign a MIDI knob on your controller to each of the three SYS-CTRL parameters. (Twist the knob above center to toggle LOOP on and below center to toggle it off again.)
Download
ZENOLOGY FX Patches
Add character to synths and drums with these lo-fi and retro sounds.


