The Pinnacle
Since the release of the JUPITER-4 in 1978, the name JUPITER has marked the pinnacle of Roland sound and playability. The JUPITER-8 was Roland’s flagship synthesizer for the first half of the 1980s and is one of the greatest analog synths of all time.
Eight voices with two oscillators per voice plus Roland’s classic chorus effects gave the JUPITER-8 a wide, thick sound. Moreover, it featured a fat resonant low-pass filter, along with an optional high-pass filter and an array of envelope and LFO modulation options.
Advanced Features
Indeed, the instrument had many advanced features for its time. These include the ability to split the keyboard into two zones, with separate patches active on each zone. Two years after the release of the JUPITER-8, Roland released the more affordable JUPITER-6 synthesizer with built-in MIDI control.
Finally, in 2011, three decades after the release of the original JUPITER series, Roland released the fully digital JUPITER-80 and JUPITER-50. These synthesizers were successors to the 1980s originals.
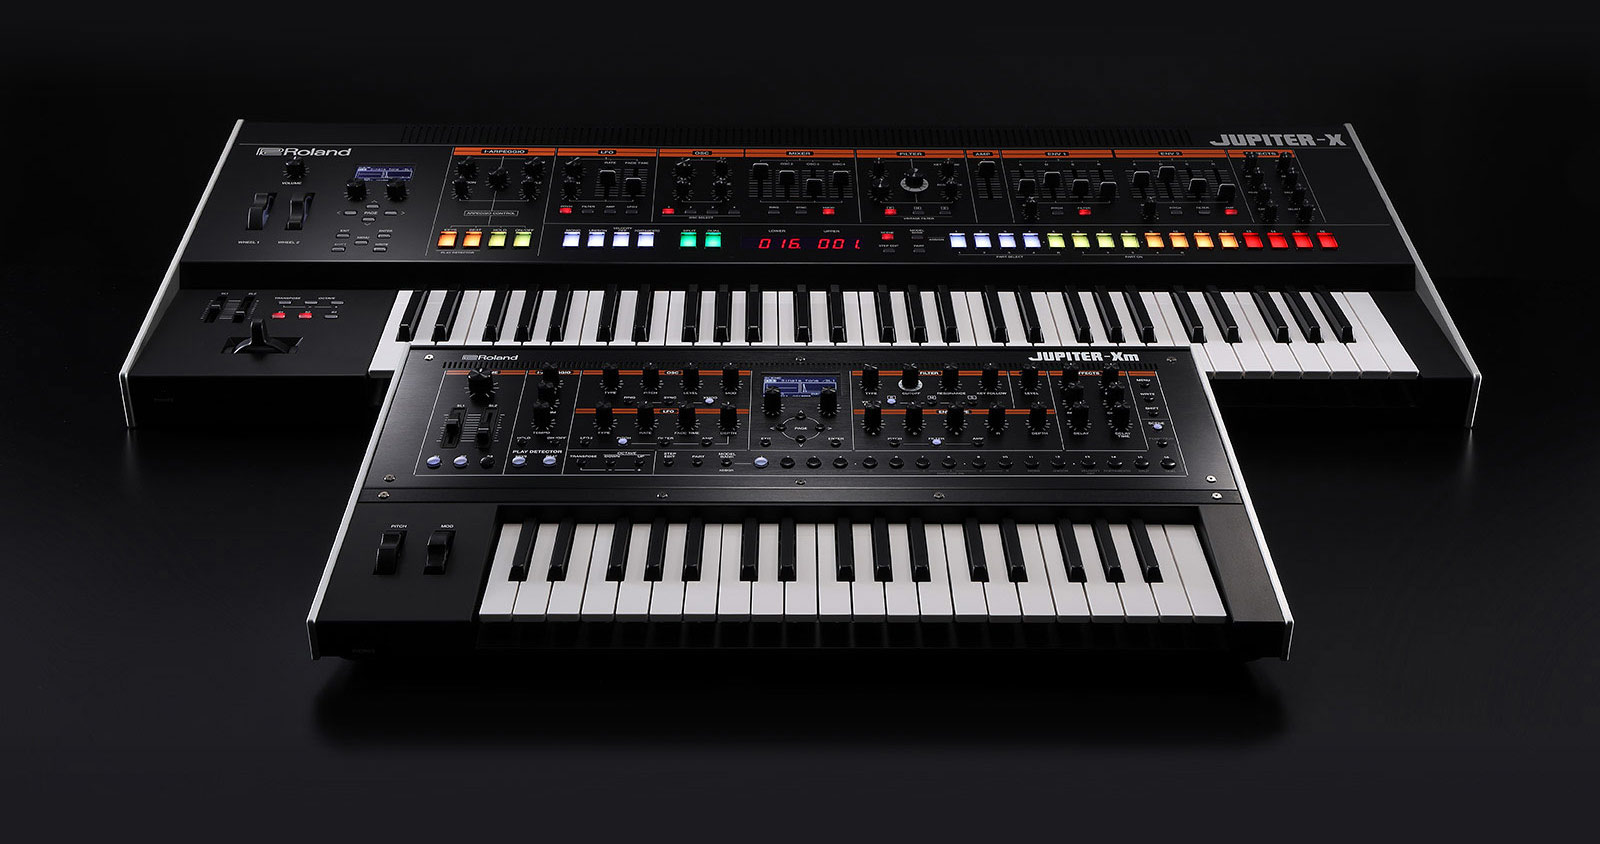
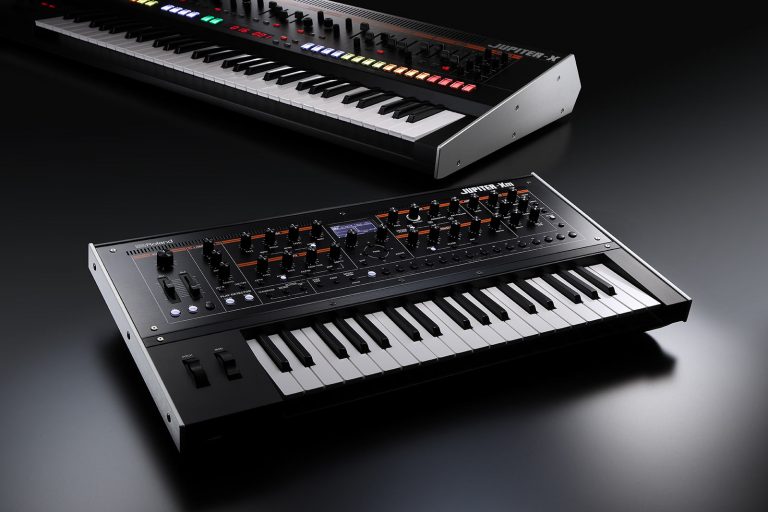
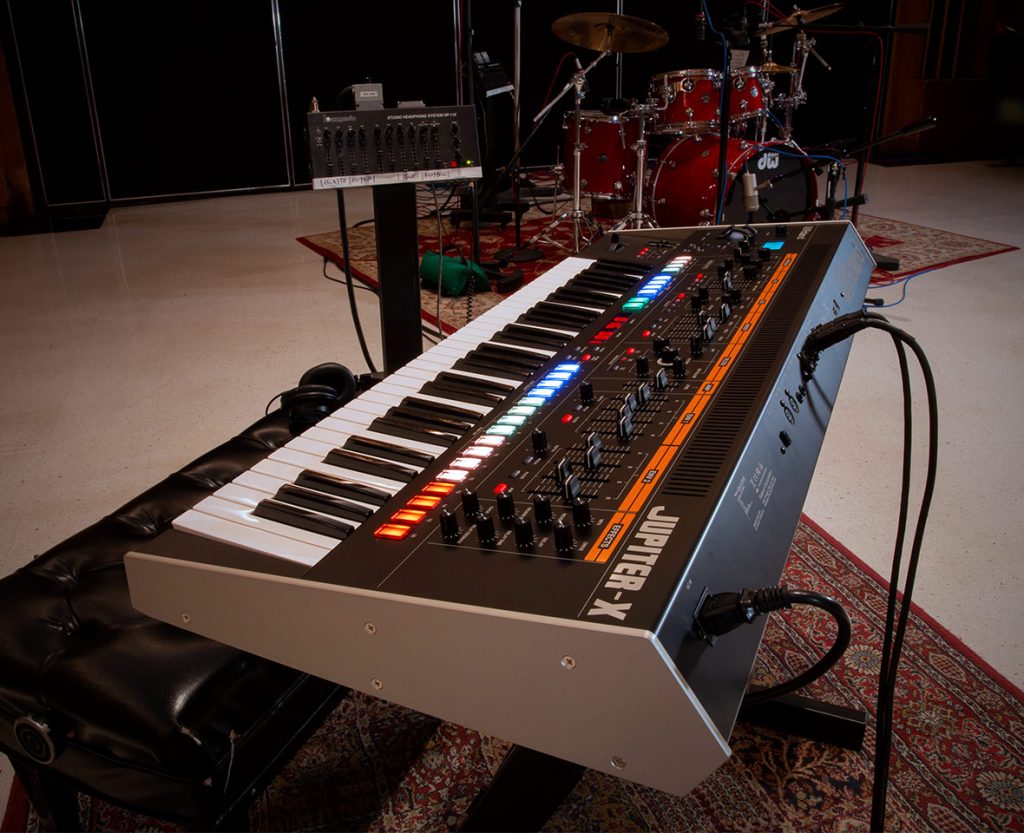
The Roland JUPITER-X and JUPITER-Xm are the next step in the evolution of Roland’s famous synthesizers. This Ultimate Guide has everything you need to know about the JUPITER-X and the JUPITER-Xm and will continue to grow with updates, expansions, and extra tips and hints.
Classic Analog to Vintage Digital and Beyond
JUPITER-X contains our latest sound engine, capable of reproducing Roland’s synths from our history of genre-defining sounds. In fact, it’s so flexible it can reproduce analog classics like the JUPITER-8, JUNO-106, and SH-101, as well as machines like the XV-5080 and RD pianos.
You also get Roland drum machines that form the foundation of electronic and dance music. These include the TR-808, TR-909, CR-78, and others. In summary, it’s a studio of vintage gear, with modern features and a deep synth engine to explore unmapped sonic territory.
A Sonic Icon
To begin with, the JUPITER-X is the peak of Roland synthesizer sound quality and design. The all-metal build uses premium materials throughout. Additionally, the all-new aftertouch-enabled keyboard is the best we’ve ever made. An ergonomic layout with a large selection of knobs and sliders let you control and easily edit your sounds. In summary, you’ll be ready for producing in the studio or performing on stage.
The Same Engine
The JUPITER-Xm has the same engine. Utilize a massive selection of sounds, which are expanding all the time. It can jam with you, inspire you, and capture your ideas. Moreover, the synth is portable, and doesn’t need any cables or wires to function—not even for power. Above all, the JUPITER-Xm is an entire production and performance environment that slides under one arm.
Understandably, with so many ways to control the sound and engines included, first experiences can be overwhelming. Therefore, these tips will answer your questions and get you straight into making new sounds and sequences. In addition, the free JUPITER-X Editor for macOS and Windows provides a friendly graphical interface that makes it even easier to harness the limitless creative potential of these powerful instruments.
Get Acquainted
The Roland JUPITER-X & Xm give you preloaded models of the JUPITER-8, the JUNO-106, the JX-8P, the SH-101, the XV-5080, and RD pianos. There’s more to come. In addition, they also include Roland’s ZEN-Core synth engine which contains 50 years of synthesizers techniques.
Equally important, the ZEN-Core multi-timbral engine combines Virtual Analog and PCM (up to 256 voices) synthesis types with powerful DSP effects. Advanced synthesis features include new VA Oscillators, precisely modeled Filters, ultra-fast and smooth LFO and Envelope modulators, and high-resolution control of primary editing and performance parameters.
Layering
The JUPITER-X/Xm can layer five parts together. To start with, you can choose from four different synth engines (JUPITERS, JUNOS, and JXs, etc) plus one drum machine like a TR808, a TR-909, or a CR-78.
Furthermore, the JUPITER-X/Xm gives enough notes to be able to stack layers together, and still have heaps of polyphony, up to 256 notes. It also has three classic vintage filters built in starting with, “R” for Roland. Equally vital, there are the “M” and “S”, a pair of vintage filters you can use to craft your sounds.

Checking System Program and Updating
Throughout this guide we’ll show you different synth models and how to use and program them, as well as install new ZEN-Core sound packs and other newly added functions. To do this, you will need to make sure your JUPITER is running the currently available system firmware. Here’s what to do.
Get the latest system updates here.
Introduction to Scenes
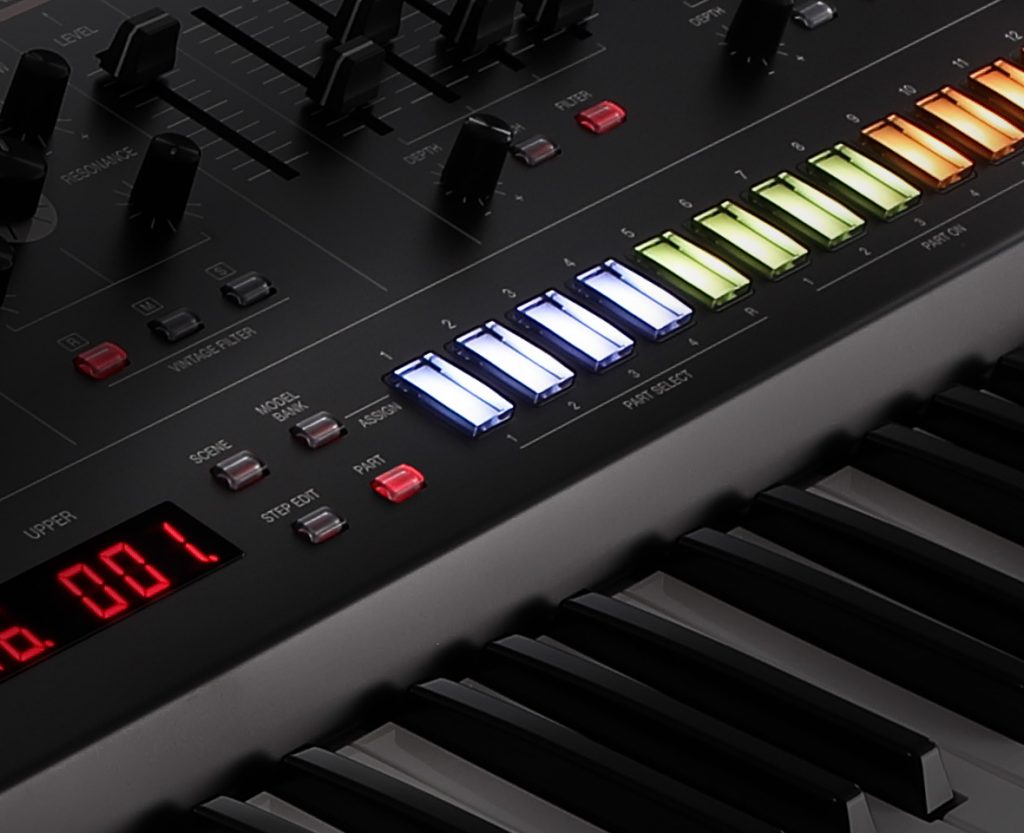
The JUPITER’s scenes contain up to four layers of synth and one drum patch, many have the new I-Arpeggio included, which will intelligently follow your playing. A scene stores the entire state of your favorite performance setting. This includes settings for each part (such as tone number, pan, and volume), settings common to all parts (such as reverb, delay, and chorus), and data for each part.
It is convenient to save your settings beforehand as scenes, and then switch between these scenes while you perform. In total, you can save a total of 256 scenes, organized as 16 scenes × 16 banks.
Scene Mode
When you first turn on the JUPITER -X/Xm, it starts up in “scene” mode, and the scene button will be lit. Next, press the numbered buttons across the front, and it will select different scenes that you can play.
Hold down the scene button and the current bank number button will flash. Press any of the sixteen buttons to select a new bank. Nothing will happen now until you select a new scene number, which will then select a new bank and scene number. Watch these videos to learn how to select scenes.
Playing Individual Synth Models
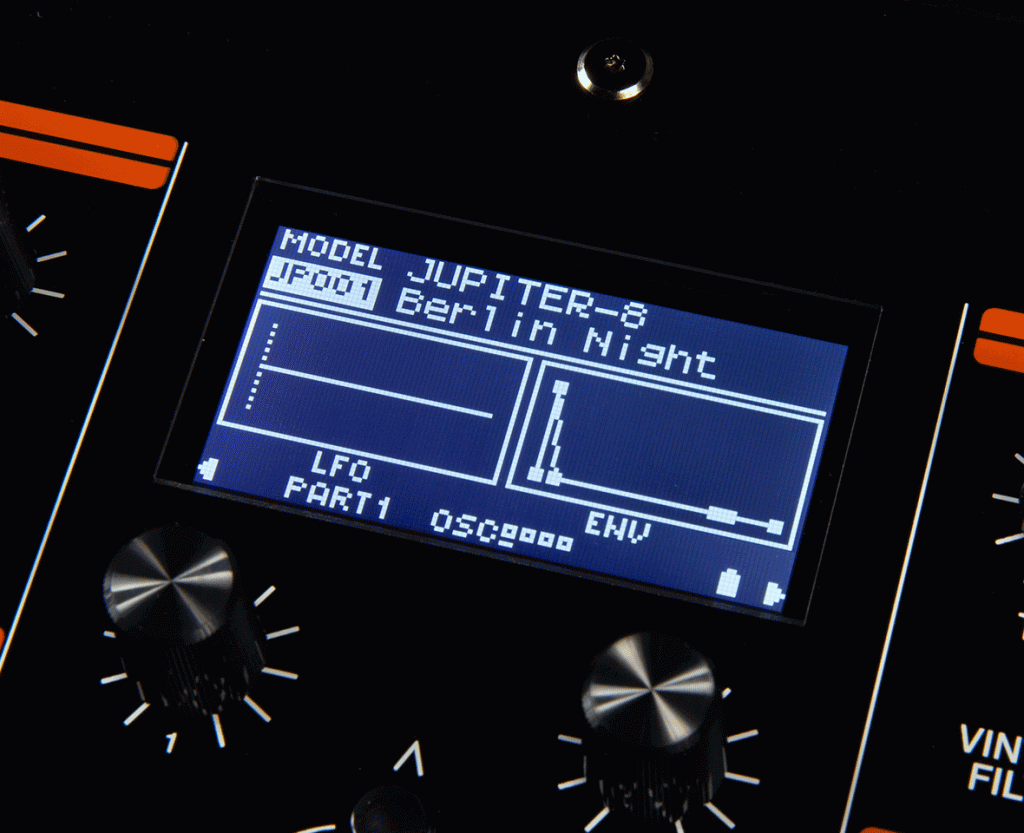
What is a “model”? A model is a sound engine that reproduces a specific vintage synth. For example, one model reproduces a vintage JUPITER-8 synthesizer.
Additionally, each model has unique parameters and effects. Keep in mind, the effect of operating the knobs and other controllers differ. This means that you can use a single JUPITER-Xm unit as if you owned a variety of units. You can create tones for each model. To access the individual synth models in the JUPITER-X/Xm, use an initialized scene.
Initializing a Scene
An initialized scene has no pre-programmed parameter information or effect settings. It’s a completely clean slate. First, hold down the scene button and select button number 16, and then press the number one button. Next, select bank #16, scene number 1 which will be an initialized scene. Finally, check the information screen. It should read, INIT SCENE.
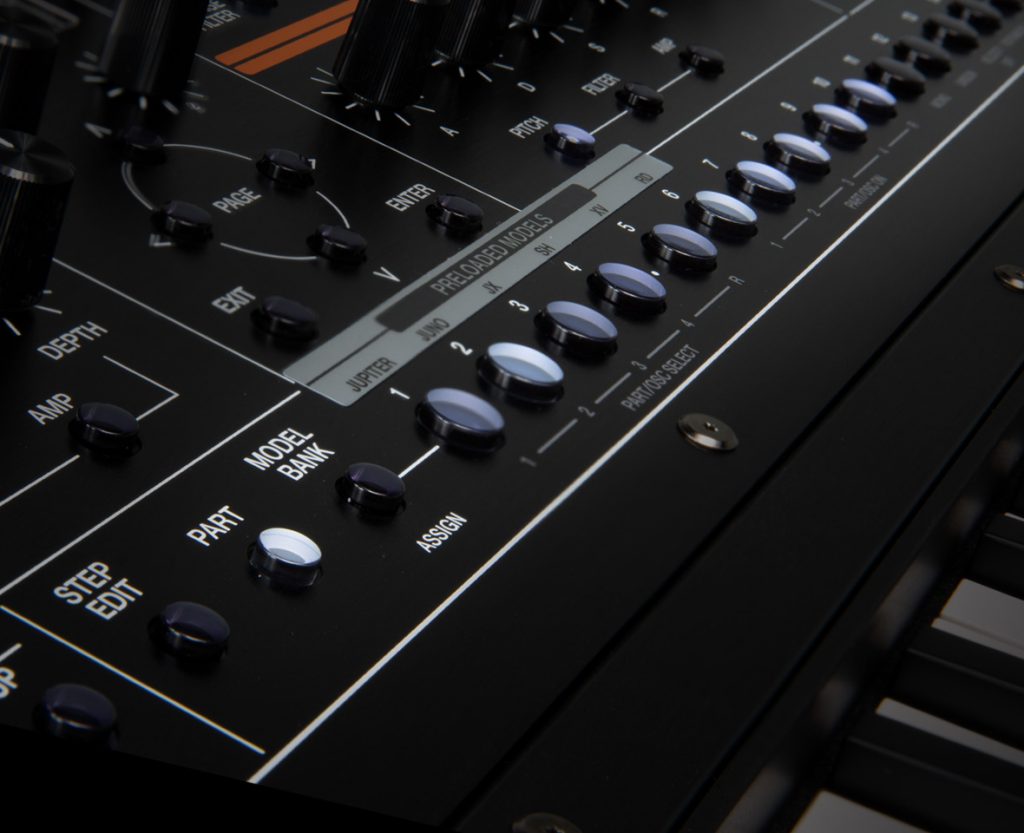
Now, press the model bank button. Pre-loaded models have a sticker above the buttons numbered 1 to 6. They represent the individual synthesizer models listed above as abbreviations. Button number 1 i all the JUPITER models, number 2 is the JUNO models etc. Finally, 7 and up are ZEN-Core patches.
Use rotary knob number 2 to scroll through and select different patches. Knob 1 will move you through the patches in increments of 10.
Selecting a Scene
In further reference to the previous tip, let’s learn how to initialize a scene. As mentioned, an initialized scene is for starting from scratch or to explore the different patches for different models. In particular, many of the existing scenes have parameters set to splits and layers of synths, I-Arpeggiator settings, and effect settings.
Choose a scene that you want to initialize. Then press the “Write” button. Look at the display, and repeatedly press the down cursor button until you reach the “SCENE INITIALIZE” menu selection. Once you’ve done that, press the “ENTER” button twice. Press “EXIT” and you’ll have an initialized scene. You’re now ready to create your own sounds.
Installing ZEN-Core Sound Packs
A huge benefit of the ZEN-Core Synthesis System is that sounds are compatible across a growing number of Roland instruments. Share ZEN-Core tones created on one instrument with other users or transfer them into different Roland hardware.
These Sound Packs are for use with compatible Roland products equipped with the ZEN-Core Synthesis System. In short, these curated collections fit genres or are inspired by an artist’s sound palette.
Selecting Scene Parts
The JUPITER-X/Xm has five parts, four parts for synths and one part for rhythm. Here I will explain how to select the different parts. If you want to create different layers or splits or edit the individual synths in a scene, you need to select the individual parts. Here is how to do it.
First, press the button labeled PART. Now the buttons 1 through to 5 will indicate the current selected part. For example, if button number 1 is lit, this means we are interacting with part number one and the model selected for this part.
Labelled underneath buttons 1 through to 5, is PART/OSC SELECT. It has numbers for part 1, 2, 3 and 4 and R for the rhythm part. Find the next set of buttons numbered 6 through 10 underneath 1 through to 4 and the title PART/OSC ON. These buttons give you the ability to turn on and off each individual part. For instance, if you wanted to layer parts 1 and 2, you must have PARTS/OSC ON 1 and 2 lit.
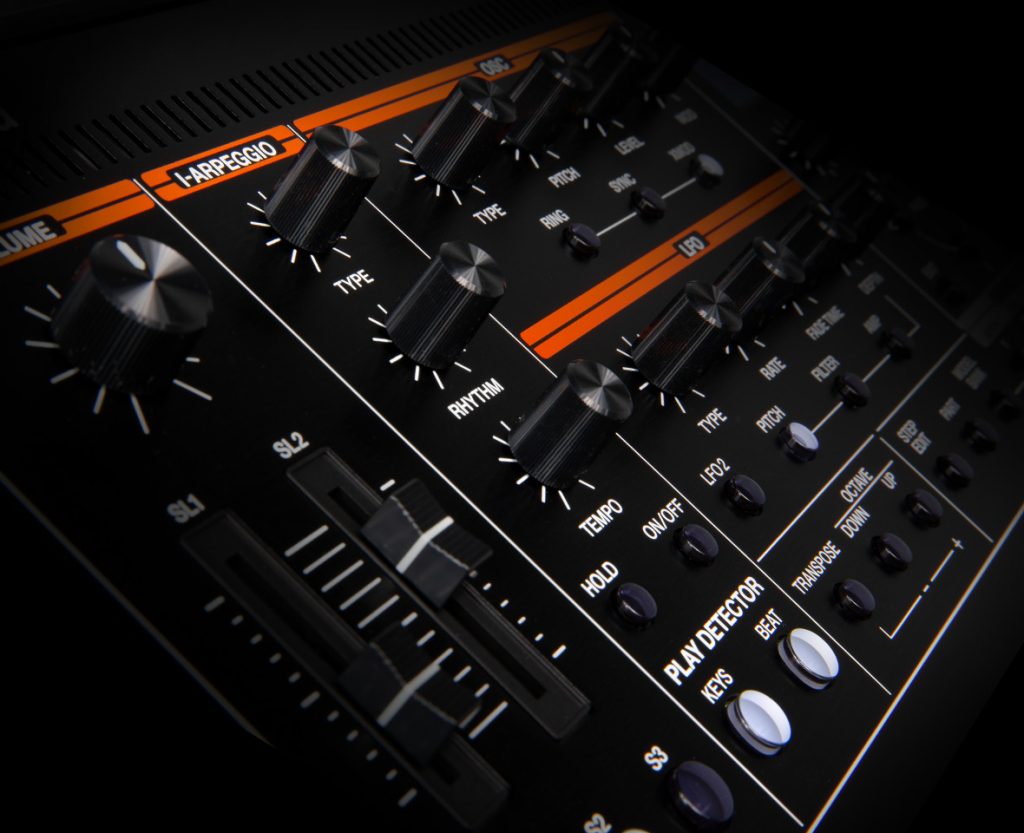
Introduction to I-Arpeggio
I-Arpeggio is a new type of arpeggiator. With it, built-in Artificial Intelligence analyzes your performance and switches to the perfect arpeggio pattern in real time. It differs from conventional arpeggiators in the many ways. I-Arpeggio allows multi-part performance. Most importantly, its AI lets you freely specify the parts to play manually and the parts the arpeggiator plays.
Depending on the type (TYPE) and rhythm (RHYTHM) you select, you can change the way your performance affects the arpeggio pattern. In fact, you can also enable or disable change. Accomplisg this by turning the PLAY DETECTOR [KEYS] and [BEAT] buttons on/off.
Creating a Backup
We’re going to show you how to edit scences and tones. However, in case you’re not happy with your edits and want to return the synth to a previous state, it’s good to know how to create a backup. Backups are also great for touring musicians, this way you can have your own custom patches and entire set on a USB stick.
Here’s how to back up user data to a USB flash drive. When you create a backup of your JUPITER-X/Xm it will include all scene data (including arpeggio settings and step edit data) and all of your user tone data as well as system settings.
Restoring a Backup
Basic Tone Editing
Selecting the oscillator to edit:
When the [FUNCTION] button is lit, press a [1]–[4] button. (The [1]–[4] buttons correspond to OSC (oscillator) 1–4 respectively. Oscillators differ depending on the model.
Selecting the oscillators that produce sound:
When the [FUNCTION] button is lit, press a [6]–[9] button. (The [6]–[9] buttons correspond to OSC (oscillator) 1–4 respectively.) Certain oscillators won’t operate with some models.
Switching Pages
Press a PAGE [<] [>] button: Selecting parameters
- [1] knob: Editing a value
- [2] knob: OSC (Oscillator)
Pitch is determined by the speed at which the waveform repeats. A waveform that takes one second to repeat is said to have a frequency of 1 Hertz (1 Hz). The higher the frequency, the higher the pitch. Conversely, the lower the frequency, the lower the pitch.
Filter
Modify the brightness of a sound by boosting or cutting specific frequency ranges. Boosting the high-frequency range produces a brighter sound, while boosting the low-frequency range produces a darker sound.
LFO (Low frequency oscillator)
You can modulate OSC, FILTER, and AMP at a rate specified by the LFO to create vibrato (by modulating the pitch) or tremolo (by modulating the volume).
Envelope
The OSC, FILTER, and AMP each has an envelope that operates each time you play a key. Respectively, they apply time-varying change to the pitch, tonal character, and volume. In addition, indivuals envelopes control each aspect of the sound.
Effects
In short, “Effects” allow you to modify or enhance the sound in various ways, such as by adding reverberation or delaying the sound.

Saving Sounds (Tones and Scenes)
The sound you create will change if you move a knob or select a different tone, and will be lost when you switch off the JUPITER’s power. When you’ve created a sound you truly like, save it as a user tone.
- Press the [WRITE] button. The WRITE MENU screen appears.
- Use the [1] knob or [2] knob to select “PART* TONE” (* is the part to which the tone you’re saving is assigned), and then press the [ENTER] button.
- Press the [1] knob to select the save-destination, and then press the [ENTER] button .
- If you want to rename the tone that’s being saved, use the PAGE [<] [>] buttons to move the cursor and use the [2] knob to specify characters .
- Press the [ENTER] button. A confirmation screen appears.
- To execute, press the [ENTER] button.
- If you decide to cancel, press the [EXIT] button.
Creating a Dual Layer Part 1
Imagine how fat a synth pad would sound if you could layer a JUPITER-8 with a JUNO-106. With the JUPITER-X models it’s easy. DUAL will layer the first two parts in a scene: part one and part two. This function works well if you’re in a scene, and you want to quickly layer two tones.
Begin with an initialized scene to make this process easier to learn. Select PART/OSC SELECT #1 by pressing button number. Then press MODEL BANK and choose what model synth you want to load. Next, rotate knob number two to scroll through and choose a tone that you like. Finally, select part two with button number two.
Creating a Dual Layer Part 2
Press button number seven being PART/OSC ON for part 2, to turn on this part. As you did when choosing a synth model, use rotary two to scroll through and select your tone.
If you’re using a JUPITER-Xm and the SCENE button is lit, press the FUNCTION button and then you can press the DUAL button and it will automatically layer part one and two together. For a JUPITER-X, you don’t need to press the function button as it has its own dual button. Another way to do this is to turn these layers off and on by using the PART/OSC ON buttons.
Creating a Split Layer
Here’s how to create a split layer. Begin with an initialized scene, and then using the PART/OSC SELECT buttons, choose your tones for part 1 and then part 2 as described in tip #7. When using the split or layer function, the JUPITER-X/Xm will choose the first two tones.
If you’re using the JUPITER-Xm, press the FUNCTION button and then the SPLIT button and press the key on the keyboard where you would like the split.
Playing the JUPITER-X? Simply press the SPLIT button and press the key on the keyboard where you want the split to be.
Creating an Advanced Layer Split
Here’s how to create an advanced layer split where we can layer two parts in the upper section of the keyboard and have one layer of bass synth on the lower part of the keyboard.
As mentioned previously, it’s always good to start from an initialized scene. In tip #13, we created a basic split using two sounds so in this example, we’ve already created a split point. Now all we have to do is add the third part. Lastly, go to the PART/OSC SELECT and press button number three.
Using the Vocoder
The “Vocoder” adds cool effects to a human voice. If you run your voice through the vocoder, you can give it a synthesized or robotic tone and control the pitch by playing the keyboard. Check out a supremely great vocoder cover by Gattobus below.
Connect a microphone to the rear panel MIC IN jack. The JUPITER-Xm supports dynamic microphones and electret microphones. It does not support condenser microphones.
Steps
- Use the rear panel [MIC GAIN] knob to adjust the volume.
- Make detailed adjustments to the MIC IN volume after you select the sound.
- Initially, set the knob to approximately the center position.
- While holding down the [MODEL BANK] button, press the [1]–[16] buttons to which you want to assign the vocoder.
- From the models, select “VOCODER.” Then press the assigned button to recall “VOCODER.”
- While playing the keyboard, sing into the microphone. Use the [MIC GAIN] knob to make fine adjustments to the volume.
Environmental Noise
Depending on the environment in which you’re performing, noise from the surroundings might be picked up by the mic. Consequently, this could cause the vocoder to not work as you intend. In this case, adjust the microphone sensitivity so that it is less likely to pickup noise.
- Press the [MENU] button.
- Use the [1] knob to select “SYSTEM,” and then press the [ENTER] button.
You can also make this selection by using the PAGE buttons instead of the [1] knob.
- Use the [1] knob to select a parameter, and use the [2] knob to edit the value.
- If you want to save the setting, execute the System Write operation.
- Perform “Saving the System Settings (System Write)”.
Assigning Controllers
On the left side of both JUPITER models, there are two sliders, SL1 and SL2, and there are three switches, S1, S2 and S3. The quickest way to set a certain parameter or function to any of these is to first press the shift button. Next, press the button or slider you wish to change and the functions will display on screen.
Here in this window, you can change what parameter the button or slider is accessing by scrolling through the available options using knob 2. Cursor up or down to change the other sliders or switches here. Alternately, use the shift button and touch the slider or button you would like to change. Furthermore, you can control many functions such as resonance, cutoff, release, modulation etc.
Editing Tones w/ Scene Offsets
Using scene offsets, you can change certain parameters such as attack, release, cutoff, and resonance and save this in the scene without having to save a new single tone. What is the benefit of this?
As an example, you can change the value of the filter settings for two layers of individual synths, without having to resave those individual tones as new tones. You’ve made new patch settings for your scene without altering the originally used tones. In the same way, you’re not changing other scenes that have been saved.
Getting Started
First, choose your scene by using the PART/OSC SELECT buttons to choose what part/tone you want to edit. Press the MENU button. On the screen select SCENE EDIT and press the ENTER button. Then press the right cursor to move over to the next screen. Now you should be in the SCENE PART EDIT window.
Hold down the shift button and move up or down to find MODIFY to change the parameters you would like to adjust. Use the cursor buttons to move to the parameter you want to change. Next, use knob 2 to change the setting. Once you’re happy, press the WRITE button, press ENTER and then choose a new patch to save over. Rename it and press ENTER as required.
Installing Drivers
Recording your performances into your DAW on your computer is a great way to compose songs and be inspired. To do this, you’ll initially need to install a dedicated driver on to your computer so that MIDI and audio can be sent to and from your JUPITER. Download the driver from one of the following URLs and install it on your computer. For more details on installation, refer to the Roland website.
DAW Setup
Connect a computer by USB COMPUTER Port so MIDI messages and tracks of audio can be exchanged with a computer via the JUPITER-X/Xm’s USB port.
Once you’ve correctly installed the JUPITER driver onto your computer (as per tip #17 above), plug the JUPITER into your computer using a USB cable. Open your DAW, whether it’s Logic, Ableton, Cubase etc and open your audio preferences in the DAW. Select JUPITER-X/Xm for the audio input and output. In your DAW, you can add six stereo audio tracks and a midi track and set their inputs to the JUPITER.
Track Breakdown
- 1 (inputs1/2) will be the stereo mix of your JUPITER.
- 2 (inputs 3/4) will be the stereo sound of PART 1 (Synth)
- 3 (inputs 5/6) will be the stereo sound of PART 2 (Synth)
- 4 (inputs 7/8) will be the stereo sound of PART 3 (Synth)
- 5 (inputs 9/10) will be the stereo sound of PART 4 (Synth)
- 5 (inputs 11/12) will be the stereo sound of PART 5 (Drums)
The MIDI track will record all MIDI coming out of the JUPITER including I-Arpeggio data for all parts.
You can expand this MIDI recording into separate tracks. Edit the MIDI and make it your own by arranging it how you like. Make sure that the MIDI track output is set to JUPITER when you want to playback the MIDI from your computer.
Using Onboard Effects
There are is a great selection of effects built into your JUPITER-X/Xm and with handy “go to” knobs, it’s really easy to control them. You’ll find in the top right hand corner of your JUPITER, the knobs for MFX, DRIVE, REVERB, CHORUS, DELAY and DELAY TIME.
For this reason, the JUPITER-X/Xm has its own multi-effect which is called [MFX] and there is one MFX for each part. You can use the [MFX] knob to adjust the MFX depth individually for each part. Select the PART/OSC SELECT buttons to use this know to change the amount of MFX effect for each part. In fact, there are 90 different MFX effects you can choose from and you can download the list and their parameters here.
Parameter Details
- [DRIVE], adjusts the amount of distortion for all parts together and will be affected only for parts whose Part: Output is “DRIVE”.
- [REVERB] adjusts the depth of reverb, again individually for each part and you need to select the PART/OSC SELECT buttons to use this to change the amount of REVERB for each part.
- [CHORUS] adjusts the amount of chorus, again individually for each part and you need to select the PART/OSC SELECT buttons to use this to change the amount of CHORUS for each part.
- [DELAY] adjusts the amount of delay, again individually for each part and you need to select the PART/OSC SELECT buttons to use this to change the amount of DELAY for each part.
- [DELAY TIME] knob adjusts the delay time for all parts together.
Turning Off Internal Speakers
Both the JUPITER-X and the JUPITER-Xm have cleverly designed built in speakers (four in fact) which actually sound really good. Because the JUPITER-Xm can be battery operated as well, this is great to have if you want to be creative on a bus or at the park.
Steps
- Press the [MENU] button.
- Use the [1] knob to select “System,” and then press the [ENTER] button.
- You can also make this selection by using the PAGE buttons instead of the [1] knob.
- Use the [1] knob to select “Speaker Out,” and use the [2] knob to edit the value.
In conclusion, are three options: “OFF,” “ON,” and “AUTO” which automatically leaves the speakers on unless you plug in headphones. This turns the speakers off.
Assigning MIDI Channel for Parts
You can specify a desired channel as the Basic CH (part 1), and part 2 and following will be assigned channels Basic CH + 1–4. In summary, this specifies the MIDI channel assigned to each part with MIDI channels being assigned consecutively. Each Part is below.
- 1: Basic Ch setting value
- 2: Basic Ch + 1
- 3: Basic Ch + 2
- 4: Basic Ch + 3
- 5: Basic Ch + 4
Controlling an External MIDI Device
MIDI messages are sent from the MIDI OUT connector. You can also send them from USB MIDI OUT when you operate the controllers of this unit. These include the knobs, keyboard, and various pedals connected to the rear panel.
Specifying MIDI
To specify MIDI input, do the following.
Press the [SCENE] button and Press the PAGE [>] button twice to access the scene part edit screen. Then use the [1] knob to select “Rx Ch,” and use the [2] knob to specify the channel that you want.
To save these settings, you must perform the scene write operation.
Specifying the MIDI output, do the following.
Press the [MENU] button. Then use the [1] knob to select “SYSTEM,” and then press the [ENTER] button. You can also make this selection by using the PAGE button instead of the [1] knobs. Now use the [1] knob to select “MIDI Tx” for the parameter that you want to output, and use the [2] knob to specify “ON.”
To save the setting, perform the system write operation.
Bluetooth Audio and MIDI
The JUPITER-X models both have BlueTooth connectivity. With Bluetooth you have the cool option of playing audio from your BlueTooth enabled device such as smart phones or tablets. This means you can play a track from iTunes on your iPhone through the speakers of your JUPITER-X, wirelessly. In short, it also gives you the ability to transmit and receive MIDI which means you could sequence from your tablet using ZenBeats for example.
Pairing
Before you begin using the Bluetooth functionality, you need to pair your devices, which is standard procedure when you are using Bluetooth devices. “Pairing” is the procedure by which the mobile device that you want to use is registered on this unit. The two devices recognize each other.
Steps
Here’s how to make the settings so that audio on your mobile device can be played wirelessly via the JUPITER.
- Place the mobile device that you want to connect nearby this unit.
- Press the [MENU] button. The MENU screen appears.
- Use the [1] knob to select “SYSTEM.”
You can also make this selection by using the PAGE buttons instead of the [1] knob. - Press the [ENTER] button. The SYSTEM screen appears.
- Use the [1] knob to select “Bluetooth Sw,” and then use the [2] knob to turn it “On.”
- Choose the [1] knob to select “Pairing,” and then press the [ENTER] button. The display indicates “PAIRING…,” and this unit waits for a response from the mobile device.
- Turn on the Bluetooth function of the mobile device.
Note: The explanation here uses the iPhone as an example. For details, refer to the owner’s manual of your mobile device.
- Tap “JUPITER-Xm Audio” that is shown in the Bluetooth device screen of your mobile device. This unit is paired with the mobile device. When pairing succeeds, “JUPITER-Xm Audio” is added to the list of “Paired Devices” on your mobile device.
- Press the [MENU] button when you’re finished making settings.
Connecting an Already-Paired Mobile Device
- Turn on the Bluetooth function of the mobile device..
- To disconnect, either turn this unit’s Bluetooth Audio function “Off ” (Setting 0 turn ”Bluetooth Sw” Off ) or turn the mobile device’s Bluetooth function off.
Playing Music from the Mobile Device
- Connect the mobile device via Bluetooth.
- On the mobile device, use a music app to play back music. The sound is heard from the JUPITER-Xm.
Transferring MIDI Data
- Place the mobile device that you want to connect nearby this unit.
- Turn on the Bluetooth function of the mobile device
Screen Parameters for Controllers
Looking for a way to move quickly to the edit screen for the parameter controlled by each knob? All you do is hold down the [SHIFT] button and turn the knob of the parameter that you want to edit and the setting screen appears. In addition, here are lists of controllers common to all models and the destination or operation when used with the [SHIFT] button.

Checking Settings Values w/out Sound Change
Is there a way to check the current value of a setting without affecting the state of the sound? Yes there is. Namely, all you need to do is hold down the [EXIT] button and operate the knob that you want to check .
In summary, the current value of the setting is shown but does not alter the current value of the parameter.
Controlling JUPITER-8 Instrument Parameters
JUPITER-Xm
- To learn which knobs and buttons on your JUPITER-Xm correspond to the JUPITER-8 parameters, download the controller/parameter list here.
JUPITER-X
- If you want to know which knobs and buttons on your JUPITER-X correspond to the JUPITER-8 parameters, download the controller/parameter list here.
Controlling JUNO-106 Instrument Parameters
JUPITER-Xm
- To learn which knobs and buttons on your JUPITER-Xm correspond to the JUNO-106 parameters, download the controller/parameter list here.
JUPITER-X
- If you want to know which knobs and buttons on your JUPITER-X correspond to the JUNO-106 parameters, download the controller/parameter list here.
Controlling JX-8P Instrument Parameters
JUPITER-Xm
- To learn which knobs and buttons on your JUPITER-Xm correspond to the JX-8P parameters, download the controller/parameter list here.
JUPITER-X
- If you want to know which knobs and buttons on your JUPITER-X correspond to the JX-8P parameters, download the controller/parameter list here.
Controlling SH-101 Instrument Parameters
JUPITER-Xm
- To learn which knobs and buttons on your JUPITER-Xm correspond to the SH-101 parameters, download the controller/parameter list here.
JUPITER-X
- If you want to know which knobs and buttons on your JUPITER-X correspond to the SH-101 parameters, download the controller/parameter list here.
Controlling XV-5080, RD-PIANO, and ZEN-Core Instrument Parameters
JUPITER-Xm
- To learn which knobs and buttons on your JUPITER-Xm correspond to the XV-5080, RD-PIANO & ZEN-Core tone parameters, download the controller/parameter list here.
JUPITER-X
- If you want to know which knobs and buttons on your JUPITER-X correspond to the XV-5080, RD-PIANO & ZEN-Core tone parameters, download the controller/parameter list here