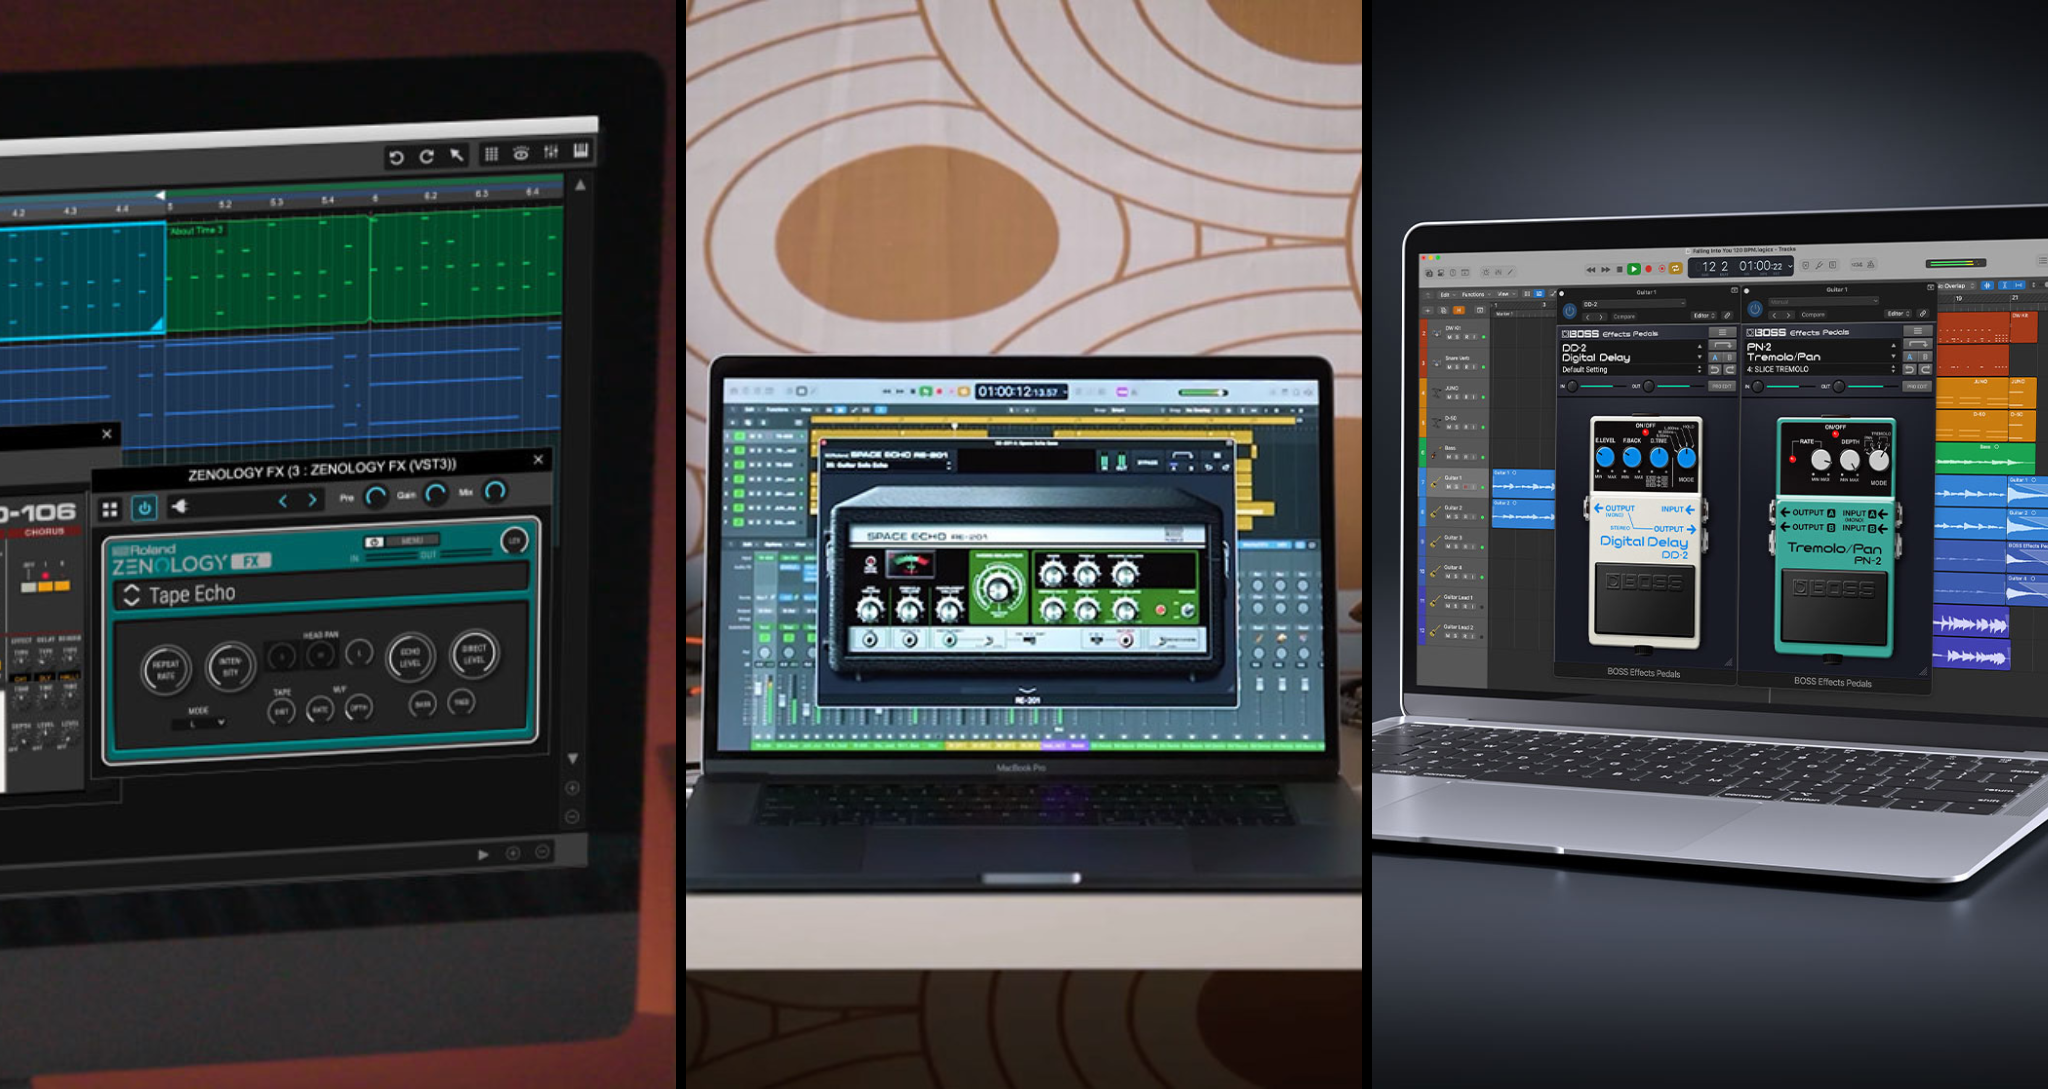
Roland Cloud instruments are so popular and varied that the audio effects in the collection can be easily overlooked. Between the iconic RE-201 Space Echo, ZENOLOGY’s multi-FX, and BOSS Effects Pedals, you have all the tools you need to supercharge your vocal production. Here’s how you can shape the tone with EQ, control the dynamics with compression, and build the ambience with chorus, reverb, and delay using plugins you already have.
Start with the Lead Vocal
The lead vocal performance is the centerpiece of any mix. How you process it will dictate how the rest of the vocal layers should sound. No plug-in can save a poorly recorded vocal, so it’s important to start your mixing session with takes you’re confident in. For home-recorded vocals, the key is to pick an environment away from surrounding noise. Your booth, even if it is a makeshift one, should sound warm with little to no echo. Remember: the less interference, the better.
"Your booth, even if it is a makeshift one, should sound warm with little to no echo."
After recording, comp the lead vocal, choosing your favorite moments from each take based on emotional delivery, pitch control, and timing. The comped performance should sound like a continuous take. When combining audio clips from multiple takes, ensure you insert crossfades to prevent unwanted pops and clicks. You can also cut out silent moments to eliminate hiss and rumble. As a general rule, every time an audio clip appears in your final mix session, it should have fades at both ends.
These precautions will help you achieve the best-sounding results in the future. Below is how my mix sounds after audio editing and polishing my vocals with Roland Cloud plug-ins. In the following section, we’ll break down how I got there.
Balance Tone and Dynamics
Early in the process, it can be tempting to reach for reverb or delay. But balancing the tone and dynamics first with EQ and compression will lead to healthier mixing decisions. ZENOLOGY FX offers multiple compression and EQ presets for you to choose from. To keep things simple, select Compressor under COMP/LIMITER in the preset menu.
When using compressors, the first two settings to focus on are the threshold and ratio. Threshold determines the volume level past which the compressor will come into effect. The ratio determines how much of that volume the compressor will let through.
If the ratio is set to 16:1, for example, the compressor will only let 1 decibel (dB) through for every 16 dB that reaches above the threshold. In other words, a compressor with a 16:1 ratio is much more aggressive than one with a 2:1 ratio. A compressor with a 2:1 ratio will only compress half the signal that peaks above the threshold.
Though the math is straightforward, there are too many variables in music. When applied to vocals, compression can produce sudden volume dips or harsh transients and consonants. This is why it’s best to combine two compressors with gentle threshold and ratio settings in most cases.
"When using compressors, the first two settings to focus on are the threshold and ratio."
Settings and Adjustments
In the first ZENOLOGY FX Compressor, try setting the ratio to 4:1 and adjusting the threshold until you see the input signal exceed it. Your goal here should be to compress the loudest moments in the performance only. If the compression effect sounds too abrupt, increase the knee level to smooth the transition between uncompressed and compressed moments. The attack (ATK) and release (RLS) knobs are provided to control how quickly or slowly you want the compressor to act. Because we want to tame the loudest moments with this compressor, a fast attack and release combo works well.
Next, insert another compressor with a 2:1 ratio to gently compress the dynamics of the entire performance. This time, the attack and release times can be much slower. Listening to both compressors in action, make small adjustments with the threshold and knee controls to find the sweet spot.
"A few subtle EQ adjustments can make your vocals sound cleaner, as well as brighter or darker."
During this process, increase the post gain to make up for the volume you lose to compression. In ZENOLOGY FX, the level (LEV) knob represents the output level of the effect. When it’s not turned all the way up, you’ll hear a mix of the raw signal with its affected version.
Now, a few subtle EQ adjustments can make your vocals sound cleaner, as well as brighter or darker. The Equalizer preset listed under FILTER is a good starting point. With the LOW fader, reduce the volume of frequencies below 100 Hz to eliminate room noise in the bass range. The rest of your EQ decisions should depend on the type of voice, microphone, and instrumental track you’re working with. In this case, I chose to subtly tame the resonance buildup at 1.25 kHz and applied a gentle boost at 3.15 kHz to add clarity.
Separate Time-Based Effects
Applying compression and EQ directly on the vocal channel makes sense because the goal is to hear each effect in full. However, with time-based effects like chorus, reverb, and delay, moderation is key. This is why you should consider placing each time-based effect on a return channel. Another benefit is that you can send multiple vocal layers to the same effects channels to create cohesion in the mix. Since the lead vocal will be the loudest layer, building the ambience around it is a solid strategy.
First, consider what’s missing in the mix. My ears were longing for harmonic excitement and reverb, so I inserted the JC-120 on the first auxiliary channel. This may seem like an odd choice, since Jazz Chorus is primarily an amplifier for electric guitars. But in its digital form, it can be repurposed as a multi-effects plugin.
"Since the lead vocal will be the loudest layer, building the ambience around it is a solid strategy."
By turning the bass and treble all the way down, I created a bandpass filter that muffled the sound. I wanted to saturate the midrange of the vocals, so I turned the Distortion knob all the way up. After that, I mixed in plenty of reverb. Then, I expanded the display to view additional options to color and widen the sound. Keeping the Stereo Mode in Dual and increasing the Ambience Width and Level added a lush quality. Finally, under the microphone panel, I chose Blend A and Long Distance after auditioning all the available options.
In vocal mixes, relying on a single type of reverb can often fall flat. To inject more space into the mix, I placed the RE-201 on a separate return channel, then switched on P.A. and Echo to hear the full effect. I turned the Mode Selector knob to Reverb Only and increased the Reverb Volume.
To eliminate muddiness, I lowered the bass and increased the low-cut level in the expanded display. Similar to my approach with JC-120, I implemented a bandpass filter by turning the high-cut level up as well. After that, it was all about aging the reverb. I experimented with Tape Speed, Condition, and Wow/Flutter (W/F) controls. A little goes a long way.
On another auxiliary channel, the standalone JUNO-60 CHORUS in TYPE I thickens the vocal beautifully. To view the additional controls, click on the LEVEL button and turn the MIX fader all the way up to WET to hear the full effect. In this case, I chose to use the JUNO-60 CHORUS without the noise for a clean vocal mix.
This cumulative ambience enriched the sound, but it was still lacking in depth. To remedy this, I inserted two ZENOLOGY FX plugins on another return channel. For tasteful echoes, I first shaped the frequencies of the incoming vocals with the EQ preset Spectrum. Reducing the volume of high frequencies can help minimize distracting sibilance in the echoes and give the illusion of an underwater effect.
In the second ZENOLOGY FX plugin, the Mid-Side Delay preset enabled me to design multiple dispersed echoes simultaneously. With this particular preset, you have the freedom to pan each echo occurring both in the middle and the sides in any direction you want. This way, the delayed vocals never take attention away from the lead part.
"Reducing the volume of high frequencies can help minimize distracting sibilance in the echoes and give the illusion of an underwater effect."
I turned the SYNC button on in both MID and SIDE panels, setting the delay to quarter notes (1/4). You can have up to four echoes in both the middle and the sides. Taking full advantage of this feature, I selected the 4Tap mode in both panels. To keep the middle echoes from cluttering the lead vocal, I engaged the HF DAMP at 630 Hz. After that, I panned the echoes in various directions for a satisfying stereo image.
Because each reverb and delay effect lives in its own return channel, you have the freedom to fine-tune their frequencies. Using ZENOLOGY FX Equalizer or Spectrum presets, I cleaned up the bass range. I also brightened or darkened each time-based effect and tamed their overpowering resonances.
Soloing each return channel makes it easy to pinpoint problem areas. Soloing all the return channels together allows you to assess the atmosphere and figure out what’s missing. You can also solo the lead vocal, mute all the return channels, and unmute them one by one to mix each effect to taste.
Group Background Vocals
Now that the lead vocal sounds a lot more polished, it’s time to focus on the background vocal layers. Treating each vocal layer individually can require significant processing power from your computer. To relieve the CPU, try grouping the layers based on their function in the arrangement.
I decided to go with three groups. I created one group for two layers of the same part that harmonize with the lead. Then, I grouped the three-part harmony vocals, totaling six layers. The ad-lib vocals fell under a separate group. This way, I could effectively EQ and compress each group of vocals with ZENOLOGY FX.
Panning each background vocal part and its double in parallel left and right, I filled the entire stereo spectrum with my voice. Then, I adjusted the volume level of each part, keeping the lead vocal at the forefront.
"Treating each vocal layer individually can require significant processing power. To relieve the CPU, try grouping the layers based on their function."
The low harmony vocals in the second half of the track meshed well with the lead vocal when I sent them to the return channels for JC-120, RE-201, and ZENOLOGY FX Mid-Side Delay. But I wanted the three-part harmony vocals to sound more ethereal, so I added another return channel to the session.
After applying a bandpass filter with the ZENOLOGY FX Spectrum, I reached for the BOSS Effects Pedals Digital Delay. I clicked on the PRO EDIT button to view all the features and turned TEMPO SYNC off. In long (L) mode, I increased the delay time and feedback until the space filled up with gently fading echoes. I sent the same vocals to JC-120 and RE-201 as well, making them sound even more ethereal.
With the ad-lib vocal group, I took a slightly different approach. After applying compression, I inserted the Space Echo RE-201 directly on the submix channel. I turned the switch to INST and selected mode 5 for a blend of reverb and echoes. With the TEMPO SYNC button on, I set the echo REPEAT RATE to 1/4. After that, it was all about balancing the echo intensity and volume with the reverb level. Following it up with a bright Equalizer on ZENOLOGY FX, I sent the ad-lib vocals to the same RE-201 return channel that all the other vocals shared. This way, they could benefit from a double dose of reverb.
Automate for a Harmonious Blend
At this point, all the vocals sounded cohesive and mixed into the instrumental. But no mix is complete without some finishing touches via automation. You can automate just about anything in most DAWs, including many settings in Roland Cloud plug-ins. But in this case, all I had to do was make some volume and panning automation edits to finalize the mix.
I paid special attention to the lead vocal, adjusting the volume of any instances that stood out in the mix. I also lowered the volume of a couple lines in the harmony vocal group and boosted the tail of a couple of words in the three-part harmony stack.
Since the ad-lib vocals were mostly textural rather than stacked, each layer’s placement in the stereo spectrum was a matter of taste. I only felt the need to automate the panning in one ad lib vocal moment to create more space between the overlapping layers. Below, you can hear how all the vocals blended together in the end.
"You can automate just about anything in most DAWs, including many settings in Roland Cloud plug-ins."
Wake Up (Vocal Production Demo)
Wake Up (A Cappella)
Final Tips
It didn’t take much intensive editing to make this vocal mix work, but each mix is different. Sometimes, no matter how much thought you put into each effect, it may not sound right without a more granular approach.
In such cases, you can always get creative with momentary effects. From delay throws to instances of flanger or distortion, there are plenty of ways you can have fun with vocal production. Bounce the affected vocal textures in place to fade them in and out easily without slowing down your computer. When you work with such intention and efficiency, no limits stand between you and your creativity.