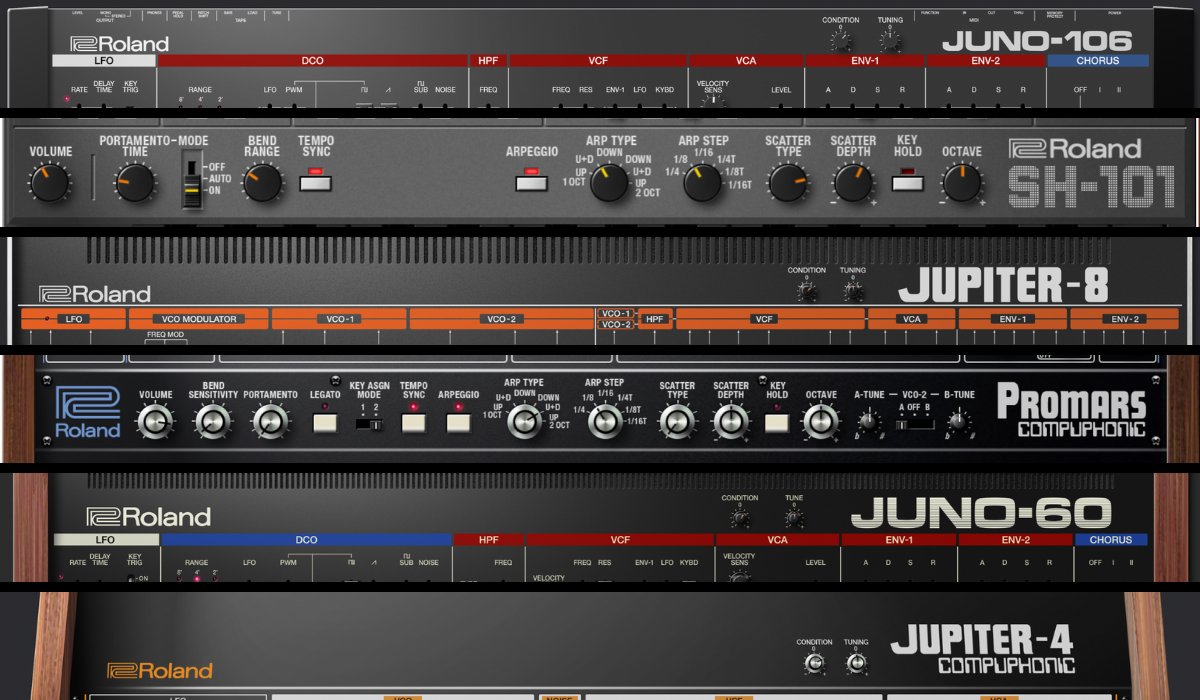
Roland Cloud offers plenty of powerful instruments, some of which are more complex than others. Luckily, several user-friendly synths in the Legendary collection share a similar visual design. Whether you’re just starting out or already on your way, this tutorial will guide you through your synthesis journey with six classics: JUNO-60, JUNO-106, JUPITER-8, JUPITER-4, PROMARS, and SH-101.
GUIDE
Shared Architecture and Visual Design
All these Roland Cloud synths use a signal path that’s easy to follow from left to right.
- Voltage or Digitally Controlled Oscillator (VCO or DCO): The sound source
- Voltage Controlled Filter (VCF): The sound sculptor
- Voltage Controlled Amplifier (VCA): The sound projector
SH-101 is a monophonic synthesizer with a single VCO. The original JUPITER-4 contains a single VCO but can play up to four notes simultaneously. The Roland Cloud emulation expands its polyphony to eight notes.
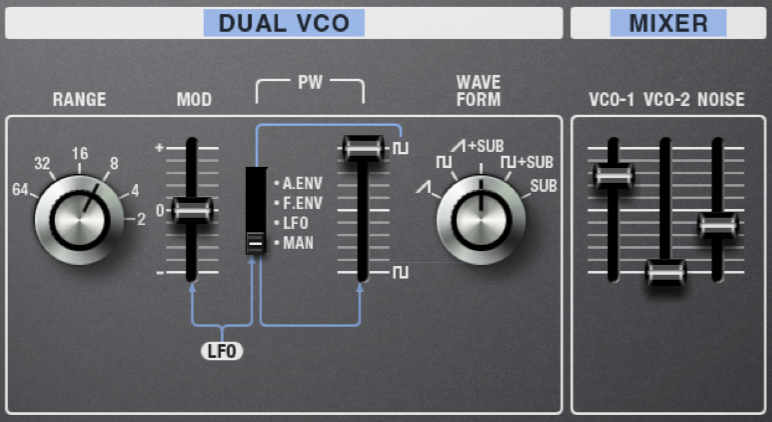
JUPITER-4’s monophonic cousin, PROMARS, has a dual VCO. Another polyphonic synth, JUPITER-8, also houses two VCOs you can mix to taste. JUNO-60 and JUNO-106 emulations feature DCOs with adjustable waveform levels and eight-voice polyphony.
Decades ago, tuning instability in VCO-based hardware synths led to the invention of DCOs. Today, Roland Cloud offers the precision of software with the character of analog hardware.
Core Features
Now that we’ve covered the big picture, let’s dig into what’s happening within each module.
Voltage or Digitally Controlled Oscillator (VCO or DCO)
Most synths using VCO or DCO technology share standard waveforms.
- Sine wave: A single pitch with no harmonics. Perfect for pure tones.
- Triangle wave: Contains some harmonics, but you’ll still hear the fundamental frequency very strongly. Great for basses and plucks.
- Square wave: Richer in harmonics with a hollow tone. Ideal for deep basses, clarinet or flute-type sounds, and bell patches.
- Sawtooth wave: Buzzy and full of harmonics. Excellent for leads, drones, and aggressive bass lines.
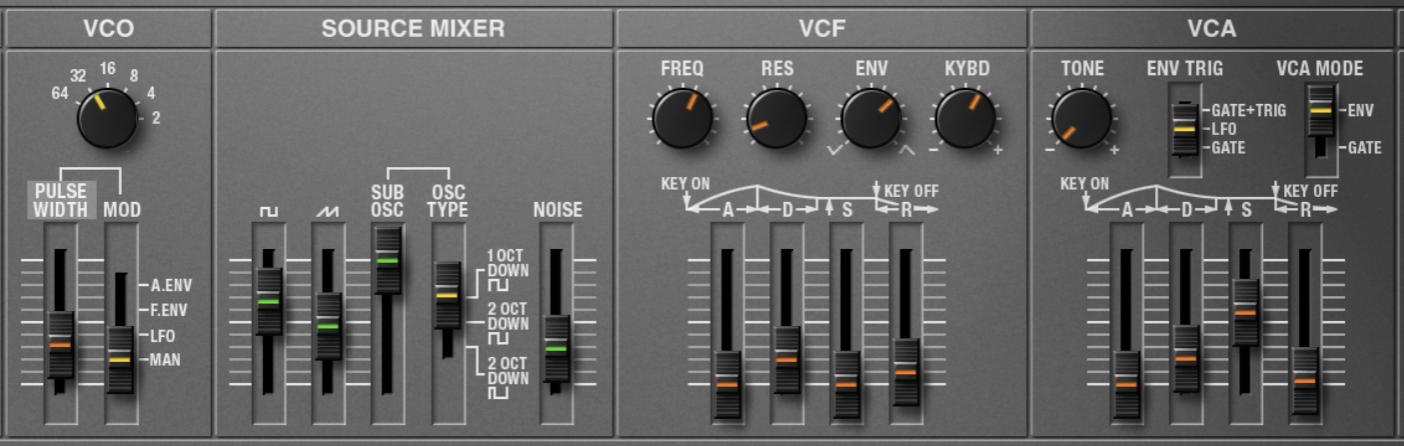
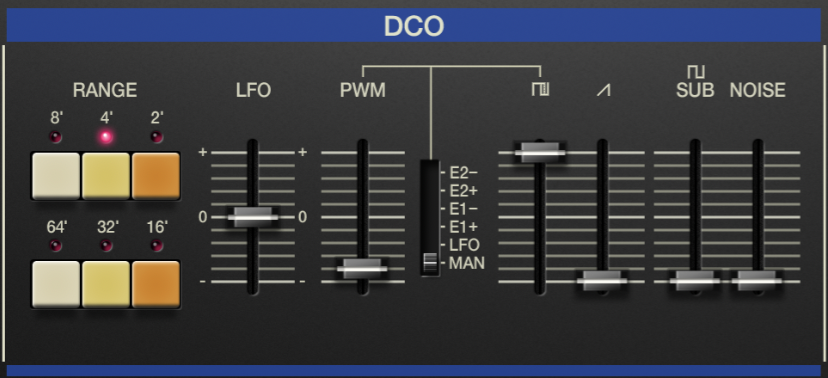
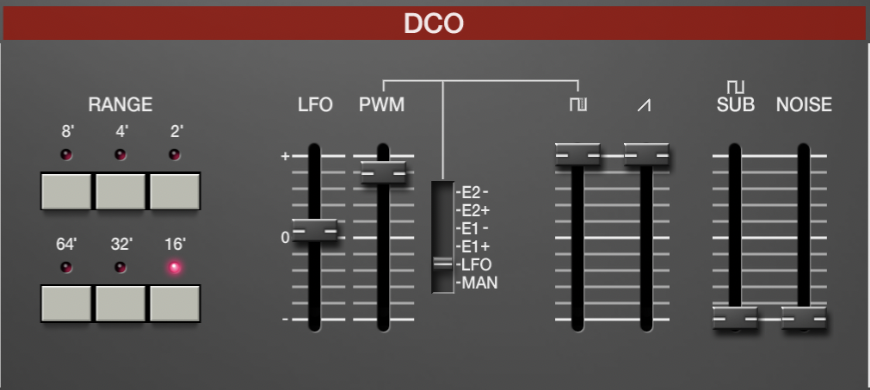
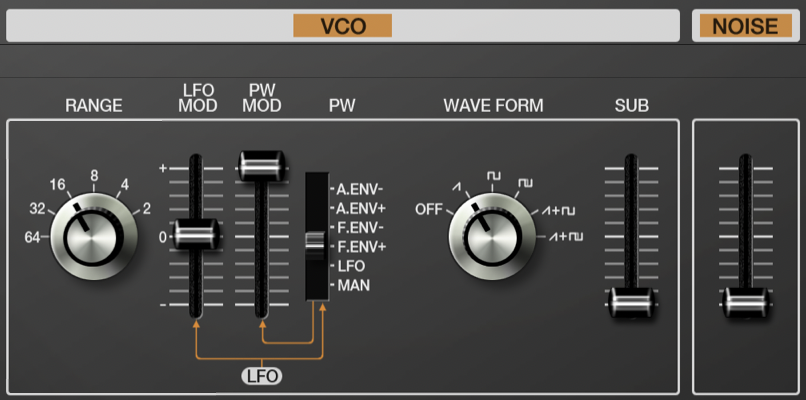
- Pulse-width modulation: Modifies a square wave into an asymmetrical shape, creating dynamic timbres. In synths like PROMARS, you can control pulse width and modulation rate with separate faders. Solid choice for ambient pads and string textures.
- Sub: Adds low-end power to any patch by generating a layer an octave below the original pitch.
- Noise: All of these synths come with a noise fader, except for JUPITER-8, where Noise is available as a waveform selection under each VCO. This is useful for drums, transitional effects, or adding grit to leads and plucks.
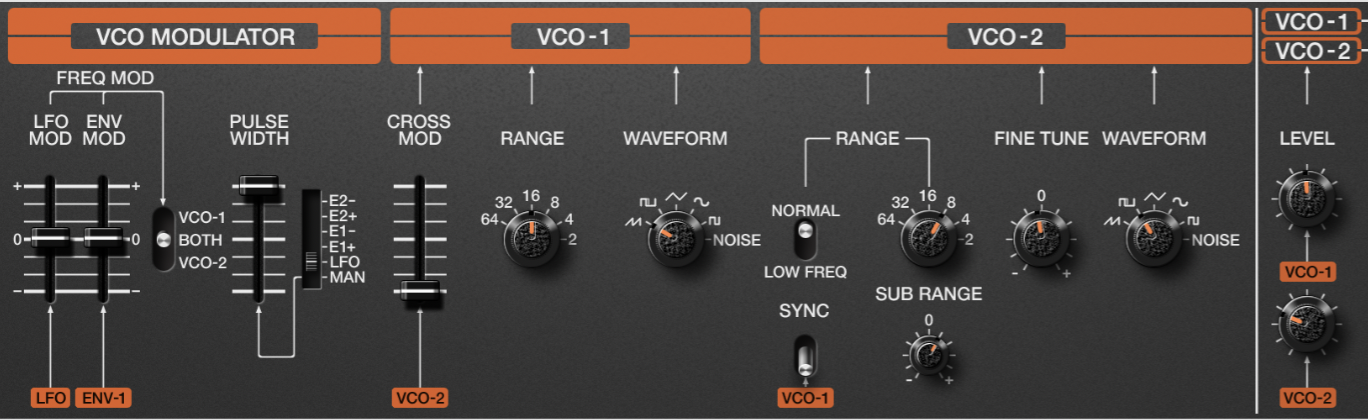
Some synths include the complete set of sound generators, while others are more limited. JUNO-60 and JUNO-106 don’t have sine or triangle waveform faders. JUPITER-8 has all the waveforms under not one, but two VCOs, which you can cross-modulate. With every synth, you can adjust the oscillator octaves using RANGE knobs or buttons.
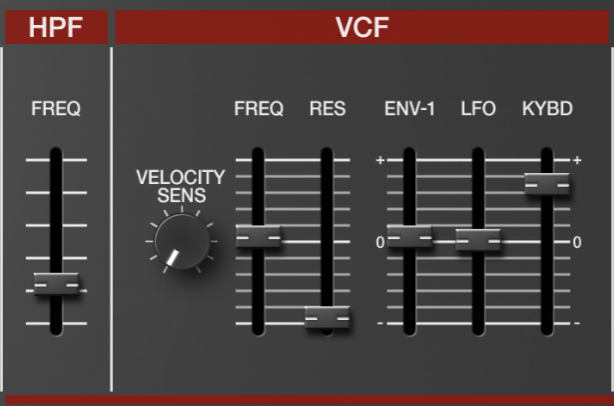
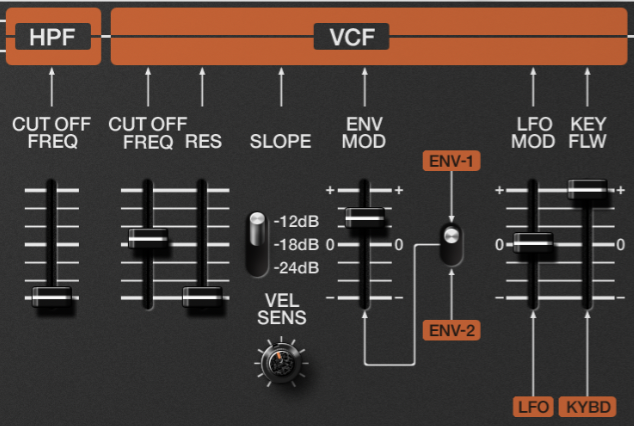
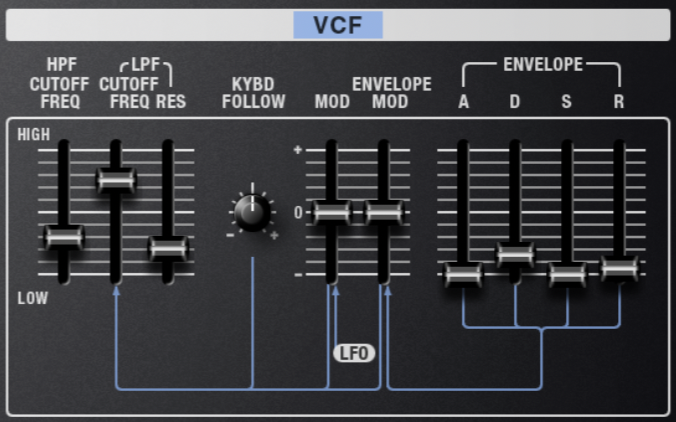
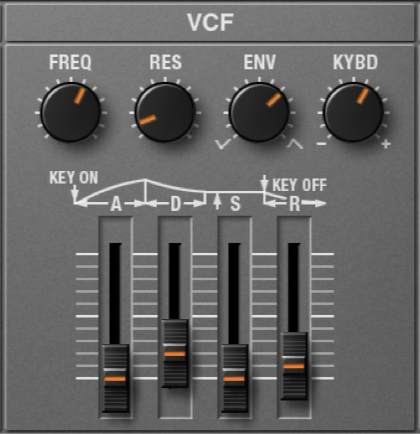
Voltage Controlled Filter (VCF)
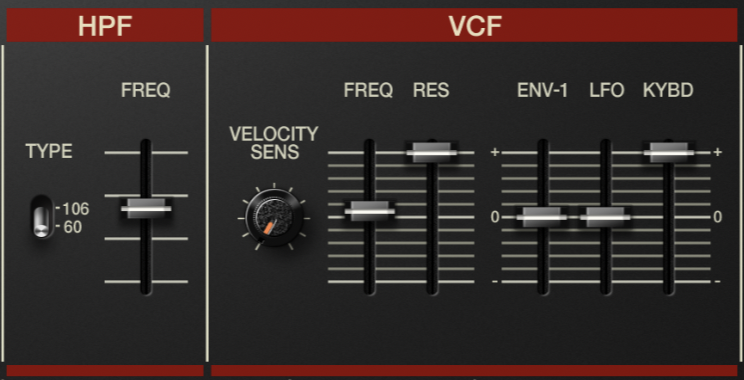
Advanced synths like the JUPITER-8 feature more complex VCFs, but all six share key filter parameters.
- FREQ: Controls the cutoff frequency of the low-pass filter.
- RES (Resonance): Emphasizes frequencies at the cutoff point, sharpening the sound.
- ENV (Envelope): Assigning an envelope to the VCF lets you shape the filter’s attack, decay, sustain, and release, affecting how the brightness evolves over time.
- KYBD / KEY FOLLOW: Moves the filter’s frequency with pitch, making higher notes sound brighter. When both the RES and KYBD faders are all the way up, you can achieve a sine-like tone quality.
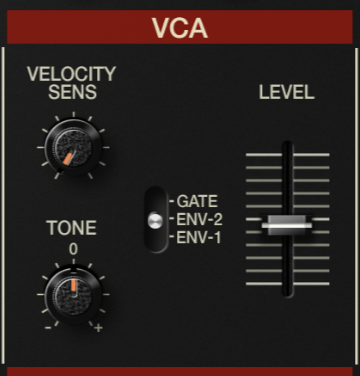
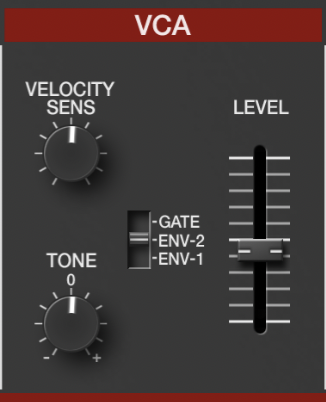
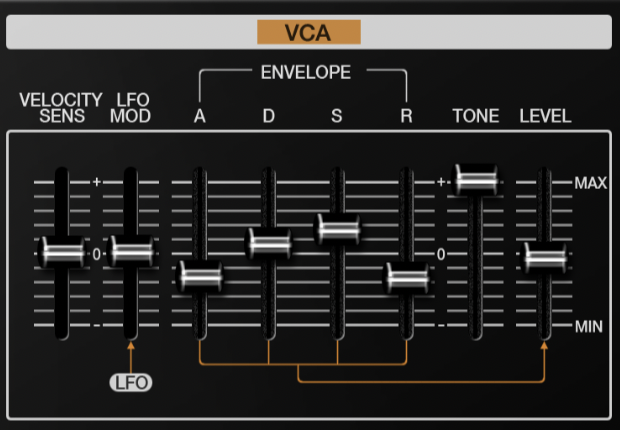
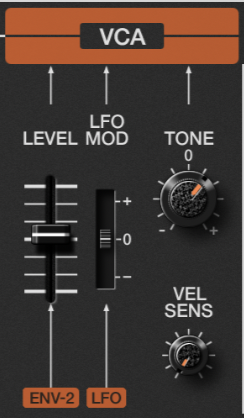
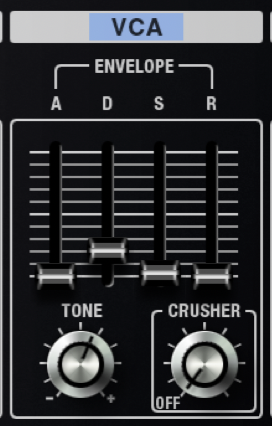
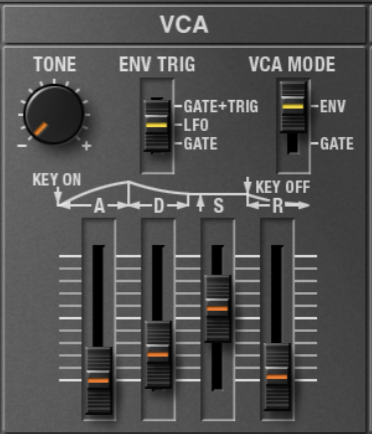
Voltage Controlled Amplifier (VCA)
If you are familiar with the Attack (A), Decay (D), Sustain (S), and Release (R) parameters, experiment with the VCA envelope to understand how they each affect volume over time.
For example, you can turn the attack fader up to create swells. Maxing out the release time leads to long-lasting drones. The title of each function is self-explanatory, but it takes practice to formulate patches you like.
Some VCAs include a Gate switch to hold the envelope for as long as you keep the keys pressed down. Found in all polyphonic models, the VEL SENS knob senses how hard or soft you play the keys. With the Tone control under each VCA, you can shape the frequencies independently from the VCF unit. As you design patches, you’ll rely on the LEVEL fader to achieve a healthy signal.
Tools That Add Movement
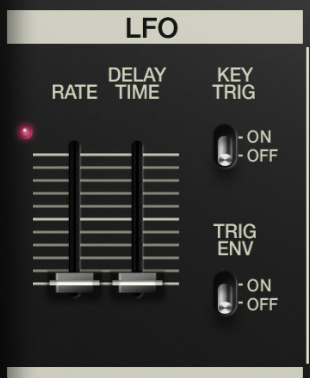
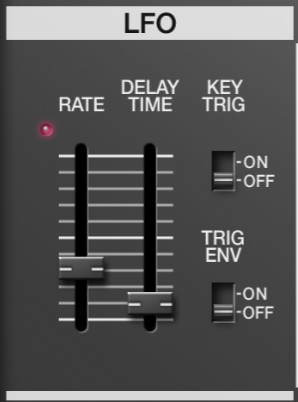
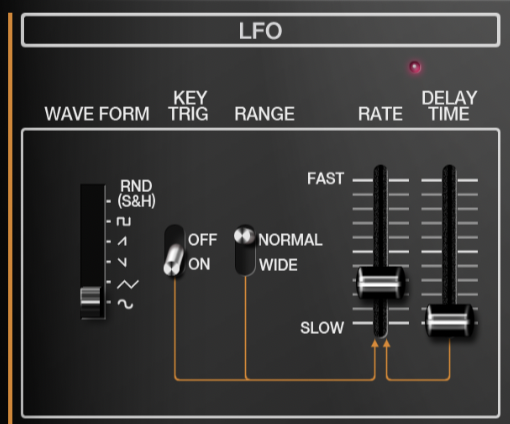
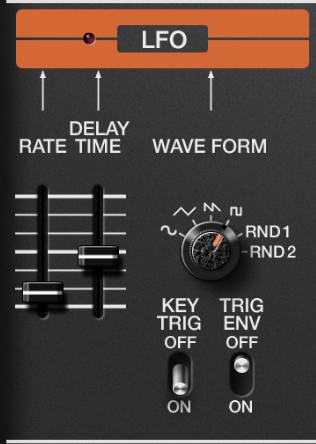
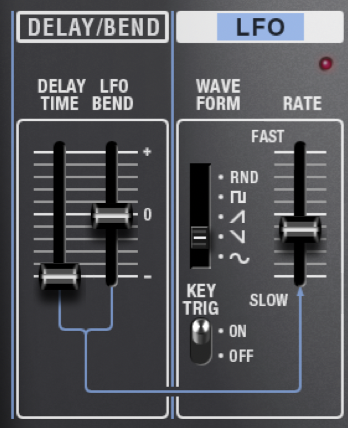
LFO (Low-frequency oscillation)
Remember those waveforms we discussed earlier? They dictate not only the type of sound you generate, but also how it moves. LFOs disrupt the continuity of the tone to add rhythm, vibrato, or wobble. Some LFOs let you choose the character of this disruption via a waveform switch. For example, if you want a pulsating synth, you can pick square wave in the LFO section.
Thankfully, all of these Roland Cloud synths can be tempo-synced. The rate selection ranges from the smallest note divisions up to two measures. You can also ensure that the LFO is triggered each time you play a note by turning Key Trig on. You can even delay the LFO using the DELAY TIME fader.
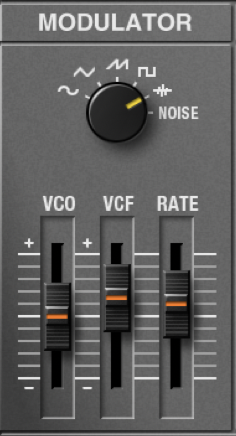
LFOs are capable of modulating the filter as well. For example, on the SH-101, this feature is placed under Modulator between the VCO and RATE faders. Some synths offer other LFO features too, like the JUPITER-8, which comes with two random waveforms for fluctuating movements.
On synths with a Trig Env switch, the envelopes only activate at the start of each legato phrase, adding fluidity.
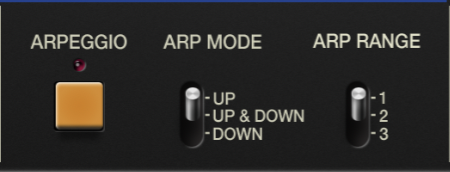
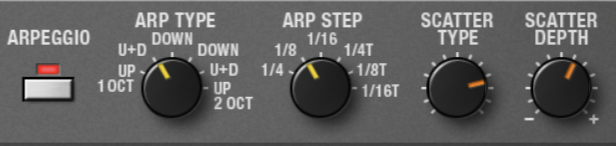
Arpeggio
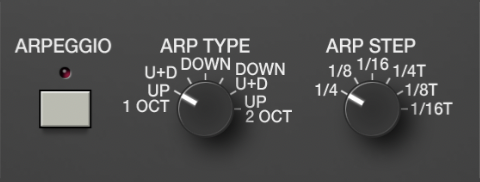
Thanks to modern software enhancements, all these synths can arpeggiate the chords you play. On the JUNO-60, you can choose from three ranges and modes. However, the JUNO-106 contains six different arp types and steps.
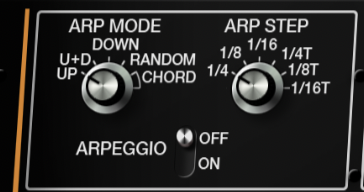
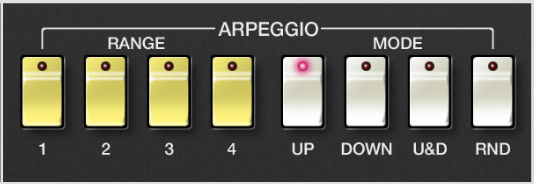
JUPITER-4 includes Chord mode to arpeggiate full chords without breaking them apart. The SH-101 and PROMARS can scatter arpeggios for colorful rhythmic variations. In general, arpeggiators are handy compositional tools, especially for rhythmic bass lines and melodic plucks.
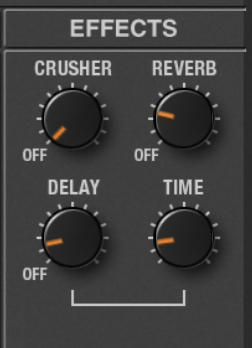
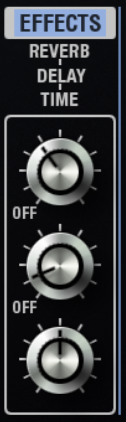
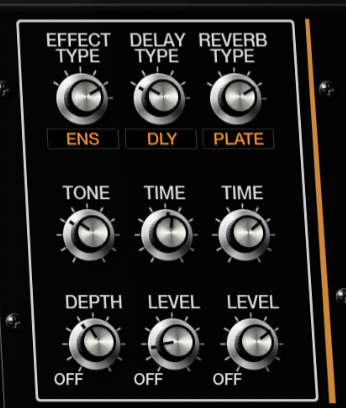
Built-in Effects
Each synth in this collection includes several built-in effects.
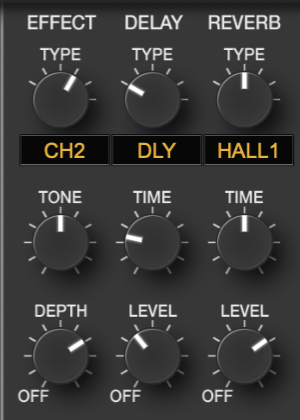
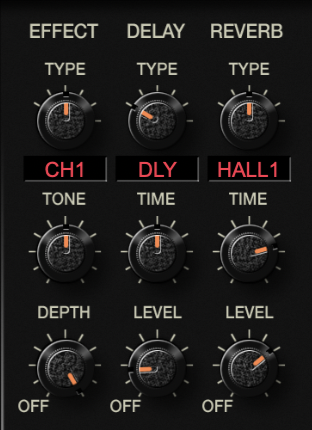
SH-101 and PROMARS offer a bitcrusher, reverb, and delay. JUNO-60 and JUNO-106 have expanded reverb and delay options, plus their iconic chorus effects with depth and tone controls. JUPITER-4 features an ensemble switch instead of chorus for a similar widening effect.
All the polyphonic synths also include additional effects like fuzz, distortion, and flanger. With so many options available, you can often mix a patch without needing other plug-ins.
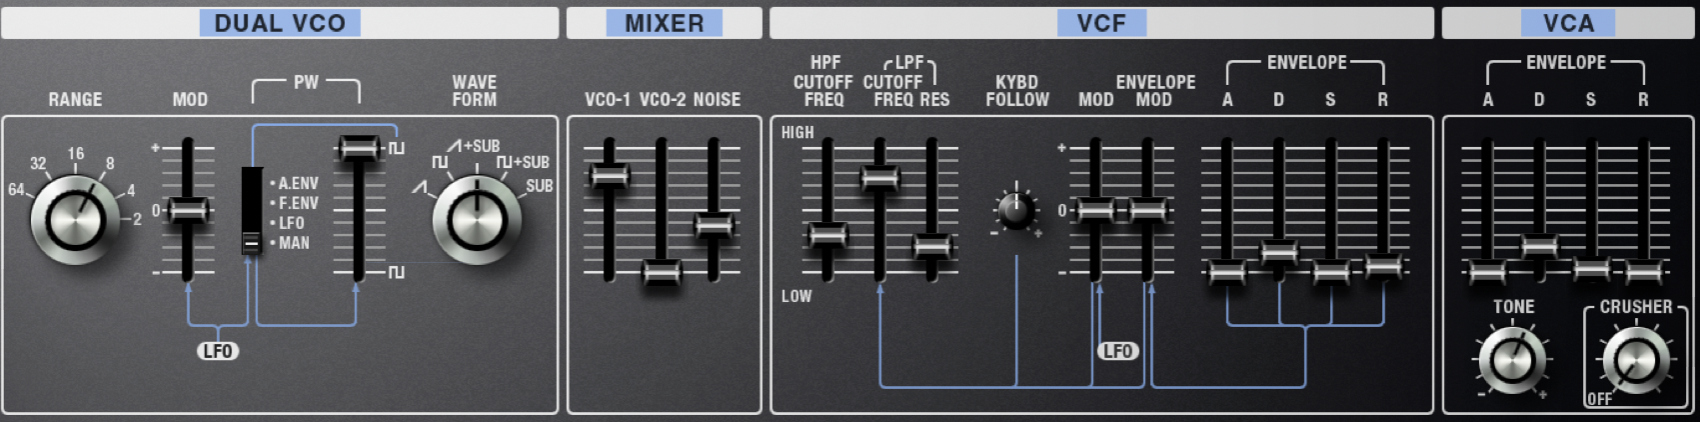
PROMARS
Now that you have all the core concepts, let’s implement all this knowledge. To start designing plucks with PROMARS, open the preset menu and choose an empty slot. This should be your first step whenever you want to design your own presets for each instrument.
First, lower the sustain fader in the VCA envelope almost the entire way down to create short, percussive notes. Keep all ADSR settings snappy, but feel free to tweak decay and release times to your liking. For a fuller sound, select the sawtooth and sub oscillator combo under Dual VCO. Add some NOISE to enhance the percussiveness of the pluck.
Next, go to the VCF panel. Use the LPF CUTOFF FREQ fader to soothe harshness. Adjust Res to control the filter’s sharpness. Turn Arpeggio on to play chords, and let the PROMARS break them into separate notes using your ARP Step and ARP Type settings.
For further movement, increase the delay amount and pick a note division that varies the rhythm. And finally, inject space into the plucks with reverb.
SH-101
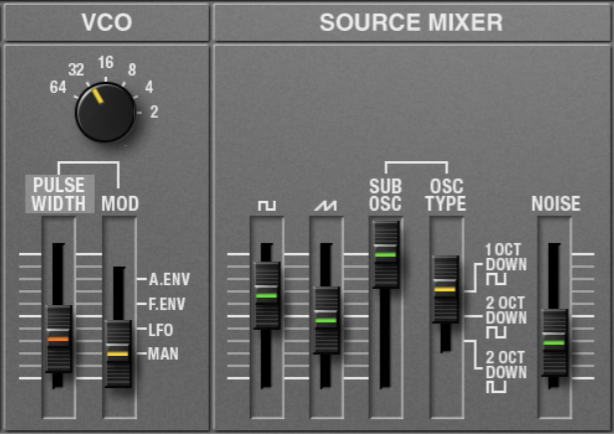
Building a rhythmic bass with the SH-101 is easy, thanks to its straightforward layout. Start by tweaking the VCA ADSR faders for a punchy bass tone that’s slightly longer than a pluck. In the Source Mixer, turn the Sub Osc all the way up. Apply a touch of sawtooth and plenty of PWM for an edgier sound.
Under VCF, implement a low-pass filter with FREQ, RES, and KYBD knobs. Turn up Env to activate filter envelope modulation before determining its ADSR times. To add movement, enable Tempo Sync and head to the Modulator section. Then, choose a rate that fits your track. The random waveform is great for unexpected variations.
Next, turn Arpeggio on and pick an ARP Type and ARP Step. When the Mode is on, experiment with Portamento Time and Bend Range for a slight glide. For atypical rhythmic patterns, play with Scatter Type and Scatter Depth. Finish with some delay and reverb for a bouncy and atmospheric bass line.
JUPITER-4
To make a brass pad with JUPITER-4, start with a sawtooth waveform and select POLY 1 under Assign Mode. Move the VCA ADSR faders until the synth mimics an orchestral brass section.
Take it one step further with a slow-acting low-pass filter. Under the VCF, turn up Envelope Mode, lengthen the ADSR, and bring the LPF CUTOFF FREQ fader almost all the way down. Brighten the overall sound by raising the Tone under the VCA panel if needed.
Now, it’s time to add warmth and texture. Turn the CIRCUIT MOD and CONDITION knobs up to age the sound. Then, widen and deepen it with effects like ensemble, reverb, and delay.
JUNO-60
To create a bell synth with JUNO-60, start by reducing the sustain time under ENV-2, which controls the VCA. Keep the attack quick, and raise the decay and release times to let the bell ring out before fading.
You won’t need the sawtooth, sub, and noise oscillators for this one. Instead, turn the square wave up and introduce a little PWM in Man mode. In the VCF section, max out RES and KYBD for a crisp, pure tone. Use the VCF FREQ fader to soften the bell and the HPF FREQ to clean up its low end.
This patch works well in POLY 1 with a deep CH1 chorus effect. To finalize, apply a rhythmic delay and hall reverb for palatable echoes.
JUNO-106
A string pad full of analog character is the perfect job for the JUNO-106. To achieve this sound, disable the sub and noise and enable the sawtooth and square waveforms to start. Then, transform the square wave using PWM in LFO mode by slightly increasing the rate to introduce a gentle vibrato.
Keep the VCF FREQ fader in the middle and lower the RES fader for a smooth low-pass filter. To keep the strings expressive across the keyboard, turn KYBD up. Then, apply a high-pass filter to roll off low frequencies.
To imitate the swell of acoustic strings, raise the attack time under ENV-2, which controls the VCA. A balanced decay, sustain, and release setting helps the pad linger before fading out. This patch works well in POLY 1, especially with the CH2 chorus effect dialed in.
Employ Circuit Mod and Condition to add analog character. With Tempo Sync off, blend delay and reverb to give the pad an ethereal quality.
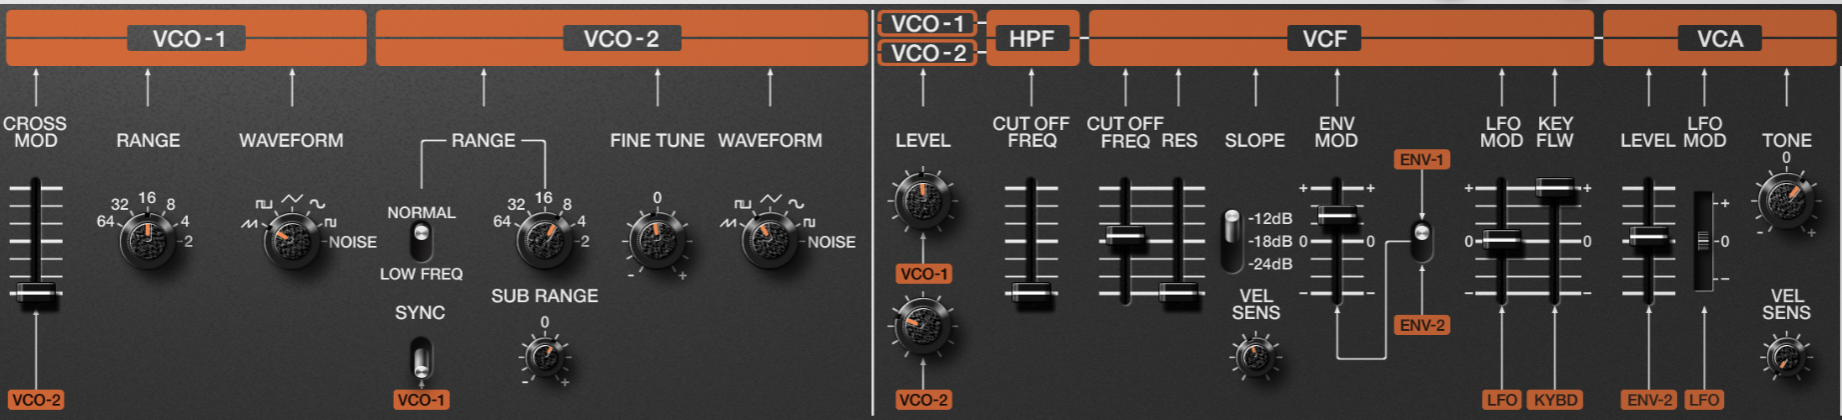
JUPITER-8
You can generate a long, cinematic drone easily with an advanced instrument like JUPITER-8.
First, select the saw wave under VCO-1 and the asymmetrical pulse wave under VCO-2. To add movement, push the PULSE WIDTH fader all the way up and switch it to LFO mode. This lets the pulse wave be shaped continuously by your chosen LFO Wave Form and Rate. With Key Trig on, play a note while adjusting the LFLFO’s delay time to give the drone a gradually shifting feel.
Try exploring different Range settings for each VCO until you find a blend that feels right. Slightly detune VCO-2 to introduce subtle width. For a power chord, turn Sub Range 7 semitones up. You can then balance the VCO levels to your taste.
Activating UNI under Assign Mode lets a key trigger up to eight voices, making a single note sound massively layered. Under the VCF section, keep the resonance low, but raise Key Flw for pitch clarity. Bring the CUT OFF FREQ fader to the middle and set the Slope to -12 dB for a soft low-pass filter that lets some high frequencies through.
For a smooth filter sweep, set the VCF to ENV-1 and shape the ADSR faders. If the filter is too overpowering, you can always turn to the Tone knob to brighten the sound. Use the Circuit Mod and Condition controls to make the JUPITER-8 a bit less stable. Some fuzz, panned delay, and hall reverb can enhance the magnitude of this pad really nicely.
For a nearly endless drone, extend the attack, sustain, and release times while lowering the decay on ENV-2. With a slight pitch bend at the beginning, this drone sounds even more massive.
Saving Presets
Do you like what you saw in the process? To save an original preset, click the PATCH button, then choose Rename or double-click on the slot to give it a title.
Next, press Save or Export, depending on the options in each synth. You’ll receive a prompt to save your preset in the same location as your demo, but you can change this if you prefer to keep all your presets in one place.
For example, on a Mac, a reliable path is:
Library > Audio > Presets > Roland Cloud
Save each preset in the corresponding instrument folder, and you’ll be all set.


