The P-6 Creative Sampler, the latest entry in the AIRA Compact series, is a versatile, pocket-sized powerhouse that marries the classic, intuitive workflow of traditional Roland samplers with a host of innovative features and even a granular sampler. Its hands-on playability makes it a perfect fit for beginners and seasoned sampling veterans, with intuitive performance techniques and layers of deep sonic exploration. Learn to use this flexible, portable instrument.
GUIDE
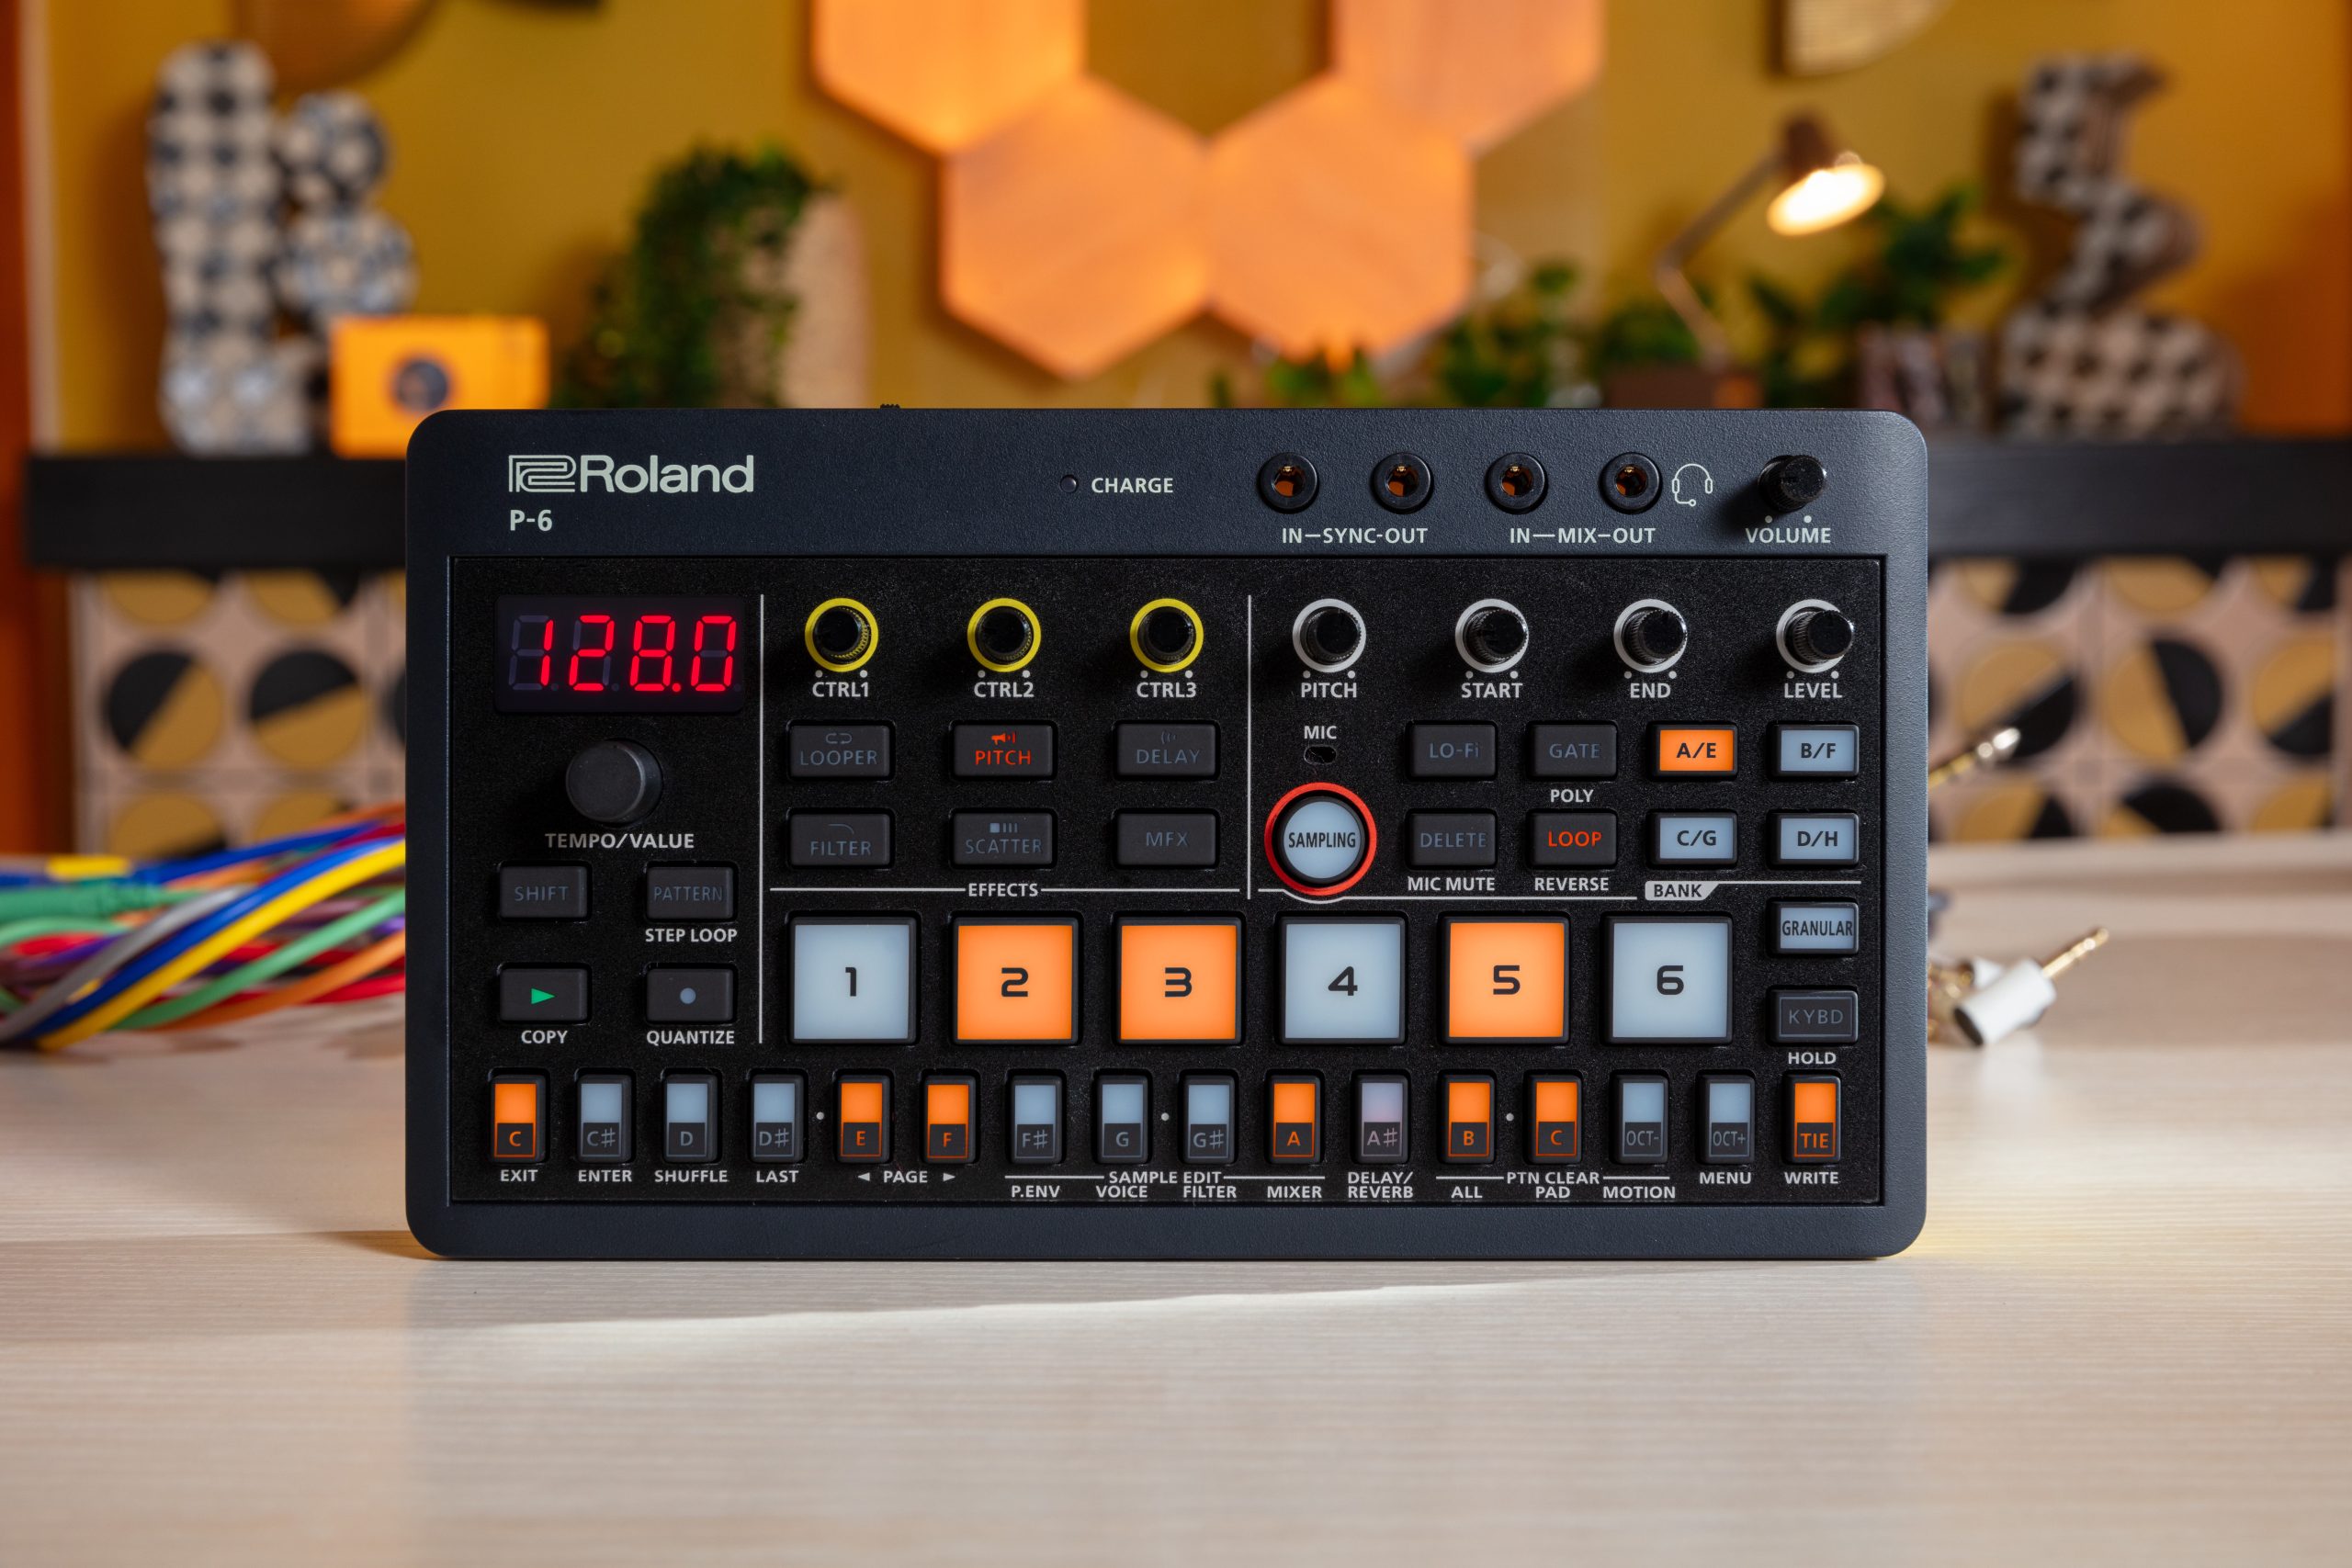
Meet the P-6 Creative Sampler
Sampling Made Simple
Capture samples effortlessly using the built-in microphone, analog inputs, or directly from your smartphone, or drag and drop sounds from your computer via the P-6 SampleTool. The P-6’s granular sampler engine lets you craft intricate, evolving textures from even the tiniest sound fragments, and you can resample internal audio to create entirely new soundscapes and seamless loops.
Additionally, the sequencer can bring patterns up to 64 steps to life with modifiers like probability, sub steps, micro-timing, off-grid sequencing, motion recording, and more. With ease, assign multiple sample slices to a single pad—all playable and programmable with the integrated keyboard or even using a connected MIDI controller. Whether onstage or in the studio, a suite of dynamic, playable performance effects and dedicated delay and reverb buses bring your beats to new heights.
NOTE: Be sure to update your P-6 to the latest firmware to access all of its great features. Also, please note that a factory reset after the firmware update is not required; doing so will wipe all the factory contents.
"The hands-on playability of the P-6 makes it a perfect fit for beginners and seasoned sampling veterans."
Pads and Banks
First, an overview of the architecture: The P-6 contains eight banks of samples, each of which contains six sample pads. To access the different banks of samples, use the buttons in the BANK section; press once to access the first bank on that button (i.e. A) then press again to access the second bank (i.e. E). Each time you select a sample from a PAD, you’ll get access to individual Sample Edit Settings for that sample, including Voice, Filter, and Pitch Envelope.
Fidelity Options
The LO-FI button can also be used when editing a sample on any PAD. Pressing this button will reduce the sample rate of your sound to add crunchy, lower-fidelity texture. This can be added to each sample, and if you press SHIFT+LO-FI, you can access the LOFI menu, where you can modify the specific amount applied to that given sample.
A Note About Sample Rates
By default, the P-6 will sample at 44.1kHz, which lets you sample for approximately six seconds. If you would like more sample time and/or added Lo-Fi flavor, you can extend this by lowering the sample rate at which you record. To do this, press the LO-FI button while SAMPLING is selected to toggle between 44.1/22.0/14.7/11.0kHz.
Maximum time per sample:
- 44.1kHz, Mono: 5.9 seconds
- 22.05kHz, Mono: 11.8 seconds
- 14.7kHz, Mono: 17.8 seconds
- 11.025kHz, Mono: 23.7 seconds
- Total sample time: 285 seconds in 44.1k mono.
*For stereo samples, the time for each of these sample rates is reduced by half.
How to Use Sample Recording
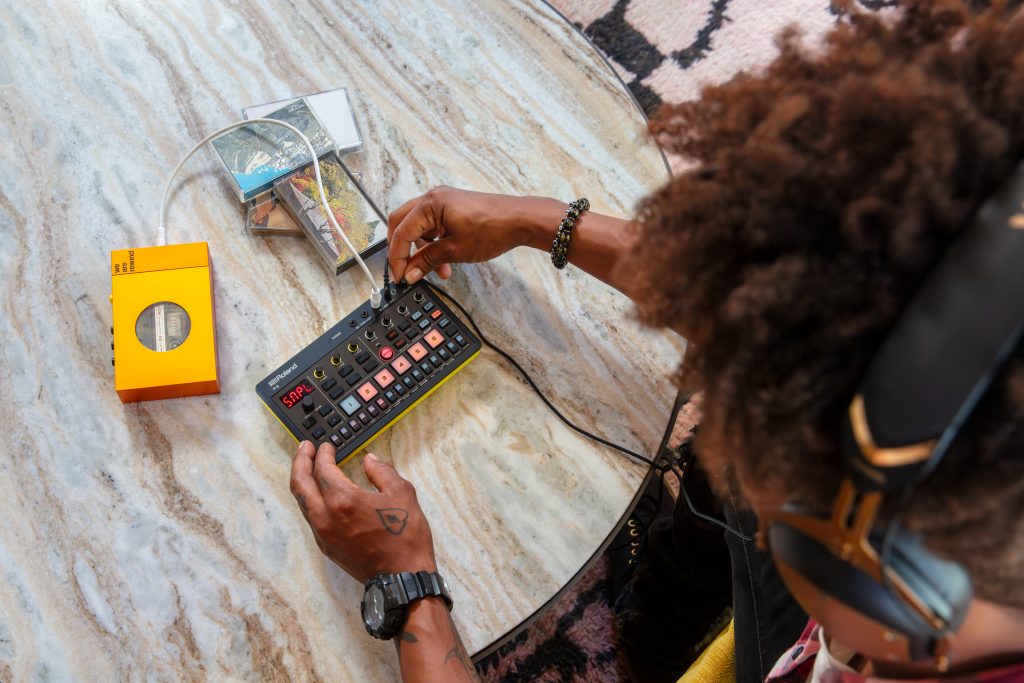
While the P-6 comes stocked with a host of high-quality samples, you’ll likely want to use your own sounds as well. You can quickly capture live samples from the high-quality built-in mic and analog audio inputs or use a smartphone or computer via USB-C.
First, press the SAMPLING button to enter SAMPLING MODE, and then select the PAD to which you want to record your sample record. Press the DELETE button to turn the in-built Microphone ON or OFF; you’re able to adjust whether you want mono or stereo recording, set your sample length, set the trigger that’s used for sampling, and set your mic level using the four knobs in the Sample Editing section.
When you’re all set, press the SAMPLING BUTTON again to start recording immediately or to go into STANDBY mode to wait for a signal for recording to begin. Finally, when your audio is captured, press the SAMPLING button again to finish the recording. Otherwise, the recording will stop when the preset sampling time is finished or the available sample time is exhausted. Now your sample is recorded to the pad, and can be edited using the Sample Editing section.
"Quickly capture live samples from the high-quality built-in mic and analog audio inputs or use a smartphone or computer via USB-C."
It’s worth noting that the P-6 practices safe sampling, meaning pads with samples already assigned to them cannot be immediately recorded over. To delete samples from pads, press DELETE, select the PAD you want to delete, and then press DELETE again.
By default, you can record up to six seconds of mono audio [see previous section]. To use the USB-C audio functions (including sampling over USB-C), power on the P-6 while holding Step Button C (EXIT).
It’s also worth noting the immense power of RESAMPLING. The P-6 will always be able to record its own internal output when SAMPLING is on—no special mode required. This lets you take sounds you’ve already processed and rework them further, applying new effects, changing the pitch or speed, and completely transforming the original audio into something fresh and unexpected. This process allows for limitless experimentation, making it great for sound design.
How to Use Sample Editing
Once you’ve got a set of samples you’re happy with, the P-6’s powerful Sample Editing section opens up hands-on controls for editing various parameters of your samples. The buttons in the Sample Edit area function as labeled and can be used to select your Play Mode, add a LO-FI effect, or DELETE samples from Pads. By default, the knobs along the top of the Sample Edit section will control the Pitch, Start End Points, and Level of your samples. Press LOOP to loop a sample (endlessly useful for creating longer looping samples), and press SHIFT+LOOP to change the direction your sample will play in (i.e., forward, reverse, or alternate).
To take a sample into the realm of polyphony, press SHIFT+GATE to change a sample from monophonic to polyphonic. Polyphonic playback is one of the standout features of the P-6, allowing you to play multiple sounds or notes simultaneously. The ability to create chords, layer samples, and overlap sounds are incredibly powerful tools for a sampler, particularly for recreating the dynamics of instruments like pianos and guitars where multiple notes can be played together.
"Once you’ve got a set of samples you’re happy with, the P-6’s powerful Sample Editing section opens up hands-on controls for editing various parameters of your samples."
Additional sample editing options are available as shift functions on the four STEP KEYS labeled SAMPLE EDIT. Hold SHIFT + Steps F# to A to access these other sample editing modes with menus for deeper voice settings, pitch envelopes, filter, and mixing options. By pressing SHIFT and VOICE, we get access to fine-tune, detune, and more; press ENTER, adjust, then press EXIT. Importantly, the top four knobs become ADSR (attack/decay/sustain/release) controls for the AMP envelope when in this menu. And you can turn GATE on for traditional synth-style behavior, where holding down keys sustains those notes for as long as they’re held.
Each sample also has its own multimode filter for further sound shaping, which you can access by pressing SHIFT + FILTER. In this menu, we can use the knobs to control Filter Type, as well as the amounts of Cutoff, Resonance, and Envelope Depth from the AMP Envelope. The dedicated Pitch Envelope menu takes your sound design even further, letting you change the pitch of a sound over time. This makes it possible to create effects like pitch bends, glides, or sweeps by shaping how the pitch moves from the start of a note and throughout its duration.
The MIXER menu lets you control Panning and how much of each sample goes to the main Delay and Reverb. Again, while in any of the other sample editing menus, the knobs along the top of the SAMPLE EDIT area are contextual and will control different parameters. Please see the “Menu Parameters” section of the manual for more detailed information on these functions.
How to use Performance Effects
Using its dedicated effects section, the P-6 lets you transform, flip, and reimagine your sounds with a mix of both legendary and fresh, cutting-edge effects. Dive into hands-on sound design and manipulation with dynamic Roland effects like the gritty vinyl simulator and the tactile DJFX looper, punchy record-style stops, nostalgic lo-fi crunch, swirling phasers, rich resonators, and the gloriously glitchy Scatter effect. Each effect invites you to add subtle texture and tone or push your sounds and patterns to the outer limits.
The best part is that these effects are all directly available on the front panel of the P-6, making them extremely playable. Press a button in the EFFECTS area to enable it, then use the CTRL knobs along the top to control the various parameters of that effect. Whether you want to sweep the cutoff or add more resonance to the filter, change delay times, or play with the speed of the looper, it’s all right at your fingertips. Most of these effects also have shift functions without the need for menu diving.
"Using its dedicated effects section, the P-6 lets you transform, flip, and reimagine your sounds with a mix of both legendary and fresh, cutting-edge effects."
There’s lots more excitement packed under the hood of the MFX engine as well. When using the MFX (Multi FX), you can hold the MFX button and use the VALUE knob to change the effect you want, or hold the MFX button and press the Step buttons to quickly toggle between the different effects (great for switching between different effect combinations in a live setting).
Likewise, to momentarily trigger an effect (i.e., to use them as punch-in effects), hold the PATTERN button and press your desired effect button for as long as you want it applied. Lastly, to stop a particular sample pad from running through the FX bus, hold MFX and press down your chosen PAD. Instead, it will get routed through BUS A, where no effect will be applied.
How to use Sample Chopping
Sample chopping is an essential part of sampler workflows and removes much of the tedium of sample editing. Essentially, chopping allows you to automatically slice a sample into a desired number of preset segments based on the length of the sample. This makes it easy to quickly divide up a drum loop or melodic phrase into discrete parts, which can then be individually triggered using the STEP KEYS.
To begin sample chopping on the P-6, press the PAD of a sample you want to edit. Hold SHIFT and press Step G (VOICE) to enter the VOICE MENU, and use the VALUE knob to select CHOP. Press step C# (ENTER), and use the VALUE knob to choose the desired number of slices. Press Step C (EXIT) twice to exit this menu, and press the KYBD button to enter Keyboard mode. Now, you can use the STEP KEYS to trigger the various slices of your sample individually!
"Essentially, chopping allows you to automatically slice a sample into a desired number of preset segments based on the length of the sample."
Lastly, to access MUTE GROUPS, press SHIFT + step G to Enter VOICE MENU, then use the VALUE knob to scroll to MU.Gr. Here, you can set a MUTE GROUP, whereby samples with the same MUTE GROUP number will cut off (otherwise known as “choke”) each other. This feature is essential for effects such as short cymbal sounds, cutting off longer ones, and creating choppier, more staccato musical sequences.
How to Use Step Sampling
Alternatively, the P-6 features an amazing new Step Sampling feature. This feature allows you to quickly record a host of separate samples that will be automatically assigned as chops on a single PAD, individually triggered via the STEP KEYS. This feature lets you create multiple single-hit recordings with no hassle, auto-chopped, and ready to use.
To get started, again press the SAMPLING button to enter SAMPLING MODE, and adjust the sampling settings as described in the previous section. Hold SHIFT and turn the PITCH knob to choose the number of steps you want, and then press the pad you want to sample to and the SAMPLING button to start recording.
After each short recording, press the SAMPLING button again to start the next one; when finished, press the KYBD button, and voila — you can now trigger your individual sample chops using the Step Keys. You can even hold SHIFT and press the GATE button to make the sounds polyphonic.
How to Use Sequencing
The P-6 transforms pattern creation into a quick and seamless experience. Craft intricate patterns up to 64 steps that pulse with life, enhanced by features like probability, micro-timing, off-grid sequencing, sub steps, motion recording, and more. Whether you’re laying down the basics or pushing creative boundaries, the P-6 makes it easy to infuse your sequences with character and complexity.
First, you’ll want to enter some triggers. To enter notes into the sequence, select the pad you want to sequence. Then press a STEP button so it lights up, and your sample will be triggered when the pattern reaches that step. You can also hold a step to change its assigned note using the VALUE knob; holding a step and pressing the GRANULAR button multiple times lets you change additional parameters, including the probability that that step will trigger (to make a pattern play in different variations), its micro-timing (for nudging triggers slightly off the grid), and sub steps (for creating zippy ratchets and trills on any given step).
"Whether you're laying down the basics or pushing creative boundaries, the P-6 makes it easy to infuse your sequences with character and complexity."
To make your pattern longer, press SHIFT + LAST and turn the VALUE knob to the desired number of steps; to swap between pages of steps, press SHIFT + STEP ARROWS. To duplicate the current measure, select the pattern you want to duplicate, then press the PLAY button while holding down SHIFT to COPY it. Use the VALUE knob to select “dUPL” (Duplicate), and then press the C (ENTER) button to copy the pattern and double its length.
But maybe you want to play in beats or melodies live. For real time recording, simply press the REC button and then PLAY: you can now play sounds by pressing each PAD. If you press the KYBD button while a PAD is selected, the STEP KEYS will let you play notes in real time across the chromatic keyboard.
Similarly, when you’re sequencing a sample PAD that has had CHOP settings applied to it, the “notes” sequenced from the STEP KEYS trigger the different slices in order along the keyboard. If you want your playing quantized, press SHIFT + QUANTIZE. And don’t forget that by using the P-6’s MIDI or USB-C inputs, you can also use an external MIDI controller to enter notes in real time.
How to Use the Granular Sampler
The new granular sampler engine integrated into the P-6 lets you create intricate, morphing tones from tiny slivers of sound. The extensive sound mangling parameters can transform samples into brand-new, unrecognizable sounds.
To assign any existing sample to the granular sampler engine, press the GRANULAR button and adjust the first parameter (SMPL) in the VOICE menu. Alternatively, you can use a shortcut: Hold PATTERN + GRANULAR and select the desired sample PAD. Now when you press the GRANULAR button, your sample will trigger, and you can use the knobs along the top of the SAMPLE EDIT area to change basic parameters of the granular engine, with even more parameters available in the VOICE menu.
"The new granular sampler engine integrated into the P-6 lets you create intricate, morphing tones from tiny slivers of sound."
You can press the KYBD button to play your granular sample chromatically and polyphonically, up to four notes, across the STEP KEYS. If your granular pad is set to POLY (SHIFT+GATE button), you can play polyphonic sequences of up to four notes using the keyboard.
It’s also worth noting that the granular engine can be processed by its own Filter, Amp/Filter Envelope, and Effects Routings, just like sample pads! Find exciting combinations of granular sounds and effects, and use the resampling feature on the P-6 to create and record wild, previously unheard textures and sounds. If you have an S-1 Tweak Synthesizer, you can even control the granular parameters on the P-6 via MIDI.
How to Use the P-6 SampleTool
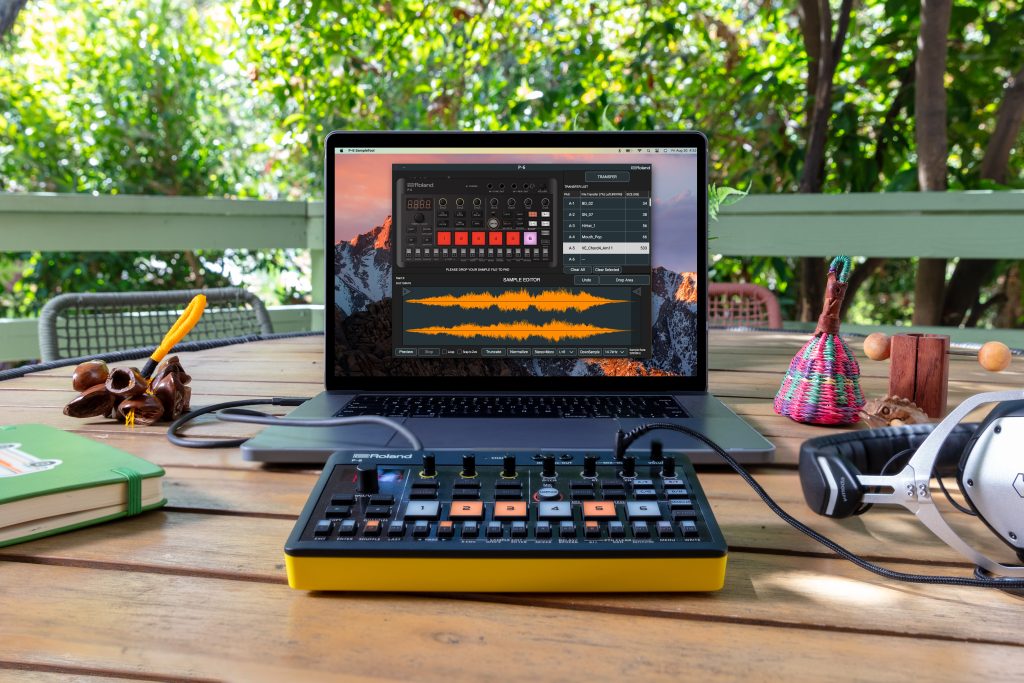
The P-6 also has a companion app called the P-6 SampleTool, which runs on macOS and Windows. The P-6 SampleTool makes organizing your sounds quick and easy and is the perfect companion for transferring your own sample content onto the P-6.
To get started, connect your P-6 to your computer using a USB-C cable and power it on while holding the SAMPLING button. Once you’re up and running, launch the P-6 SampleTool on your computer, select your P-6 drive, and hit connect.
From there, you can dive into your Sample Bank; pads with loaded samples will light up in purple, while empty pads will appear white, ready to be filled with new sounds. Simply drag your samples into the Sample Editor, where you can preview, loop, and tweak them to your liking: adjusting start and end points, downsampling, converting from stereo to mono, and truncating. Also, note that the P-6 can import up to 10MB of samples at a time.
"The P-6 SampleTool makes organizing your sounds quick and easy and is the perfect companion for transferring your own sample content onto the P-6."
When you’re satisfied with a sample, drag it to a Pad in the editor, then hit transfer at the top of the app to export your sounds to the P-6. Finally, press the KYBD button on the P-6 to write your samples to the unit. Eject the P-6 drive from your computer by right-clicking on the P-6 icon and clicking “Eject” on PC, or dragging the “P-6” icon to the Trash icon in the Dock on macOS. Once the P-6 displays DONE on the screen, reboot it, and you’re all set to start making music with your newly edited and organized sounds.
If you want the quickest way to get samples on and off your P-6, you can even drag and drop samples directly from the macOS Finder or Windows PC.